OWNER'S MANUAL AND INSTALLATION GUIDE AV-427 DETACHABLE FRONT PANEL AM/FM/MPX RADIO WITH AUTO-REVERSE CASSETTE PLAYER, CD CHANGER CONTROLS AND QUARTZ CLOCK
INST ALL AT ION INSTRUC INSTALL ALLA INSTRUCTT IONS INSTALLATION INSTRUCTIONS This unit is designed for installation in cars, trucks, and vans with an existing radio opening. In many cases, a special installation kit will be required to mount the radio to the dashboard. These kits are available at electronics supply stores and car stereo specialist shops. Always check the kit application before purchasing to make sure the kit works with your vehicle.
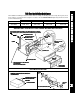
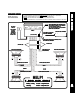
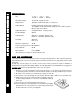
UNIVERSAL INSTALLATION USING MOUNTING SLEEVE EXISTING DASH OPENING (FILE EDGES TO FIT IF NECESSARY-DO NOT OVERFILE) NOTE NOTE:: IF DASH IS SOLID, USE MOUNTING SLEEVE AS A TEMPLATE & CUT OPENING NUT PERFORATED STRAP FASTEN THIS END TO SCREW STUD ON REAR OF CHASSIS BEND TOP TABS UPWARD BEND BOTTOM TABS DOWNWARD SCREW INST ALL AT ION INSTRUC INSTALL ALLA INSTRUCTT IONS Toll-Fr ion As sis oll-Free e Ins Instt allat allation Assis sistt anc ancee The installation and wiring connections for this unit are s
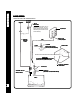
R A DIO WIRING R A DIO WIRING REFER TO PAGE 4 FOR SPEAKER WIRING ANTENNA AUTOMATIC ANTENNA BLUE IMPORTANT THE BLUE WIRE CAN BE USED TO REMOTELY ACTIVATE AN AUTOMATIC ANTENNA OR AN EXTERNAL AMPLIFIER (SEE ANTENNA OR AMPLIFIER MANUAL) EXISTING ANTENNA CABLE FUSEBLOCK “RADIO” FUSE + 12V ACCESSORY RED SCREW BLACK CAR BATTERY METAL PART OF DASH (DRILL HOLE IF NECESSARY) YELLOW IMPORTANT YELLOW WIRE MUST BE CONNECTED AS SHOWN OR RADIO WILL NOT OPERATE PROPERLY 4 PIN PLUGS 9 PIN PLUG (SEE PAGE 4 FOR SP
REFER TO PAGE 3 FOR RADIO WIRING WARNING! l l l l THE AMPLIFIERS IN THIS RADIO ARE ONLY DESIGNED FOR USE WITH 4 SPEAKERS. NEVER COMBINE (BRIDGE) OUTPUTS FOR USE WITH 2 SPEAKERS. NEVER GROUND NEGATIVE SPEAKER LEADS TO CHASSIS GROUND. FAILURE TO WIRE EXACTLY AS SHOWN BELOW MAY CAUSE ELECTRICAL DAMAGE TO THE RADIO. NOTE: SET CHANGER SELECTOR SWITCH ON BOTTOM OF CHASSIS TO CORRECT POSITION (SEE PAGE 10). SET TO POSITION "B" FOR USE WITH MODEL ACC-30 CHANGER.
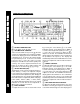
OPER AT ING INSTRUC INSTRUCTT IONS OPER AT ING INSTRUC INSTRUCTT IONS 1 ON-OFF POWER BUTTON Press this button to turn the unit on or off. 2 VOLUME/LEVEL CONTROL To increase the volume level, press the side of the control. The volume will increase and the level will be shown on the display panel from a minimum of 0 to a maximum of 15. To increase the volume quickly, keep the button pressed. To decrease the volume level, press the side of the control. Keep the button pressed to decrease the volume quickly.
2 7 3 2 8 9 bl 2 bm MANUAL UP/DOWN TUNING ( / ) To manually select a radio station, momematrily press the Up Tuning ( ) button to advance the unit one digit higher or the Down Tuning ( ) button to tune downward. Pressing either button for longer than 0.5 seconds will cause the radio to tune rapidly in the selected direction until the button is released. AUTOMATIC SEEK TUNING (SEEK) During radio operation, this function is used to search for stations automatically.
OPER AT ING INSTRUC INSTRUCTT IONS operation and remain on the selected frequency. Pressing and holding the button for longer than 2 seconds will activate the Auto-Store Tuning feature which will automatically scan and enter up to 6 stations into the 6 pre-set memories on the band in use. After entering the stations into the memories, the unit will automatically stop at each station for 5 seconds so each can be heard.
cq cr 3. If there is a malfunction of any of the switches on the unit, pressing the Re-Set button may clear the system and return to normal operation. FRONT PANEL RELEASE BUTTON This button is used to release the mechanism that holds the front panel to the chassis. To detach the front panel, press the button so that the left side of the panel is released. Grasp the released side and pull it off of the chassis.
SPECIFICA NCE SPECIFICAT CARE AND MAINTENA INTENANCE SPECIFICATTIONS CARE AND MAINTENA INTENA IONS // CA RE A ND MA MAINTENA INTENANCE NCE SPECIFICA SPECIFICATT IONS Size: 7” W x 178 mm x 2” H x 6” D 50 mm x 150 mm Operating Voltage: 12 volts DC, negative ground Output Power: 100 watts maximum (25 watts x 4 channels) Output Wiring: Floating-ground type designed for 4 speaker use. The amplifiers in this unit are NOT designed for use with 2 speakers. RCA pre-amp level outputs.
cr ct cu dl cu dl press the CD- button . The number of the disc in play will be shown on the display panel. TRACK SELECT ( / ) This button is used to quickly select the beginning of a particular track. With each momentary press of the Forward Track Select button ( ), the next higher track number will be selected as shown on the display panel. Similarly, with each momentary press of the Backward Track Select button ( ), the next lower track number will be selected.
MONTH LIMITED WARRANTY AUDIOVOX CORPORATION (the Company) warrants to the original retail purchaser of this product that should this product or any part thereof, under normal use and conditions, be proven defective in material or workmanship within 12 months from the date of original purchase, such defect(s) will be repaired or replaced with new or reconditioned product (at the Company's option) without charge for parts and repair labor.