DT102 10.
Introduction Thank you for choosing the DT102 portable DVD player. The unit applies the latest state of the art electronics and is designed to be used in a variety of applications. It can be used as portable DVD player or when installed into the available docking stations as a home or mobile DVD player. The DVD Player is constructed to provide years of reliable, trouble-free service, and is compact so that you can take it with you anywhere and is designed for quick and easy setup.
Cautions And Warnings RISK OF ELECTRIC SHOCK DO NOT OPEN The lightning flash with arrowhead symbol, within an equilateral triangle, is intended to alert the user to the presence of un-insulated “dangerous Voltage” within the product’s enclosure that may be of sufficient magnitude to constitute a risk of electric to persons.
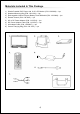
Materials Included In This Package 1) 2) 3) 4) 5) 6) 7) 8) Shuttle Portable DVD Player with 10.
Main Features • 10.
Main Features Front Panel Controls 12 1 2 3 4 5 6 7 8 9 10 11 1. Power ON/OFF* — Press and hold for one second to switch the DT102 on or off. 2. Screen Mode — To select the screen mode aspect ratio and to turn the screen off (16:9, 4:3 or Off). 3. Pause — To pause Playback. 4. Previous — Go to the previous track / chapter. 5. Volume (-) — To decrease the volume of the speakers. Also used to scroll down in the Menu and for reducing levels in the picture adjustment mode. 6.
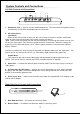
System Controls and Connections Left Side Controls and Connections 1 2 3 AUDIO VIDEO IN/OUT IN/OUT GAME PORT 2 IN 4 OUT ON AV 5 OFF IRT DC 9V 1. Headphone Jack — Used to connect wired headphones. The sound from the speakers will be automatically cut off when the headphones are connected. 2. AV In/Out Switch Input Mode When the AV In/Out switch is set to IN* the unit is ready to accept an auxiliary audio/video signal or game input via the audio video inputs or game port input**.
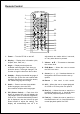
Remote Control 26 25 1 2 24 3 4 5 6 23 VOL 22 21 7 8 9 10 11 12 13 14 15 20 19 18 17 16 1. Power — Turn the DT102 on and off. adjustments are made within 6 seconds, or if any other button is pressed. 2. Display — Display disc information (title, chapter, time, track, etc.) 7. Volume pq — To increase or decrease the volume level. 3. Angle — Displays and selects the available camera angles. Each time you press the button, The angle changes. The number of angles varies from disc to disc. 8.
Remote Control 14. Slow — Allows the user to slow the playback speed to 1/2,1/3, 1/4, 1/5, 1/6, 1/7 the normal playback speed of a DVD. 21. Enter — Used to confirm a selected setting or option. 22. Setup — Allows the user to select the DVD player’s setup options (Display, OSD Language, Defaults, Parental Control, Password, Exit Setup). 15. Stop (<) — DVD disc playback will be Stopped. 16. Pause (;) — Allows the user to pause Playback and move forward one frame at a time (STEP). 23.
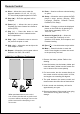
Power Supply About the Rechargeable Battery Pack Battery charge indicator Red – Charging Green – Fully charged ON OFF Battery On/Off Switch Your portable DVD player comes with a lithium ion rechargable battery that attaches to the bottom of the player. Your new battery must be fully charged before initial use. Charging time is normally about 6 hours. A fully charged battery delivers about 2.5 hours of use, but playback time will vary depending on the playback settings and environmental conditions.
Power Supply After attaching the Battery Pack, place the DT102 screen in a normal position. The attached Battery Pack can also be used as a stand. When used in a vehicle, the DT102 can be placed into the headrest mounting bag. The bag is easy to attach to a headrest and fits on most vehicle headrest types. Detaching the Battery Pack If the DVD Player is not going to be used for long periods of time, the Battery Pack should be detached.
Power Supply Using the Vehicle DC Adapter To use the Vehicle DC Adapter disconnect the Battery pack and connect the supplied Vehicle Power Adapter into the DVD Player’s Power Jack and the other end into the Vehicle power outlet as shown below. Vehicle Power Outlet DC 9V NOTE: Do not operate the unit or view video software while driving a vehicle. Place the unit in a secure position for viewing. Do not leave the battery attached when using the car adapter as power source.
Playback Preparations Pre-Operation 1. Connect the DVD Player to the desired power Adapter or battery. 2. Press the “POWER” button for one second. 3. Load a disc with the label facing towards the front. Push the disc in about ¾ of the the way and the disc will be pulled into the Player automatically. 4. The disc will load and automatically begin Playback. Using Wired Headphones 1. Connect any set of standard headphones that have a 1/8 jack to the headphone jack on the left side of DT102. 2.
Playback Preparations Disk Formats Supported By This Player DISC LOGO DIAMETER PLAYBACK TIME / PLAYABLE SIDES 133 min (SS – SL) 242 min (SS – DL) 12cm DVD 266 min (DS – SL) VIDEO 484 min (DS – DL) COMPACT CD 12cm 74 min 12cm 600 min DIGITAL AUDIO Mp3 The disc maker specifies the operation of some DVD discs. Please refer to the instruction manual with the disc. Note: The DT102 is capable of playing most recordable DVDs in the DVD-R format.
System Connections NOTE: Before plugging the power cord into an AC outlet, make sure that all the connections have been made as described below. Power Supply Connection Connect the AC power adapter to the side of the DVD player in the jack marked “DC 9V IN”. Plug the twoprong end of the power cord to an AC100-240 outlet. If you have difficulty inserting the plug, turn it over and re-insert it. If the DVD Player will not be used for a long time, disconnect the plug from the outlet.
DT102 Menu Adjustments Picture Adjustments When watching a program, the picture quality can be adjusted to suit your taste. MENU SET PICTURE MODE SELECT VOLUME EXIT PICTURE CONTRAST BRIGHTNESS COLOR TINT RESET EXIT 1. Press the MENU button on the front of the DVD player, the main menu will appear. 2. Press the +/- button to select the from the available menu selections. When the desired item is highlighted press the MENU button again to select the item. 3.
DT102 Menu Adjustements (Cont) NOTE: Pressing the screen mode button on the DT102 will cycle through the screen aspect ratio options (16:9, 4:3, OFF ). Pressing the screen mode button will restore the picture in 16:9 mode. Volume VOLUME – + Use the +/- button to select VOLUME, after that press the menu button, you can then control the volume using the +/- buttons. NOTE: The volume can also be controlled by using the volume +/- buttons on the DT102 or the remote control.
Setting And Adjustments The Setup menu contains features and options that let you customize your DVD player. For example, you can select a language for the OSD (On Screen Display), limit playback by children, select the TV Type and aspect ratio. Using the Setup Menu 1) Press the setup button on the remote control. The Setup Menu will appear on the screen as shown.There are 3 icons on the top part of the Setup Menu. Each icon represents a page.
Setup TV Type The TV Type setup allows you to select the screen aspect ratio. 4:3 PS This displays a wide picture on the screen with a portion of the left & right side removed. 4:3 LB This displays a wide picture with black bands on the upper and lower portions of the screen. 16:9 This displays a picture with bands on the upper and lower portion of the screen. The bands will vary, depending on the aspect ratio of the DVD. NOTE: This setting can only be made when there is no disc in player.
Rating This item allows you to limit the content of movie playback from G to ADULT. The lower the value, the more strict the control. G PG PG - 13 R NC - 17 ADULT Note: This feature only works on DVD’s that contain the rating lockout feature. Exiting the Setup Menu Press the SETUP button again or highlight EXIT SETUP and then press ENTER. Language Setup OSD LANGUAGE (language for on screen display) The OSD LANGUAGE setup allows you to select the language for on the screen display.
Troubleshooting PROBLEM SOLUTION The DVD Player will not play There is no sound from front Speaker There is no picture Poor AV performance Make sure system setting are correct. Make sure the DVD audio setting is correct. Is the disc dirty or warped? Clean or replace disc. Make sure there are no headphones plugged into Headphone jack. Make sure TV is turned ON and in correct video mode. Make sure your system connections are correct. Press the screen mode button to confirm the screen is on.
Specifications Screen Size : 10.2” Display Resolution : 800 RGB x 480 Compatible Discs : DVD, CD, MP3, CD-R, CD-RW, DVD-R Screen Type : TFT Active Matrix Laser Wavelength : 780/650mm Video System : NTSC/PAL/AUTO Audio Output : Output Level: 1.5V±0.2/1.0, Load: 10K ohms Video Output : Output Level: 1Vp-p±0.1, Load: 75ohms Unbalanced Negative Power Consumption : 1.
90 DAY LIMITED WARRANTY Applies to Audiovox Video Products AUDIOVOX ELECTRONICS CORP. (the Company) warrants to the original retail purchaser of this product that should this product or any part thereof, under normal use and conditions, be proven defective in material or workmanship within ninety (90) days from the date of original purchase, such defect(s) will be repaired or replaced with reconditioned product (at the Company's option) without charge for parts and repair labor.