DV 1680 128-6000A Revision A: Changed Warranty from 12 months to 90 Days
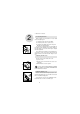
BEFORE USING THE DVD PLAYER Important! Please read the following instructions before attempting to operate the DVD Player Types of Warning Signs There are two types of warnings in this manual, indicated by the following symbols: Indicates a Warning or caution for operation. Indicates a Warning or caution for safety. Rain and Moisture Warning To reduce the risk of fire or electric shock, do not expose this appliance to rain or moisture. Laser Warnings This product is equipped with a laser device.
Power Cord W arnings If operating the DVD Player from battery power, refer to Chapter 10 of this manual. Use an approved power cord. If the original power cord is missing or lost, purchase a power cord: - That is approved for use in your country. - That is rated for the product and for the voltage and current marked on the product's electrical ratings label. - That has a voltage and current rating greater than the voltage and current rating marked on the product. - With a minimum wire diameter of 0.
Selecting the Video System The video system of the DVD Player can be set automatically according to the contents of the DVD or VCD titles. In general, the NTSC system, used by the USA, is also used in most Asian countries. The PAL system, used by most European countries, is used in China and Hong Kong. The DVD Player is compatible with both the NTSC and PAL systems. Thank you for purchasing Audiovox's portable DVD Player.
Table of Contents 1. Accessories List...................................... 5 2. Quick User Guide.................................... 7 10 3. Features of the DVD Player....................... 12 4. Parts of DVD Player.................................... 5. Remote Control........................................ 18 6. Initial Setup.............................................. 25 7. Basic System Operation......................... 34 8. External Connection................................36 9.
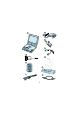
1. Accessories List/Option List 1 Check the contents of the package to make sure nothing is missing or damaged. Some parts may be optional. Contact your dealer with any questions. Accessories List 1. DVD Player 2. AC Adapter 3. Stereo Headphone 4. Car Cigarette Lighter Adapter 5. Audiovisual Cable 6. Remote Control 7. One User's Manual 8. Li-ion Battery Pack 9. Optical Cable Option List 10.
6
2. Quick User Guide 2 2.1 Connecting the Power Refer to Chapter 10 for instructions on how to install and use the battery pack. 1. Connect the power cord to the AC adapter. 2. Connect the power cord to a power source. 3. Connect the AC adapter to the DC IN 12V jack on the right side of the DVD Player. Use only the AC adapter that was shipped with the DVD Player. Using substitutes may result in damage to the DVD Player. Do not use the DVD Player's adapter with other equipment.
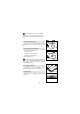
Even though the laser beam will stop emitting when the cover is opened, DO NOT LOOK AT THE LASER HEAD. The laser beam could still damage your eyes. 2.4 Removing the safety card Before inserting a disc and turning on the power for the first time, be sure to remove the cardboard safety card. 2.5 Placing a Disc in the DVD Player To place a disc in the DVD Player: 1. Open the disc cover. 2. Align the disc on the DVD Player . 3. Gently press the disc into place. 4. Close the disc cover.
2.8 Stopping Disc Play To stop the disc play, press the [ ] button on the front of the DVD Player. 2.9 Turning the power off To turn off the DVD Player, press the POWER ON/OFF button on the right side of the DVD Player.
3. Features of the DVD Player 3 3.1 Plays discs of various formats The DVD Player can play: °∑DVD V ideos °∑VCDs °∑CDs °∑SVCDs °∑CVDs °∑MP3 music recorded on a CD-ROM The DVD Player will automatically identify the type of disc and select the right format to play. 3.2 NTSC and PAL Compatible The DVD Player is compatible with both the NTSC and PAL systems. You can use the remote control to select the desired system from the "system setup menu". See Chapter 6 for more information about settings. 3.
3.5 Digital Output The DVD Player is equipped with a digital output. You can connect the signal to an AC3 and DTS decoder and amplifier with an optical cable to enjoy the high-end effect at 5.1 channels. 3.6 Signal Input and Output The DVD Player can apply signals to a TV, amplifier, VCR, video projector, or any other audiovisual components. The DVD Player can receive signals from a VCR, video camera, or even an amplifier.
4. Parts of the DVD Player 4 4.1 LCD Screen The DVD Player's 6.8-inch, 4:3, no radiation TFT LCD screen provides a sharper, more colorful image. 4.2 Brightness Knob Turning the knob adjusts the brightness of screen. 4.3 Select Button and Arrow Button 4.1 Use the arrow button ( a menu. , , , ) to navigate within Press the SELECT button to select a menu item. 4.2 4.4 RETURN Button Press the RETURN button to return to the previous menu. DV-1680 4.5 SETUP Button 4.5 4.
4.8 Previous/Rewind ( / ) Button Press the button to return to the previous chapter. Press and hold for a few seconds to rewind at 2X, 4X,8X, and 16X. 4.9 Stop ( ) Button Press the Stop button to stop disc play. 4.10 PAUSE ( ) Button Press the Pause button to pause disc play. Press the PLAY button to resume play . 4.11 PLAY ( ) Button Press the Play button to play the disc. 4.10 4.8 4.7 4.9 4.
4.12 ) Button Press the button to go to the next chapter. Press and hold for a few seconds to fast forward at 2X, 4X, 8X and 16X. 4.13 LCD On/Off Press the LCD On/ Off Button to turn the LCD screen on or off . 4.13 4.14 Volume Control Turn the control to adjust the volume of the speakers or earphones. 4.15 Earphone Jack The jack is a standard 3.5mm earphone jack. You can use the stereo earphones shipped with the DVD Player, or use any other standard earphones.
4.17 A/V Signal Input/Output Switch Slide the switch to set the DVD Player to input or output mode. When the switch is in the IN position, all output signals from the DVD Player are muted so the DVD Player can receive input signals. MAKE SURE THE INPUT/OUTPUT SWITCH IS IN THE OUT POSITION BEFORE TRYING TO PLAY A DISC. 4.18 4.18 S-VHS Output Using the S-VHS signal produces better picture quality. Connect it with a S-VHS cable (optional) between the DVD Player and your TV.
4.20 Power Switch Turns the DVD Player on or off. Press once to turn the power ON. Press again to turn the power OFF. 4.21 Power Indicator Not lit when the power is off. Red light indicates standby mode. Green light indicates busy mode. 4.22 Battery Charge Indicator Not lit when the battery is not being charged. Yellow indicates that battery charging is in progress. Blinking yellow light indicates that the battery is finished charging. 4.
DV-1680 4.22 4.
5. Remote Control 5 Cautions for Remote Control Remove the battery from the remote control if it will not be used for a long time. Keep the remote control away from heat and moisture. Do not disassemble the remote control. Aim the remote control at the DVD Player's IR receiver.
5.1 POWER Turns the DVD Player on or off. 5.1 5.2 SETUP (or 1) Normal mode: Display the system setup page, from which you can set up some system parameters. Number mode: Represents the number 1. See 5.25 for information about normal and number modes. 5.3 TITLE/PBC (or 2 ) Normal mode: Display the title menu. Please note that not all DVD titles have a title menu. For VCDs, turns PBC on and off. Number mode: Represents the number 2. See 5.25 for information about normal and number modes. 5.
5.5 SUB-T (or 0) 5.6 5.7 5.8 Normal mode: Changes the language of the subtitles. Most DVD video titles contain hidden subtitles. Number mode: Represents the number 0. See 5.25 for information about normal and number modes. 5.6 AUDIO (or 4) Normal mode: Selects an audio language. Number mode: Represents the number 4. See 5.25 for information about normal and number modes. 5.7 ANGLE (or 5) Normal mode: Changes the view angle for DVDs with different view angles. Number mode: Represents the number 5.
5.9 ZOOM (or +10) Normal mode: Zooms -in on the image on the screen. The DVD Player supports magnification in X2 and X4 modes. Number mode: Used to enter a number greater than 10. For example, to enter 25, press the +10 button twice, then the 5 button once. See 5.25 for information about normal and number modes. 5.10 DISPLAY (or 7) Normal mode: Displays the status bar on the top of the screen, including title playback time, title remaining time, chapter playback time, and chapter remaining time.
5.13 PREV ( ) Plays the previous chapter of a DVD disc or the previous track of a CD/VCD disc. 5.14 NEXT ( ) Plays the next chapter of a DVD disc or the next track of a CD/VCD disc. 5.13 5.14 5.15 5.16 5.15 REV ( ) Plays the movie in reverse. 5.16 FWD ( ) Plays the movie in fast forward. 5.17 SLOW ( ) Plays the movie in slow motion. 5.18 Key Moves the highlight bar upward in a menu. 5.19 STOP ( ) 5.17 5.18 5.19 5.20 Stops play of the disc. 5.20 PAUSE/STEP ( ) Pauses play of a movie.
5.21 Key Move the highlight bar to the left. 5.21 5.22 5.23 5.22 PLAY ( ) Play the disc. 5.23 Key Move the highlight bar to the right 5.24 SEARCH Searches for a desired chapter, title or track. The searching method of MP3 is slightly dif DVD/VCD. MP3: Search allows a 3-digit number for CD-R/CDRW containing more than100 songs. For example: Search for No. 2 song, enter " 002" Search for No. 12 song, enter " 012" Search for No.
5.25 NUM Switches between normal and number mode. Some keys on the remote control are both number keys and function keys. Press the NUM button to switch from normal mode to number mode. Press the NUM key again to switch back to normal mode. When the remote is in number mode, the word 'NUM' appears in the bottom right corner of the screen 5.26 Key Moves the highlight bar downward in a menu. 5.27 SCREEN ON/OFF Turns the LCD screen on and off. 5.25 5.26 5.27 5.28 5.
6. Initial Setup 6 To display the initial set up screen, press the SETUP button on either the front panel of the DVD Player or on the remote control. The initial setup includes five menu pages: 1. GENERAL SETUP: general function setup 2. SPEAKER SETUP: speaker output mode setup 3. DOLBY DIGITAL SETUP: digital sound output setup 4. VIDEO SETUP: video quality setup 5.
6.1.2 TV TYPE MULTI NTSC PAL GENERAL SETUP TV DISPLAY TV TYPE >> MULTI PICTURE MODE NTSC ANGLE MARK PAL OSD LANG AUDIO OUTPUT CAPTIONS SCREEN SAVER SET TV STANDARD 6.1.3 PICTURE MODE AUTO HI-RES NONFLICKER GENERAL SETUP TV DISPLAY TV TYPE PICTURE MODE >> AUTO ANGLE MARK HIGH RESOLUTION OSD LANG NONFLICKER AUDIO OUTPUT CAPTIONS SCREEN SAVER Set Picture Mode 6.1.
6.1.5 OSD (On-Screen Display) LANGUAGE ENGLISH CHINESE GENERAL SETUP TV DISPLAY TV TYPE PICTURE MODE ANGLE MARK OSD LANG >> ENGLISH AUDIO OUTPUT CHINESE CAPTIONS SCREEN SAVER SET OSD LANGUAGE 6.1.6 AUDIO OUTPUT ANALOG SPDIF/RAW SPDIF/PCM GENERAL SETUP TV DISPLAY TV TYPE PICTURE MODE ANGLE MARK OSD LANG AUDIO OUTPUT >> ANALOG CAPTIONS SPDIF/RAW SCREEN SAVER SPDIF/PCM SELECT AUDIO OUTPUT 6.1.
6.1.8 SCREEN SAVER ON OFF GENERAL SETUP TV DISPLAY TV TYPE PICTURE MODE ANGLE MARK OSD LANG AUDIO OUTPUT CAPTIONS SCREEN SAVER >> ON OFF SCREEN SAVER 6.2 SPEAKER SETUP PAGE 6.2.1 DOWNMIX LT/RT --SPEAKER SETUP PAGE-- STEREO SOUND >MAIN PAGE< >> LT/RT STEREO SET DOWNMIX MODE 6.3 DOLBY DIGITAL SETUP 6.3.
6.3.2 DUAL MONO STEREO LEFT MONO RIGHT MONO MIXED MONO --DOLBY DIGITAL SETUP PAGE-OPERATIONAL DUAL MONO DYNAMIC RNG >MAIN PAGE< >> STEREO LEFT MONO RIGHT MONO MIXED MONO DUAL MONO(1+1) SETUP 6.3.3 DYNAMIC RANGE --DOLBY DIGITAL SETUP PAGE-OPERATIONAL DUAL MONO DYNAMIC RNG >MAIN PAGE< >> DYNAMIC RANGE COMPRESSION 6.4 VIDEO SETUP 6.4.
6.4.2 CONTRAST MODE 6.4.3 BRIGHT MODE --VIDEO PAGE-- --VIDEO PAGE-- COLOR MODE CONTRAST MODE >> BRIGHT MODE >MAIN PAGE< COLOR MODE CONTRAST MODE BRIGHT MODE >> >MAIN PAGE< SET CONRAST MODE SET BRIGHT MODE 6.5 PREFERENCES PAGE This function allows the user to select DVD disc viewing preferences before playing a movie. The selection must be performed with power applied to the DVD Player . In addition, the DVD disc must be removed from the DVD Player or with the disc cover open.
6.5.3 DISC MENU --PREFERENCES PAGE-AUDIO SUBTITLE DISC MENU >> ENGLISH COUNTRY CHINESE PARENTAL FRENCH PASSWORD SPANISH DEFAULTS JAPANESE PREFERRED MENU LANGUAGE This setting is used to select your preferred disc menu (root and title menus) language in the DVD titles. If the preferred language chosen is available on the DVD disc title, the menu will be displayed in that language. The DVD Player supports the languages listed on the right side of the display.
6.5.6 PASSWORD(REMOTE CONTROL REQUIRED) The password function is used to ensure --PREFERENCES PAGE-the DVD disc-viewing rating system is AUDIO SUBTITLE utilized. When the user wishes to view a DISC MENU COUNTRY DVD disc with rating that is above what is PARENTAL PASSWORD >> CHANGE selected in the PARENTAL menu, a DEFAULTS password must be entered. If you set the country at USA and PG-13, but the DVD CHANGE PASSWORD disc is rated Adult, two possible situations could occur: A).
6.5.7 DEFAULTS Resets all settings to their default values when you want to clear preferred settings. This will not change the password.
7. Basic System Operation 7 7.1 Connecting the Power 1. Connect the power cord of the DVD Player's AC adapter to a power source. 2. Connect the other end of the adapter to the DVD Player's DC IN jack. 7.2 Playing a Disc 1. Slide the cover lock to the right, then GENTLY lift the LCD screen into position. 2. Press the OPEN button to open the disc cover. 3. Align the disc in the DVD Player , then gently press the disc into place. 4. Close the disc cover. 5.
7.4 Selecting the Next or /Previous Chapter or /Track Press the NEXT ( or track. ) button to select the next chapter Press the PREVIOUS ( chapter or track. ) button to select the previous 7.5 Pausing and Stepping Through a Disc 1. Press the PAUSE/STEP ( ) button to pause the disc. 2. Once the disc is paused, press the PAUSE/STEP ( button again to move forward one frame at a time. ) 3. To resume normal play, press the PLAY ( ) button. 7.6 Fast Forward/Rewind 1.
8. External Connection 8 You can connect the DVD Player to any audiovisual equipment from the DVD Player's output terminals of DVD Player. You can also connect any audiovisual equipment to the DVD Player's input terminals. To switch the DVD Player's signal source between input and output, adjust the Input/Output switch(IN OUT). Set the switch to the OUT position, to transmit signals from the DVD Player to other equipment.
Attention! The DVD Player's A/V cable contains three wires: - White for audio left channel - Red for audio right channel - Yellow for video signal If not connected correctly, there will be no response from the external equipment. Most audiovisual equipment has an IN/OUT switch. Make sure that the switch on other components is set to IN when receiving incoming signals. 8.2 S-VHS Out Some equipment is equipped with a S-VHS terminal, which you can use instead of the RCA video terminal.
8.3 Stereo Audio Out You can connect the stereo audio out of the DVD Player to the following equipment: (1) Stereo amplifier (2) 2-channel cassette or open-reel tape deck (3) DAT (4) Mini Disc To adjust the volume, adjust the volume control of the playback component. 8.4 Digital Out You can connect the DVD Player to audio equipment with an AC-3 and/or DTS decoder with an optical cable from the Digital Out on the side of the DVD Player.
8.5 A/V Signal Input When the A/V IN/OUT switch is in the IN position, the DVD Player will receive incoming signals from the 3-in-1 A/V terminal. Use the DVD Player's AV cable to connect to the following components: (1) TV with A/V OUT terminals (2) VCR/Video Cassette DVD player (3) Cassette Recorder (4) V8 or VHS video cameras (5) Digital Camera The DVD Player is the playback medium for these components. You can hear the sound from the DVD Player's speakers and see the pictures on the LCD screen.
9. Battery Installation and Use 9 The DVD Player comes with a rechargeable high performance Li-ion battery. Apart from the high capacity, Li-ion batteries does not have 'memory' effect, so you do not need to discharge the excess energy before recharging the battery. Make sure to charge the battery before use. Never short the battery. Keep battery out of metal containers and away from moisture. Store the battery in a dry place. The battery can be recharged up to 500 times.
Battery Use and Maintenance (1) Use only the DVD Player's AC adapter to charge the battery. (2) Battery charge and discharge efficiency will be lower when the ambient temperature is under 50 (10 ) or over 95 (35 ). (3) Avoid recharging a fully charged battery. Installing the Battery (1) Remove the power supply. (2) Push the slide door on the back of the DVD Player to the S-VHS position, to reveal the battery connector. (3) Close the LCD screen.
10. Cautions and Maintenance Please follow the following instructions to keep the DVD Player in the best condition. 10 Avoid exposing the DVD Player to direct sunlight, high temperatures, and moisture. Keep the DVD Player out of the reach of children. The base of DVD Player will feel warm after long periods of use. Do not place the DVD Player on a hot surface. Condensation will take place when the DVD Player is moved from a cold environment to a warm and humid environment.
Contact your dealer for help in locating a qualified service technician. The DVD Player's AC adapter is specially designed for the DVD Player. Do not use a substitute DC adapter. Avoid scratching the LCD screen. Always close the cover when the DVD Player is not in use. Use a soft cloth to clean the screen. Do not use water or detergent to clean the screen. The remote control comes equipped with a Panasonic CR2052 button battery. The power consumption of the remote control is very low.
11 11. Warranty 90 DAY LIMITED WARRANTY Applies to Audiovox Mobile V ideo Products AUDIOVOX ELECTRONICS CORP. (the Company) warrants to the original retail purchaser of this product that should this product or any part thereof, under normal use and conditions, be proven defective in material or workmanship within 90 days from the date of original purchase, such defect(s) will be repaired or replaced with reconditioned product (at the Company's option) without charge for parts and repair labor.
This Warranty is in lieu of all other express warranties or liabilities. ANY IMPLIED WARRANTIES, INCLUDING ANY IMPLIED WARRANTYOF MERCHAN T ABILITY , SHALL BE LIMITED TO THE DURATION OF THIS WRITTEN WATTATNTY. ANY ACTION FOR BRECH OF ANY WARRANTY HEREUNDER INCLUDING ANY IMPLIED WARRANTABILITY MUST BE BROUGHT WITHIN A PERIOD OF 15 MONTHS FROM DATE OF ORIGINAL PURCHASE.
12. Troubleshooting 12 Whenever there is a problem with your DVD Player, please check the following table before sending the DVD Player for service. If you are unable to solve the problems using this table, contact your dealer for service.
13.Specifications Power:Universal AC to DC switching power adapter. DC 12V/2A AC to DC power adapter, approx 3.5 hours playing time with battery. Playing Discs: DVD,VCD(v2.0),CD,SVCD,MP3 Dimensions Inches (mm):6.62(168.3)W x 6.77(172)D x 1.38(35)H Weight: Approx.2.2lb(1kg), without battery pack Display: 6.