FPE1908DV 19” HD FLAT PANEL LCD TV/DVD COMBO OWNER’S MANUAL 1 FOR ASSISTANCE CALL CUSTOMER SERVICE AT 1-800-645-4994 OR VISIT US AT WWW.AUDIOVOX.COM 128-8329 E-1 English P1-32.
Safety Precautions Placement INFORMATION • Do not use this unit in places that are extremely hot, cold, dusty, or humid. • Do not restrict the airflow of this unit by placing it somewhere with poor airflow, by covering it with a cloth, or by placing it on bedding or carpeting. WARNING: TO REDUCE THE RISK OF ELECTRIC SHOCK, DO NOT REMOVE COVER (OR BACK). NO USERSERVICEABLE PARTS INSIDE. REFER SERVICING TO QUALIFIED SERVICE PERSONNEL.
IMPORTANT SAFETY PRECAUTIONS 1. Read these instructions. 2. Keep these instructions. 3. Heed all warnings. 4. Follow all instructions. 5. Do not use this apparatus near water. 6. Clean only with a dry cloth. 7. Do not block any ventilation openings. Install in accordance with the manufacturer’s instructions. 8. Do not install near any heat sources such as radiators, heat registers, stoves, or other apparatus (including amplifiers) that produce heat. 9.
TABLE OF CONTENTS SAFETY PRECAUTIONS ................... 2 IMPORTANT SAFETY INSTRUCTIONS . .......................................................... 3 TABLE OF CONTENTS ...................... 4 QUICK INSTALLATION .................... 5 DISC FORMATS ................................ 6 ACCESSORIES .................................. 7 GETTING STARTED .......................... 7 REMOTE CONTROL REFERENCE GUIDE ..................................................... 8 - 9 UNIT REFERENCE GUIDE .......
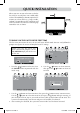
Quick Installation When you turn on your television set for the first time, be sure to place it on a solid stable surface. To avoid danger, do not expose the TV to water, or a heat source (e.g. lamp, candle, radiator). Do not obstruct the ventilation grid at the rear and be sure to leave sufficient gaps around the unit as shown. Turning On the Unit for the first time The first time you turn on the unit, the unit will enter SETUP mode.
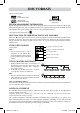
DISC FORMATS This unit can playback: DVDs [8cm/12cm disc] audio cds [8cm/12cm disc] CD-R/CD-RW Region Management Information Compatible Region Management Information: This unit is designed and manufactured to respond to the Region Management Information that is encoded on DVDs. If the region number printed on the DVD does not correspond to the region number of this unit, this unit cannot play that disc. The region number of this unit is 1 .
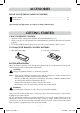
Accessories Please LOCATE the INCLUDED accessories. .Remote Control ........................................................................................................ x 1 .AAA Batteries ........................................................................................................... x 2 Specifications and appearance are subject to change without notice. GETTING STARTED Using the Remote Control • Point the remote control at the REMOTE SENSOR located on the unit.
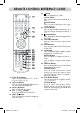
remote CONTROL REFERENCE GUIDE 5. MENU Button Press to display the on-screen TV menu. 6. VOLUME (- / +) Buttons Press to adjust the volume level. 7. CURSOR ( , , , ) Buttons Press to highlight selections on a menu screen and adjust certain settings. ENTER Button Press to confirm selections on a menu screen. 8. / Buttons : Fast reverse playback. : Fast forward playback. 9. PREV Button Press to select previous chapters or tracks on a disc. 10.
remote CONTROL REFERENCE GUIDE 22. 23. 24. 25. 26. 27. 28. 17. FUNCTION Button Press to switch between TV / AV In / YUV In / DVD / PC In. 18. LAST CH Button Press to switch repeatedly between the last two channels displayed. 19. MUTE Button Press to turn off the sound. 20. CH / CH Buttons Press to change the TV channels. 21. NEXT Button Press to select the next title, chapter or track on a disc. 29. Button Press to stop playing a disc. PLAY Button Press to start and resume playback of a disc.
UNIT REFERENCE GUIDE FRONT, LEFT & right SIDE VIEW 1) Color LCD Screen 2) Button Press to turn the unit on and off. 3) PLAY Button Press to start or resume playback of a disc. 4) STOP Button Press to stop playing a disc. 5) MENU Button Press to enter and exit the TV menu. 6) FUNCTION Button Press to select TV, AV In, YUV In, DVD, or PC In. 7) CH Buttons Press to select a TV channel. Button Press to select previous chapters or tracks on a disc.
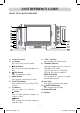
UNIT REFERENCE GUIDE bACK VIEW 14) AC Power Cord 15) VIDEO OUT Jack - AV OUT 16) AUDIO OUT Jacks (Left/Right) - AV OUT 17) VIDEO IN Jack - AV IN 18) AUDIO IN Jacks (Left/Right) - AV IN 19) MONITOR/VGA Jack - PC IN 20) AUDIO Jack - PC IN 21) COMPONENT VIDEO IN Jacks (Y/PB/ PR) - YUV IN 22) AUDIO IN Jacks (Left/Right) - YUV IN 23) S-VIDEO Jack - AV IN 24) HEADPHONES Jack 25) TV Antenna Terminal E - 11 English P1-32.
CONNECTIONS Connecting a TV ANTENNA/CABLE/SATELLITE To view television channels correctly, a signal must be received from one of the following sources: - An indoor or outdoor aerial antenna - A cable system - A satellite system Connecting a Digital Antenna The tuner in this TV receives ATSC TV signals from an antenna. This digital TV can receive standard (SDTV) and high definition (HDTV) over the air broadcasts.
CONNECTIONS Connecting Devices with a Composite (yellow RCA-type) Video Output To connect A/V devices such as a VCR, video game system or camcorder: Connecting to a VCR / Video Game System / Camcorder Connect the AUDIO / VIDEO cable (not included) as shown. Make sure you connect the cable from the other equipment (AUDIO and VIDEO OUT) to this unit (AUDIO and VIDEO IN) Note: Please refer to the user manual for the other equipment for more information.
CONNECTIONS Connecting A HIGH-DEFINITION (HD) SOURCE High-Definition (HD) Devices with component video output must be connected to the YUV input. Connect the component video cable and audio cable (not included) as shown. Make sure you connect the component video cable and audio cable from the other equipment (COMPONENT VIDEO OUT and AUDIO OUT) to this unit (COMPONENT VIDEO IN and AUDIO IN - YUV IN). To AUDIO IN jacks To AUDIO (YUV IN) OUT jacks * May require a subscription for receiving HD channels.
CONNECTIONS Connecting AN AUDIO AMPLIFIER/EXTERNAL SPEAKERS This connection allows you to use an audio amplifier and external speakers. Connect the AUDIO cable (not included) as shown. Make sure you connect the cable from the other equipment (AUDIO IN) to this unit (AUDIO OUT). To AUDIO OUT jacks To AUDIO IN jacks Connecting THE AC POWER CORD • Connect the AC power cord into a wall outlet. • Press the button on the left side of the unit or use the remote control to turn on the unit.
INSTALLATION REMOVING THE BASE STAND WARNING: The LCD Display is very fragile, and must be protected at all times when removing the base stand. Be sure that nothing hard or sharp, or anything that could scratch or damage the LCD display, come in contact with it. Do NOT place pressure on the front of the unit at any time because the screen could crack. 1. Disconnect any cables or cords connected to the unit. 2.
USING HEADPHONEs • Turn down the volume before connecting headphones to the unit, then adjust the volume to your desired level. • When headphones are connected, no sound will come from the front speakers. Headphones (1/8” [3.5mm] diameter plug) Note: Avoid listening to sound at high levels for prolonged periods of time. This may be harmful to you and may cause hearing loss. SOUND system Dolby Digital (for DVD) Dolby Digital is a sound system developed by Dolby Laboratories Inc.
TV SETUP Note: Some setting items on the menu screen may not activate depending on the mode selected (TV / AV in / YUV in / DVD / PC in). PICTURE MENU 1. Press the MENU button. 2. Press the button to enter PICTURE settings. 3. Use the or button to select the options (Picture Mode, Contrast, Brightness, Sharpness, Tint or Color). Adjust them using the or button (Screen will change to your desired setting). 4. Repeat step 3 to adjust other options. 5.
TV SETUP TIME MENU 1. Press the MENU button. 2. Use the or button to select time, then press the button to enter the time settings. 3. Use the or button to select the options (OSD Duration, Sleep Timer, Time Zone or Day Saving Time). Adjust them using the or button. 4. Repeat step 3 to adjust other options. 5. To exit the MAIN MENU and return to the normal screen, press the EXIT or MENU button repeatedly.
TV SETUP PC Set Up (in PC mode only) - Resolution : 1,440 x 900 max - Refresh Frequency : 60Hz max H - Pos V - Pos Clock Phase : Center the image by moving it left or right. : Center the image by moving it up or down. : Adjusts the display clock to change width of the image. : Adjusts the image if there is flicker of screen letters, color misalignment, or blurring. Closed Caption Note: This function only works on ATSC programs broadcast with captions.
TV SETUP Parental 1. Use the or button to select various Parental settings. Adjust them using the or button, or press the button to go into the detailed settings. 2. Press the MENU button to return to the previous menu. 3. Repeat steps 1 - 2 to adjust other options. 4. To exit the MAIN MENU and return to the normal screen, press the EXIT or MENU button repeatedly. Rating Enable US Canada RRT Setting Reset RRT U.S. TV Ratings : Select On to edit the following parental items.
TV SETUP TV MENU (For TV Mode Only) 1. Press the MENU button. 2. Use the or button to select TV, then press the button to enter the TV settings. 3. Use the or button to select the options (Antenna, Auto Scan, Auto Scan Add CH, Channel Skip, Channel No., Channel Label or DTV Signal). Adjust them using the or button, or press the button to go into the detailed settings. 4. Press the MENU button to return to the previous menu. 5. Repeat steps 3 and 4 to adjust other options. 6.
CD/DVD OPERATION This owner’s manual explains the basic instructions of this unit. Some DVDs are produced to limit operation during playback. For example, many DVDs do not allow users to skip government warnings, or in some cases previews or other features. This is not a defect in the unit. Refer to the instruction notes of discs. ” may appear on the screen during operation. A “ ” means that the desired operation is “ not permitted by the unit or disc. Playing a Disc 1.
CD/DVD OPERATION Fast Forward/Fast Reverse 1. Press the SEARCH or SEARCH button when a disc is playing. • Each time the SEARCH or SEARCH button is pressed, the speed of fast scan changes in the following sequence: 2. Press the PLAY button when you reach the desired point to resume playback at normal speed. SLOW-MOTION PLAY (dvd) 1. In Play mode, press the SLOW button on the remote control. Each time the SLOW button is pressed, the speed of slow-motion playback changes in the following sequence: 2.
SPECIAL FUNCTIONS DISPLAY function (DVD) While the disc is playing, press the DISPLAY button repeatedly to display information on operation status: Locating a specific title (DVD) If a DVD contains title numbers, you can locate a specific title by directly selecting a title number. 1. In STOP mode, press the GOTO button. 2. Press the or button to highlight a specific field and press the corresponding number button(s) for the title you want. 3. Press the ENTER button to confirm.
REPEAT PLAYBACK You can play a specific title or chapter repeatedly. (Title repeat, chapter repeat, A-B repeat) Repeating a chapter (DVD) You can play the same chapter repeatedly. 1. While the disc is playing, press the REPEAT button until the “ displays on the screen. The current chapter is played repeatedly. ” indicator Repeating a title You can play the same title repeatedly. 2. While the disc is playing, press the REPEAT button until the “ on the screen. The current title is played repeatedly.
DVD PROGRAMMABLE PLAYBACK Programmable memory The two types of programmed playback provided by this unit is title/chapter programmed playback. Title/Chapter programmed playback 1. Press the MEMORY button in PLAY mode. 2. Input the title (2 digits) and chapter (2 digits) by pressing the number buttons. (For example : 01 02, 02 05, 02 11) It will move to the next item automatically. 3. Repeat steps 2 to add additional titles and chapters. 4. Press the PLAY button to start the programmed playback.
CUSTOMIZING THE DVD FUNCTION SETTINGS VIDEO SETUP 1. In STOP mode, press the SETUP button. 2. Press the or button repeatedly until VIDEO SETUP appears. 3. Use the or button to select the option (Brightness or Contrast), then press the button. Use the or button to make adjustments, then press the ENTER button. (The screen will change to your selected setting). 4. Repeat steps 2 and 3 above to adjust other options. 5. To exit the SETUP MENU and return to the normal screen, press the SETUP button.
MAINTENANCE Cleaning THE Disc A defective or soiled disc inserted into the unit can cause sound to drop out during playback. Handle the disc by holding its inner and outer edges. • Do NOT touch the surface of the unlabeled side of the disc. • Do NOT stick paper or tape on the surface. • Do NOT expose the disc to direct sunlight or excessive heat. • Clean the disc before playback. Wipe the disc from the center outward with a cleaning cloth. • NEVER use solvents such as benzine or alcohol to clean the disc.
Trouble Shooting Guide The picture is not clear Severe hum or noise is heard. The disc does not play. TV Bad Picture (snow, multiple images, distortion, blurry) No sound. Black and white picture. • Clean the disc. • The disc is scratched. • The plugs and jacks are dirty. Wipe them with a cloth slightly moistened with alcohol. • Clean the disc. • There is no disc inside (“No Disc” appears on the screen). • Insert the disc correctly with the playback side facing frontward. • Clean the disc.
Unit: INCH E - 31 English P1-32.
E - 32 English P1-32.