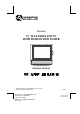
FPE1508DV 15” FLAT PANEL LCD TV WITH BUILT-IN DVD PLAYER OWNER'S MANUAL FOR ASSISTANCE CALL CUSTOMER SERVICE AT 1-800-645-4994 OR VISIT US AT WWW. AUDIOVOX.
SAFETY PRECAUTIONS PLACEMENT INFORMATION • Do not use this unit in places that are extremely hot, cold, dusty or humid. • Do not restrict the airflow of this unit by placing it somewhere with poor airflow, by covering it with a cloth, by placing it on bedding or carpeting. SAFETY INFORMATION WARNING : TO REDUCE THE RISK OF ELECTRIC SHOCK, DO NOT REMOVE COVER (OR BACK). NO USER SERVICEABLE PARTS INSIDE. REFER SERVICING TO QUALIFIED SERVICE PERSONNEL.
IMPORTANT SAFETY INSTRUCTIONS 1) 2) 3) 4) 5) 6) 7) Read these instructions. Keep these instructions. Heed all warnings. Follow all instructions. Do not use this apparatus near water. Clean only with a dry cloth. Do not block any ventilation openings. Install in accordance with the manufacturer’s instructions. 8) Do not install near any heat sources such as radiators, heat registers, stoves, or other apparatus (Including amplifiers) that produce heat.
CONTENTS SAFETY PRECAUTIONS .......................... 1 IMPORTANT SAFETY INSTRUCTIONS ....... ...................................................................... 2 MAINTENANCE ........................................ 2 CONTENTS ............................................... 3 QUICK INSTALLATION ............................. 4 DISC FORMATS ........................................ 5 ACCESSORIES ......................................... 6 GETTING STARTED .................................
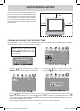
QUICK INSTALLATION When you turn on your television set for the first time, be sure to place it on a solid stable surface. To avoid danger, do not expose the TV to water, or a heat source (e.g. lamp, candle, radiator). Do not obstruct the ventilation grid at the rear and be sure to leave sufficient gaps around the unit as shown. 2 3/8" 2 3/8" 7 7/8" Turning On the Unit for the first time The first time you turn on the unit, the unit will enter the setup mode.
DISC FORMATS ICONS USED ON DVDs NOTES ON COPYRIGHT Sample Icons: It is forbidden by law to copy, broadcast, show, broadcast on cable, play in public or rent copyrighted material without permission. Apparatus Claims of U.S. Patent Nos. 4,907,093; 5,315,448 and 6,516,132 licensed for limited viewing uses only. DVDs are copy protected, and any recordings made from these discs will be distorted. This product incorporates copyright protection technology that is protected by method claims of certain U.S.
ACCESSORIES Please check and identify the supplied accessories. Remote control (with batteries) ...................................................................................................... x 1 AC adapter ...................................................................................................................................... x 1 Car power adapter ..........................................................................................................................
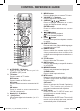
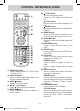
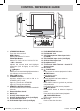
CONTROL REFERENCE GUIDE 5. MENU button Press to display the on-screen TV menu. 6. VOLUME (- / +) buttons Press to adjust the volume level. 7. CURSOR ( , , , ) buttons Press to highlight selections on a menu screen and adjust certain settings. ENTER button Press to confirm selections on a menu screen. 8. / buttons : Fast reverse playback. : Fast forward playback. 9. PREV button Press to select previous chapters or tracks on a disc. 10.
CONTROL REFERENCE GUIDE 22. STOP button Press to stop playing a disc. Press to go to a folder list of picture file list. PLAY button Press to start and resume playback of a disc. PAUSE button Press to pause playback and single frame advance. 23. AUDIO button Press to select audio soundtracks on a DVD or change the output mode of a CD. 24. SLOW button Press to perform slow forward playback of a DVD. 25. DVD MENU button Press to enter the main menu of the DVD. 26.
CONTROL REFERENCE GUIDE 1 2 3 4 5 6 7 8 9 10 18 19 20 11 12 13 1415 16 17 1. STANDBY/ON Button Turns the unit on and off. MENU Button Enters and exits the TV menu. FUNCTION Button Selects TV / DVD / AV IN / YUV IN / PC IN. – VOL + Controls Adjusts the volume level and highlight selections (Left & Right) on the menu screen. / Buttons Selects a TV channel and highlight selections (Up & Down) on the menu screen. 2. Color LCD Screen 3.
CONNECTIONS CONNECTING A TV ANTENNA / CABLE / SATELLITE To view television channels correctly, a signal must be received from one of the following sources: - An indoor or outdoor aerial antenna - A cable system - A satellite system Connecting a Digital Antenna The tuner in this TV receives ATSC TV signals from an antenna. This digital TV can receive standard (SDTV) and high definition (HDTV) over the air broadcasts.
CONNECTIONS CONNECTING DEVICES WITH A COMPOSITE (YELLOW RCA-TYPE) VIDEO OUTPUT To connect A/V devices such as a VCR, video game system or camcorder. Connecting to a VCR / Video Game System / Camcorder Connect the AUDIO / VIDEO cable (not included) as shown. Make sure you connect the cable from the other equipment (AUDIO and VIDEO OUT) to this unit (AUDIO and VIDEO IN). To AUDIO / VIDEO IN jacks (AV IN) NOTE Please refer to the user manual for the other equipment for more information.
CONNECTIONS CONNECTING A HIGH-DEFINITION (HD) SOURCE High-Definition (HD) Devices with component video output must be connected to the YUV input. Connect the component video cable and audio cable (not included) as shown. Make sure you connect the component video cable and audio cable from the other equipment (COMPONENT VIDEO OUT and AUDIO OUT) to this unit (COMPONENT VIDEO IN and AUDIO IN - YUV IN). With component video output (Digital Cable Box*, Satellite Receiver*, or external over-the-air HD-Tuner).
CONNECTIONS CONNECTING AN AUDIO AMPLIFIER This connection allows you to use an audio amplifier and external speakers. Connect the AUDIO cable (not included) as shown. To AUDIO IN jacks To AUDIO OUT jacks Make sure you connect the cable from the other equipment (AUDIO IN) to this unit (AUDIO OUT). POWER SUPPLY Using the Car Power Adapter The car power adapter allows the unit to be used with vehicles that have a 12V, negative ground electrical system. Cautions • Use the provided car power adapter only.
INSTALLATION REMOVING THE BASE STAND WARNING: The LCD Display is very fragile, and must be protected at all times when removing the base stand. Be sure that no hard or sharp object, or anything that could scratch or damage the LCD display, comes into contact with it. Do NOT place pressure on the front of the unit at any time because the screen could crack. 1. Disconnect any cables or cords connected to the unit. 2.
USING HEADPHONES • Turn down the volume before connecting headphones to the unit, then adjust the volume to your desired level. • When headphones are connected, no sound will come from the front speakers. NOTE Avoid listening to sound at high levels for prolonged periods of time. This may be harmful to you and may cause hearing loss. Headphones [1/8"(3.
TV SETUP Note: Some setting items on the menu screen may not activate depending on what mode the unit is currently in (TV/AV in/YUV in/PC in). PICTURE MENU 1. Press the MENU button. 2. Press the button to enter PICTURE settings. 3. Use the or button to select the options (Picture Mode, Contrast, Brightness, Sharpness, Tint or Color). Adjust them using the or button (Screen will change to your desired setting). 4. Repeat step 3 to adjust other options. 5.
TV SETUP TIME MENU 1. Press the MENU button. 2. Use the or button to select time, then press the button to enter the time settings. 3. Use the or button to select the options (OSD Duration, Sleep Timer, Time Zone or Day Saving Time). Adjust them using the or button. 4. Repeat step 3 to adjust other options. 5. To exit the MAIN MENU and return to the normal screen, press the EXIT or MENU button repeatedly. : Select the length of time for the On screen menu is displayed : 15 Sec / 30 Sec / 45 Sec / 60 Sec.
TV SETUP PC Set Up (in PC mode only) - Resolution : 1,024 x 768 max - Refresh Frequency : 60Hz max H - Pos : Center the image by moving it left or right. V - Pos : Center the image by moving it up or down. Clock : Adjusts the display clock to change width of the image. Phase : Adjusts the image if there is flicker of screen letters, color misalignment, or blurring. Best Resolution is 1024x768 Closed Caption Note This function only works on ATSC programs broadcast with captions.
TV SETUP Parental 1. Use the or button to select various Parental settings. Adjust them using the or button, or press the button to go into the detailed settings. 2. Press the MENU button to return to the previous menu. 3. Repeat steps 1 - 2 to adjust other options. 4. To exit the MAIN MENU and return to the normal screen, press the EXIT or MENU button repeatedly. Rating Enable US Canada RRT Setting Reset RRT U.S. TV Ratings : : : : : Select On to edit the following parental items.
TV SETUP TV MENU (For TV Mode Only) 1. Press the MENU button. 2. Use the or button to select TV, then press the button to enter the TV settings. 3. Use the or button to select the options (Antenna, Auto Scan, Auto Scan Add CH, Channel Skip, Channel No., Channel Label or DTV Signal). Adjust them using the or button, or press the button to go into the detailed settings. 4. Press the MENU button to return to the previous menu. 5. Repeat steps 3 and 4 to adjust other options. 6.
CD/DVD OPERATION This owner’s manual explains the basic instructions of this unit. Some DVDs are produced with limited operation during playback. For example, many DVDs do not allow users to skip government warnings, or in some cases previews or other features. This is not a defect in the unit. Refer to the instruction notes of discs. “ ” may appear on the screen during operation. A “ ” means that the desired operation is not permitted by the unit or disc. PLAYING A DISC 1.
CD/DVD OPERATION FAST FORWARD / FAST REVERSE 1. Press the SEARCH or SEARCH button when a disc is playing. • Each time the SEARCH or SEARCH button is pressed, the speed of fast scan changes in the following sequence: 2. Press the PLAY button when you reach the desired point to resume playback at normal speed. SLOW-MOTION PLAY (DVD) 1. Press the SLOW button on remote control in the play mode. Each time the SLOW button is pressed, the speed of slow-motion playback changes in the following sequence: 2.
SPECIAL FUNCTIONS DISPLAY FUNCTION (DVD) While the disc is playing, press the DISPLAY button repeatedly to display information on operation status. LOCATING A SPECIFIC TITLE (DVD) If a DVD disc contains title numbers, you can locate a specific title by directly selecting a title number. 1. In STOP mode, press the GOTO button. 2. Press the or button to highlight a specific field and press the corresponding number button(s) for the title you want. 3. Press the ENTER button to confirm.
REPEAT PLAYBACK You can play a single track or an entire disc repeatedly. Repeating a single track (CD) You can play the same track repeatedly. 1. While the disc is playing, press the REPEAT button until the “ The current track is played repeatedly. ” indicator displays on the screen. Repeating an entire disc 2. While the disc is playing, press the REPEAT button until the “ The entire disc is played repeatedly. ” indicator displays on the screen. To resume normal playback 3.
CUSTOMIZING THE DVD FUNCTION SETTINGS LANGUAGE SETUP 1. Press the SETUP button in stop mode. 2. Use the or button to select the option (OSD Language, Audio, Subtitle or Disc Menu), press the button. 3. Use the or button to select your preferred language, then press the ENTER button to confirm. 4. Press the button to go back to previous menu. Repeat steps 2 and 3 to adjust other options. 5. To exit the SETUP MENU and return to the normal screen, press the SETUP button.
TROUBLESHOOTING GUIDE SYMPTOM CAUSE (AND REMEDY) No power. • Check that the AC power adapter is connected. • The unit is not turned on. The remote does not function. • • • • DVD No sound or only a very low-level sound is heard. Remove any obstacles between the remote and the unit. Use the remote near the unit. Point the remote at the remote sensor on the unit. Replace the batteries in the remote with new ones. • Make sure that you select DVD mode. • The system is in pause mode.
Unit : INCH 4 1/8 16 3/4 14 3/8 6 5/8 11 8 7 1/2 10 1/2 Printed in China 811-211591W420 E - 27 FPE1508DV_UL_IB_MSTAR+MTK_E21-27.