LCD TV Operating Manual FPE2006 Before connecting, operating or adjusting this product, please read the manual completely. FOR ASSISTANCE CALL 1-800-619-3848 OR VISIT US AT WWW.AUDIOVOX.COM 1287682REV .
Table of Contents Important Information......................................................................................1 Important Safety Precautions ...........................................................................2 Preparations ....................................................................................................5 Identification of Controls .................................................................................7 Connections .........................................
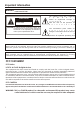
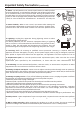
Important Information WARNING: TO REDUCE THE RISK OF FIRE OR ELECTRIC SHOCK, DO NOT EXPOSE THIS APPARATUS TO RAIN OR MOISTURE. CAUTION RISK OF ELECTRIC SHOCK DO NOT OPEN CAUTION-To reduce the risk of electric shock, do not perform any servicing other than that contained in the operating instructions unless you are qualified to do so.
Important Safety Precautions Electrical energy can perform many useful functions, but it can also cause personal injuries and property damage if improperly handled. This product has been engineered and manufactured with the highest priority on safety. But IMPROPER USE CAN RESULT IN POTENTIAL ELECTRICAL SHOCK OR FIRE HAZARD. In order to prevent potential danger, please observe the following instructions when installing, operating and cleaning the product.
Important Safety Precautions (continued) 12. Stand---Use only with the cart, stand, tripod, bracket, or table specified by the manufacturer, or sold with the apparatus. Do not place the product on an unstable trolley, stand, tripod or table. Placing the product on an unstable base can cause the product to fall, resulting inserious personal injuries as well as damage to the product. When mounting the product on a wall, be sure to follow the manufacturer’s instructions. Use only the 13.
Important Safety Precautions (continued) 22. Power source---This product is intended to be supplied by a listed power supply indicated on the marking label. If you are not sure of the type of power supply to your home, consult your product dealer or local power company. For added protection for this product during a lightning storm, or when it is left unattended and unused for long periods of time, unplug it from the wall outlet and disconnect the cable system.
Preparations Using the Remote Control
Preparation (continued) Antenna Connection CABLE TV (CATV) CONNECTION A 75-ohm coaxial cable connector is built into the set for easy hookup. When connecting the 75- ohm coaxial cable to the set, screw the 75-ohm cable to the ANT. Terminal. Some cable TV companies offer “premium pay channels”. Since the signals of these premium pay channels are scrambled, a cable TV converter/descrambler is generally provided to the subscriber by the cable TV company.
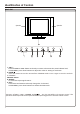
Identification of Controls Main Unit Speaker Speaker 1. VOL+/Press the VOL+ or VOL- button to directly increase or decrease the sound volume level; In OSD MENU, press these buttons to adjust the value or setting of each item. 2. POWER Press this button to turn the unit ON from STANDBY mode. Press it again to turn the set back to STANDBY. 3.Remote Sensor 4. SOURCE To select the input signal source. 5.
Identification of Controls (continued) Main Unit 1. D-Sub input /Audio Line in Connect to the D-Sub/audio output jacks on your PC. 2. Component inputs (Y, Pb/Cb, Pr/Cr, Audio L, R) Connect to the audio and component output jacks of a DVD player or Set-Top Box. 3. Antenna input Allows you to connect cable or outdoor antenna. 4. S-Video input Receive a S-Video signal from external source such as VCR or DVD player. 5.
Identification of Controls (continued) Remote Control To display channel status or signal To select Stereo mode Turn the unit on or off Sound mute [0-9] number buttons: To access the MENU main page or exit menu operation To switch channels; In MENU operation, use CH+/- to select menu To quickly jump between current channel and last To adjust volume; In MENU operation, use ENTER or VOL+/- to adjust selected item To confirm your operation To select input signal source To set sleep timer Picture mode se
Connections Cautions Before Connecting Carefully check the terminals for position and type before making any connections. The illustration of the external equipment may be different depending on your model. Loose connectors can result in image or color problems. Make sure that all connectors are securely inserted into their terminals. Refer to the operating manual of the external device as well. When connecting an external device, turn the power off on the panel to avoid any issues.
Connections (continued) Connect a Camcorder OUT Y W R IN Yellow (VIDEO) White (AUDIO L) Red (AUDIO R ) R AUDIO L W Y Y W R R VIDEO Audio cable Video cable How to connect: Connect the Audio/Video cables between the Audio (L/R)/Video jacks on the unit and camcorder. To playback Camcorder 1. Turn on your LCD TV , press SOURCE button repeatedly to select Video. 2. Turn on your camcorder and set it to output mode. (For details, refer to your camcorder owner's manual.
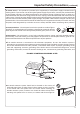
Connections (continued) G B R R W Connect a DVD player G Y R G B R B COMPONENT Yellow (VIDEO) Red (AUDIO R, rP /C r ) Green (Y) Blue (Pb /C b ) Y Pb R W AUDIO Pr L AUDIO R AV OUT R AUDIO L VIDEO S - VIDEO Rear of the DVD player How to connect a DVD Player using Component Video Connections: Connect the Video cable between the Y, Pb, Pr input jacks on the unit and Y, Pb, Pr ( or Y, Cb, Cr) output jacks on the DVD player.
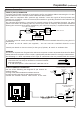
Connections (continued) Connect a PC How to connect: Connect a D-Sub cable between the D-Sub jack on the PC and the D-Sub input jack on the unit. Connect an Audio cable between the AUDIO output on the PC and AUDIO input jack on the unit. To Watch the PC screen 1. Turn on your LCD TV , press SOURCE Sub.
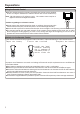
Turning the Unit On and Off Turning the Unit On and Off Turning On Insert the power cord into the wall outlet. Press the Power button on the remote control. The unit will be turned on and you will be ready to use it's Turning Off With the power on, press the Power control to turn off. button on the remote Note: Viewing the MENUs and Displays Your LCD TV has a simple, easy-to-use menu system that appears on the screen.
Memorizing the Channels Your LCD TV can memorize and store all the available channels for both antenna and cable channels. After the available channels are memorized, use CH+/- to scan the channels. Selecting the Signal Source Before your LCD TV can memorize the available channels, you must specify the type of signal source that is connected to the unit. (i.e., an antenna or cable system) Channel 1 Auto Searching Source Cable Channel Skip On Fine Tune AFC On Frequency 55.
Memorizing the Channels (continued) Manual Fine Tuning Channel 1 Auto Searching Source Cable Channel Skip On Fine Tune AFC On Frequency 55.25 MHz 2 3 Move Select Off Off Menu to exit Adding and Erasing Channels 1 2 3 4 Channel Auto Searching Source Cable Channel Skip On Fine Tune AFC On Frequency 55.25 MHz Move Select Off Off Menu to exit When the item is set to on, the selected channel will be erased. When the item is set to off, the selected channel will be added.
Basic Operations Changing Channels Using the Channel Buttons (CH+ or CH-) Press the CH+ or CH- to change channels. When you press the CH+ or CH-, the unit changes channels in sequence. You will see all the channels that the unit has memorized. You will not see channels that were erased. Direct Accessing Channels Press the number buttons to go directly to a channel.
Setting Picture Using the Preset Picture Mode Picture 1 Picture Mode Brightness Contrast Color Tint Sharpness The picture page will be displayed automatically. 2 3 Move Normal 50 75 60 50 12 Select Menu to exit You may also use the P.M button to quickly select picture mode. There are three preset picture modes (Bright, Soft and Normal) and one user-set picture mode (User). Each preset mode has its own picture settings. Bright: Select for a bright picture. Soft: Select for a finely detailed picture.
Adjusting Image in D-Sub mode With working in D-Sub mode, this unit allows you to perform several adjustments for image Adjusting the Picture Automatically Image 1 2 3 Auto Adjustment Image Position Phase Clock Move 30 1328 Select Menu to exit Auto Adjustment 4 Auto Adjustment: Yes 5 The unit automatically adjusts phase, clock or position, etc.
Setting Sound Customizing the Sound Sound 1 2 3 4 5 Bass Treble Balance MTS Move Function Option 14 16 43 Mono Select Range Operation Bass Adjusts Bass (low sounds) VOL+ stronger VOL- weaker 0~31 Treble Adjusts Treble (high sounds). VOL+ stronger VOL- weaker 0~31 Balance Menu to exit Adjusts volume balance (left VOL+Higher volume from right 0~100 speaker. and right volumes). Using the Preset Sound Mode Use the S.M button to quickly select Sound mode.
Other Functions Adjusting Menu Transparency Display 1 2 3 4 5 Language Transparency Back light Factory Reset DCDi Captions CC When Mute Move English Bright Yes On Off Off Off Select Menu to exit Adjusting Back Light Display 1 Language Transparency Back Light Factory Reset DCDi Captions CC When Mute 2 3 Move English Bright Yes On Off Off Off Select Menu to exit Setting DCDi Function Display 1 2 3 Language Transparency Back Light Factory Reset DCDi Captions CC When Mute Move English Bright
Viewing Closed Captions The unit decodes and displays the closed captions that are broadcast with certain TV shows. These captions are usually subtitles for the hearing impaired or foreign language translations. All VCRs record the closed caption signal from television programs, so home-recorded video tapes also provide closed captions. Most prerecorded commercial video tapes provide closed captions as well. Check for the closed Note: The Caption feature does not work with YPbPr, D-Sub.
Parental Controls Parental Controls This function allows TV programs to be restricted and TV usage to be controlled based on FCC data. It prevents children from watching violent or sexual scenes that may be harmful. Restriction of TV programs includes two ratings that contain information about the program: the MPAA rating and the TV Parental Guidelines. The MPAA rating is restricted by age. TV Parental Guidelines are restricted by age and content. [1] Movie Rating (MPAA) Rating G GENERAL AUDIENCES.
Parental Controls (continued) [2] TV Rating Rating content based D L S V FV TV-Y (All children) TV-Y7 (Direct to Older Children) age TV-G (General Audience) based TV-PG (Parental Guidance Suggested) TV-14 (Parents Strongly Content Rating can be set but this Rating is not normally broadcast by TV Station. Content Rating can be set.
Parental Controls (continued) Accessing the Parental Controls Menu Parental Controls 1 Enter Password 2 3 Move Select Menu to exit Parental Controls 4 The default password is 1111, you may change the password 5 Parental Lock Clear All TV Rating Movie Rating CA-FR-Rating CA-EN-Rating Change Password Move On Yes Off None NA E E Select Menu to exit Changing the Password 1 From the Parental Controls menu, press CH+/- repeatedly to select 2 3 4 Change Password New Password Re-Enter Password Mo
Parental Controls (continued) Adjusting the Movie Rating Parental Controls 1 Parental Lock Clear All TV Rating Movie Rating CA-FR-Rating CA-EN-Rating Change Password 2 3 Move 4 5 On Yes Off None NA E E Select Menu to exit Movie Rating When “PG-13” in the age-based rating is blocked, this will automatically block the higher ratings “R”, “NC-17”, “X” also.
Parental Controls (continued) Adjusting Canadian English Rating 1 From the Parental Controls menu, press CH+/- repeatedly to select 2 3 4 CanEng Rating CanEng Rating: E C C8+ G PG 14+ 18+ Move Select Menu to exit CANADIAN ENGLISH RATING CHART E Exempt - Exempt programming includes: news, sports, documentaries and other information programming, talk shows, music videos, and variety programming. C Programming intended for children under age 8.
Troubleshooting Before calling for repair service, check the following items for possible remedies to the Symptoms “Ghost” or double images Check item !This may be caused by obstruction to the antenna due to high rise buildings or hills. Using a highly directional antenna may !Check No power that the AC power cord is plugged into the mains socket. !Unplug the power cord, wait for 60 seconds.
Care and Maintenance LCD Display panel information Important Information Regarding Use of Video Games, Computers, Captions or Other Fixed Image Displays. The extended use of fixed image program material can cause a permanent "shadow image" on the LCD panel. This background image is viewable on normal programs in the form of a stationary fixed image. This type of irreversible LCD panel deterioration can be limited by observing the following steps: A.
Specifications Power supply: AC 110-240V 50/60Hz Power Consumption: 70W (Max.) Dimensions: 24.8 (W) x 6.8 (D) x 18.3(H) (inch) Weight: 24.3 lb Screen: 20” TV system & channel coverage: SYSTEM VHF UHF CATV NTSC-M 2-13 14-69 1-125 Color system: NTSC Speaker: 8W, 8W x 2 Accessories: operating manual X 1 Remote control X 1 Note: Design and specification are subject to change without notice.
PRINTED IN RECYCLED PAPER 604-L20Y187-00 Ver. 1.
Table des matières Informations importantes ................................................................................................1 Importantes précautions de sécurité...............................................................................2 Préparations ...................................................................................................................5 Identification des contrôles .............................................................................................
Information importante ATTENTION : AFIN DE RÉDUIRE LE RISQUE D'INCENDIE OU DE CHOC ÉLECTRIQUE, N'EXPOSEZ PAS CET APPAREIL À LA PLUIE OU À L'HUMIDITÉ. MISE EN GARDE RISQUE DE CHOC ÉLECTRIQUE NE PAS OUVRIR MISE EN GARDE-Afin de réduire les risques de choc électrique, n'effectuez aucune opération d'entretien autre que celles contenues dans les instructions d'utilisation à moins que vous ne possédiez les qualifications requises.
Importantes précautions de sécurité 'énergie électrique peut rendre de nombreux services, mais si elle n'est pas utilisée adéquatement elle peut causer des blessures et des dommages matériels. Ce produit à été conçu et fabriqué avec comme priorité principale la sécurité. Mais UNE UTILISATION INCORRECTE PEUT ENGENDRER DES RISQUES POTENTIELS DE CHOC ÉLECTRIQUE ET D'INCENDIE.
Importantes précautions de sécurité (suite) 12. Pied --- Utilisez uniquement un chariot, support, trépied, fixation ou table recommandés par le fabricant ou vendus avec ce produit. Ne placez pas ce produit sur un chariot, un support, un trépied, une fixation ou une table instable. Placer le produit sur une base instable peut le faire tomber, entraînant des blessures graves ou endommageant le produit. Lors du montage du produit sur un mur, assurez-vous de bien suivre les instructions du fabricant.
Importantes précautions de sécurité (suite) Source d'alimentation --- Ce produit est conçu pour une alimentation fournie par une source d'alimentation telle qu'indiquée sur l'étiquette. Si vous n'êtes pas certain du type d'alimentation électrique de votre maison, consultez votre détaillant d'électroménagers ou la compagnie d'électricité locale.
Préparations Utilisation de la télécommande
Préparation (suite) Connexion de l'antenne CONNEXION DU CÂBLE TÉLÉ (CATV) Un connecteur de câble coaxial de 75 ohms est intégré dans l'appareil pour raccordement facile. Lors du branchement du câble coaxial de 75 ohms à l'appareil, vissez le câble à la borne ANT. Certaines compagnies de télévision par câble offrent des postes payants. Comme les signaux de ces postes sont brouillés, un convertisseur/débrouilleur est en général fourni au souscripteur par la société du câble.
Identification des contrôles Appareil principal Haut-parleur Haut-parleur 1. VOL+/Appuyez sur le bouton VOL+ ou VOL- pour augmenter ou diminuer directement le volume du son ; Dans le MENU OSD, appuyez sur ces boutons pour ajuster la valeur ou les paramètres de chaque élément. 2. ALIMENTATION Appuyez sur ce bouton pour allumer l'appareil (ON) à partir du mode STANDBY (attente). Appuyez de nouveau pour revenir à STANBY. 3.Capteur à distance 4. SOURCE Pour sélectionner la source du signal d'entrée. 5.
Identification des contrôles (suite) Appareil principal 1. Entrée Sub-D / Audio Line in Branchez aux prises de sortie Sub-D/audio de votre ordinateur. 2. Entrées des composants (Y, Pb, Pr, Audio) Branchez aux prises de sortie audio et composants du lecteur DVD ou de l'appareil. 3. Entrée S-Video Recevez un signal S-Video à partir d'une source externe comme un lecteur de magnétoscope ou DVD. 4.
Identification des commandes (suite) Télécommande Pour afficher le statut du poste ou les informations sur les signauxinformation Sélection du mode image Stéréo Allumez ou éteignez l'appareil Couper le son Sélection directe du poste Pour accéder à la page principal MENU ou sortir du menu Pour changer de poste ; À partir du MENU Opération, utilisez CH+/pour sélectionner un élément de menu Pour sélectionner la source du signal d'entrée Sélection du mode image 9 Pour passer rapidement du poste actuel
Connexions Précautions avec la connexion Vérifiez avec soin les bornes pour vous assurer que leur position et leur type sont adéquats avant de faire des connexions. L'illustration de l'équipement externe peut varier selon les modèles. Les connecteurs desserrés peuvent entraîner des problèmes d'image ou de couleur. Assurez-vous que tous les connecteurs sont correctement insérés dans leurs bornes. Consultez le manuel d'utilisation du dispositif externe également.
Connexions (suite) Brancher un caméscope OUT Y W Jaune (vidéo) Blanc (audio L) Rouge (audio R) R AUDIO L R R R IN W Câble Audio Y Câble Video Comment vous brancher : Branchez les câbles audio/vidéo entre les prises audio (G/D)/vidéo de l'appareil et le caméscope. Pour lire le caméscope 1. Allumez votre téléviseur à cristaux liquides, appuyez sur le bouton SOURCE à répétition pour sélectionner un Video. 2. Allumez votre caméscope et réglez-le en mode sortie.
Connexions (suite) G B R R W Brancher un lecteur DVD G Y R G B Jaune (vidéo) Rouge (AUDIO R , Pr /Cr ) Vert (Y) Bleu (Pb /C b ) R B COMPONENT Y Pb R W AUDIO Pr L AUDIO R AV OUT R AUDIO L VIDEO S - VIDEO Arrière du lecteur DVD Comment brancher un lecteur DVD à l'aide des connexions vidéo du composant : Branchez le câble vidéo entre les prises d'entrée Y, Pb, Pr de l'appareil et les prises de sortie Y, Pb, Pr (ou Y, Cb, Cr) du lecteur DVD.
Connexions (suite) Brancher un ordinateur personnel Câble Sub-D Câble audio Comment vous brancher : Branchez un câble Sub-D entre la prise Sub-D de l'ordinateur et la prise d'entrée Sub-D de l'appareil. Branchez un câble audio entre la sortie AUDIO de l'ordinateur et la prise d'entrée AUDIO de l'appareil. Pour afficher l'écran de l'ordinateur 1. Allumez votre téléviseur à cristaux liquides, appuyez sur le bouton SOURCE à répétition pour sélectionner Sub-D. 2.
Mise en marche et arrêt de l'appareil Mise en marche et arrêt de l'appareil Mettre en marche Insérez le cordon d'alimentation dans la prise murale. Appuyez sur le bouton Power de la télécommande. L'appareil s'allumera et vous serez prêt à utiliser ses fonctions. Arrêter Avec l'appareil allumé, appuyez sur le bouton Power (alimentation) de la télécommande pour éteindre l'appareil. Remarque : Vous pouvez utiliser le bouton Power du panneau de commande de l'appareil principal.
Mémorisation des canaux Votre téléviseur à cristaux liquides peut mémoriser et entreposer tous les postes disponibles de canaux par câble et par antenne. Une fois les postes disponibles mémorisés, utilisez CH+/- pour faire un balayage des canaux. Sélection de la source de signal Avant que votre téléviseur à cristaux liquides puisse mettre en mémoire les postes disponibles, vous devez spécifier le type de source de signal relié à l'appareil.
Mémorisation des canaux (suite) Syntonisation manuelle de précision Channel 1 Répétez les étapes 1 à 3 (en sélectionnant la source de signal) pour obtenir l'accès à la page Channel (poste). 2 Appuyez à répétition sur CH+/- pour sélectionner l'élément Fine Tune (syntonisation de précision). 3 Appuyez sur ENTER ou VOL+/- pour syntoniser avec précision la meilleure image et le meilleur son possibles. Auto Searching Source Cable Channel Skip On Fine Tune AFC On Frequency 55.
Fonctionnement de base Changer de poste Avec les boutons de poste (CH+ ou CH-). Appuyez sur les boutons CH+ ou CH- pour changer de poste. Lorsque vous appuyez sur CH+ ou CH- les postes changent en séquence. Vous verrez tous les postes qui ont été mémorisés par l'appareil. Vous ne verrez aucun des postes qui ont été effacés. Accès direct aux postes Appuyez sur les chiffres pour aller directement à un poste.
Réglage de l'image Utilisation du mode de pré réglage de l'image Picture 1 Appuyez à répétition sur MENU pour afficher le menu de la page principale. La page image s'affichera automatiquement. 2 Appuyez sur ENTER ou VOL+/- pour obtenir l'accès à l'image. L'élément Picture Mode est automatiquement mis en surbrillance. 3 Picture Mode Brightness Contrast Color Tint Sharpness Normal 55 76 75 50 60 49 12 Move Select Menu to exit Appuyez sur ENTER ou VOL+/- pour sélectionner le mode d'image désiré.
Adjusting Image in D-Sub mode Lorsque vous êtes en mode Sub-D, cet appareil vous permet d'effectuer de nombreux ajustement d'image. Réglage automatique de l'image 1 2 3 4 5 Image Appuyez à répétition sur MENU pour afficher le menu de la page principale. Appuyez à répétition sur CH+/- pour sélectionner la page Image. Appuyez sur ENTER ou VOL+/- pour obtenir l'accès à la page Image. L'élément Auto Adjustment (ajustement automatique) se mettra automatiquement en surbrillance.
Réglage du son Personnalisation du son 1 2 3 4 5 Sound Appuyez sur MENU pour afficher le menu de la page principale. Appuyez à répétition sur CH+/- pour sélectionner la page Sound (son). Bass Treble Balance MTS 14 16 43 Mono Appuyez sur ENTER ou VOL+/- pour obtenir l'accès au sous-menu. Appuyez à répétition sur CH+/- pour sélectionner l'élément Bass, Treble ou Balance (bass, aigu ou balance). Move Select Menu to exit Appuyez sur VOL+/- pour ajuster la valeur de l'élément.
Autres fonctions Display Réglage du menu Transparency (transparence) 1 2 3 4 5 Appuyez sur MENU pour afficher le menu de la page principale. Appuyez à répétition sur CH+/- pour sélectionner la page Display (écran). Appuyez sur ENTER ou VOL+/- pour obtenir l'accès au sous-menu. Language Transparency Back light Factory Reset DCDi Captions CC When Mute Move English Bright Yes On Off Off Off Select Menu to exit Appuyez sur CH+/- pour sélectionner l'élément Transparency (transparence).
Visionnement du sous-titrage L'appareil décode et affiche le sous-titrage qui est diffusé avec certaines émissions télé. Ces sous-titres s'adressent en général aux malentendants ou aux traductions en langue étrangère. Tous les magnétoscopes enregistrent le signal de sous-titrage des émissions de télé, les cassettes enregistrées à la maison affichent par conséquent les sous-titres. La plupart des cassettes vidéo commerciales pré-enregistrées offrent des sous-titrages également.
Contrôle parental Contrôle parental Cette fonction permet de restreindre les émissions de télé et l'utilisation du téléviseur contrôlée grâce à une donnée FCC. Elle empêche les enfants de regarder des scènes violentes ou sexuelles qui pourraient leur être nuisibles. La restriction sur les programmes télé comprend deux classifications qui contiennent des informations sur le programme : la classification MPAA et les directives télé parentales. La classification MPAA est restreinte par âge.
Contrôle parental (suite) Classification télé [2] Classification basée sur le contenu D L S V FV TV-Y (tous) TV-Y7 (enfants plus âgés) basée sur l'âge TV-G (auditoire général) TV-PG (surveillance parentale suggérée) TV-14 (surveillance parentale fortement suggérée) TV-MA (auditoire adulte uniquement) La classification par contenu peut être programmée mais elle n'est pas généralement télédiffusée par les postes de télé. La classification par contenu peut être réglée.
Contrôle parental (suite) Acces au menu de contrôle parental Parental Controls 1 Appuyez à répétition sur MENU pour afficher le menu de la page principale. 2 Appuyez à répétition sur CH+/- pour affichere la page Parental Controls (contrôle parental). 3 Appuyez sur ENTER ou VOL+/- pour obtenir l'accès à la page Password checking (vérification du mot de passe). 4 Entrez le mot de passe approprié à l'aide des chiffres de 0 à 9. Le mot de passe par défaut est 1111, vous pouvez le modifier vous-même.
Contrôle parental (suite) Réglage de la classification de film 1 2 3 4 5 Parental Controls Répétez les étapes 1 à 5 (accès au menu Parental Controls) Appuyez sur CH+/- pour sélectionner l'élément Movie Rating (classification de films). Appuyez sur ENTER ou VOL+/- pour afficher la page Movie Rating (classification de film). Appuyez sur CH+/- pour sélectionner une classification de film à être configurée. Appuyez sur ENTER ou VOL+/- pour confirmer le blocage et sur MENU pour revenir.
Contrôle parental (suite) Réglage de la classification canadienne anglaise 1 À partir du menu Parental Controls, appuyez sur CH+/- à répétition pour sélectionner l'élément CA-EN Rating (classification canadienne anglaise). Appuyez sur ENTER ou VOL+/- pour obtenir l'accès à la page CanEng 2 Rating. 3 Appuyez sur CH+/- pour sélectionner une classification à être configurée. Appuyez sur ENTER ou VOL+/- pour confirmer le blocage et sur MENU pour 4 revenir.
Soin et entretien Informations sur le panneau à cristaux liquides de l'écran Importantes informations relatives à l'utilisation de jeux vidéo, d'ordinateurs, de sous-titres ou d'autres afficheurs d'images fixes. L'utilisation prolongée de programme d'image fixe peut causer une "image fantôme" permanente sur le panneau à cristaux liquides. Cette image d'arrière-plan est visible sur les programmes normaux sous la forme d'une image stationnaire fixe.
Spécifications Alimentation: AC 110-240V 50/60Hz Consommation électrique : 70W (Max.) Dimensions : 24.8 (Lar) x 6.8 (Prof) x 18.3(Haut) (pouces) Poids : 24.3 lbs Écran : 20 Système télé et couverture des canaux : SYSTÈME VHF UHF CATV NTSC-M 2-13 14-69 1-125 Système couleur : NTSC Haut-parleur : 8W, 8 ohm x 2 Accessoires: manuel de l’utilisateur X 1 Télécommande X 1 Remarque : le design et les spécifications sont sujets à modifications sans préavis.