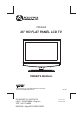
FPE2608 26” HD FLAT PANEL LCD TV OWNER'S MANUAL FOR ASSISTANCE CALL CUSTOMER SERVICE AT 1-800-645-4994 OR VISIT US AT WWW. AUDIOVOX.
SAFETY PRECAUTIONS PLACEMENT INFORMATION • Do not use this unit in places which are extremely hot, cold, dusty or humid. • Do not restrict the air flow of this unit by placing it somewhere with poor air flow, by covering it with a cloth, by placing it on bedding or carpeting. WARNING : TO REDUCE THE RISK OF ELECTRIC SHOCK, DO NOT REMOVE COVER (OR BACK). NO USERSERVICEABLE PARTS INSIDE. REFER SERVICING TO QUALIFIED SERVICE PERSONNEL.
IMPORTANT SAFETY INSTRUCTIONS 1) 2) 3) 4) 5) 6) 7) Read these instructions. Keep these instructions. Heed all warnings. Follow all instructions. Do not use this apparatus near water. Clean only with a dry cloth. Do not block any ventilation openings. Install in accordance with the manufacturer’s instructions. 8) Do not install near any heat sources such as radiators, heat registers, stoves, or other apparatus (Including amplifiers) that produce heat.
CONTENTS SAFETY PRECAUTIONS .................................................................................................................... 1 IMPORTANT SAFETY INSTRUCTIONS ........................................................................................... 2 CONTENTS ......................................................................................................................................... 3 ACCESSORIES ................................................................................
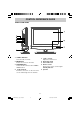
ACCESSORIES Please check and identify the supplied accessories. Remote Control (with batteries) ................................................................................................. x 1 GETTING STARTED USING THE REMOTE CONTROL • Point the remote control at the remote sensor located on the unit. • When there is a strong ambient light source, the performance of the infrared remote sensor may be degraded, causing unreliable operation.
CONTROL REFERENCE GUIDE REMOTE CONTROL 1. STANDBY / ON button Press to turn ON the unit or put it in STANDBY (OFF) mode. 2. TV button Press to switch to TV mode. AV button Press to switch to source connected to AV 1 / AV 2 (composite) inputs. HD button Press to switch to source connected to YUV (component) inputs and HDMI 1 / HDMI 2 inputs. DISPLAY button Press to change disc status information displayed on the screen. 3. Number (0 - 9) buttons 4. • [dot] button Use to enter digital sub-channels. (i.e.
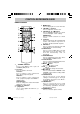
CONTROL REFERENCE GUIDE FRONT & SIDE VIEWS 1. STD.BY / ON button Turns the unit on and off. 2. MENU button Enters the on-screen TV menu. 3. FUNCTION button Selects TV / AV 1 / AV 2 / YUV in / HDMI 1 / HDMI 2 / PC in. 4. CH buttons Confirms selections on the TV menu screen and changes the TV channels. 5. - VOL + controls Adjusts the volume level. 6. Removable stand 7. Color LCD screen 8. Remote sensor Receives the remote control signal. Standby indicator 9. Speaker E-6 FPE2608_ib_eng_1-13.
CONTROL REFERENCE GUIDE REAR VIEW 12 10 13 11 18 20 21 19 20 22 12 14 13 15 21 23 14 16 22 24 15 17 18 16 25 23 19 17 10. AUDIO IN (Left/Right) jacks (AV IN 2) 11. VIDEO IN jack (AV IN 2) 12. VIDEO IN jack (AV IN 1) 13. Headphones jack 14. TV ANTENNA terminal 15. AUDIO IN (Left / Right) jacks (AV IN 1) 16. S-VIDEO IN jack (AV IN 1) 17. AUDIO IN (Left / Right) jacks (YUV IN) 18. VIDEO / AUDIO OUT (Left / Right) jacks (AV OUT) 19. PC IN MONITOR / VGA jack 20. AC Power Cord 21.
CONNECTIONS CONNECTING A TV ANTENNA / CABLE / SATELLITE To view television channels correctly, a signal must be received from one of the following sources: - An indoor or outdoor aerial antenna - A cable system - A satellite system Connecting a Digital Antenna The tuner in this TV receives ATSC TV signals from an antenna. This digital TV can receive standard (SDTV) and high definition (HDTV) over the air broadcasts.
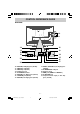
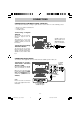
CONNECTIONS CONNECTING DEVICES WITH A COMPOSITE (YELLOW RCA-TYPE) VIDEO OUTPUT To connect A/V devices such as a VCR, video game system or camcorder: Connecting to a VCR / Video Game System / Camcorder Connect the AUDIO / VIDEO cable (not included) as shown: Make sure you connect the cable from the other equipment (AUDIO and VIDEO OUT) to this unit AV IN 1 (AUDIO and VIDEO IN) or AV IN 2 (AUDIO and VIDEO IN).
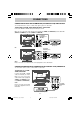
CONNECTIONS CONNECTING A HIGH-DEFINITION (HD) SOURCE High-Definition (HD) Devices with component video output must be connected to the YUV input. Connect the component video cable and audio cable (not included) as shown. Make sure you connect the component video cable and audio cable from the other equipment (COMPONENT VIDEO OUT and AUDIO OUT) to this unit (COMPONENT VIDEO IN and AUDIO IN - YUV IN). To AUDIO IN jacks (YUV IN) * May require a subscription for receiving HD channels.
CONNECTIONS CONNECTING HDMI HDMI (High Definition Multimedia Interface) supports both video and audio on a single digital connection for use with DVD players, DTV, set-top boxes and other digital AV devices. HDMI was developed to provide the technologies of High Bandwidth Digital Content Protection (HDCP) as well as Digital Visual Interface (DVI) in one specification. HDCP is used to protect digital content transmitted and received by DVI-compliant or HDMI-compliant displays.
CONNECTIONS CONNECTING THE AC POWER CORD • Connect the AC power cord into a wall outlet. • Press the STD. BY / ON button on the left side of the unit or use the remote control to turn on the unit. NOTES • TO PREVENT ELECTRIC SHOCK, MATCH WIDE BLADE OF PLUG TO WIDE SLOT OF WALL OUTLET, THEN FULLY INSERT. • When the AC power cord is plugged in, the unit is not completely disconnected from the main power, even when the power is turned off.
INSTALLATION REMOVING THE BASE STAND WARNING: The LCD display is very fragile, and must be protected at all times when removing the base stand. Be sure that no hard or sharp objects, or anything that could scratch or damage the LCD display, come in contact with it. Do NOT place pressure on the rear of the unit at anytime because the screen could crack. 1. Disconnect any cables or cords connected to the unit. 2.
TV SETUP VIDEO MENU 1. Press the MENU button. 2. Press the ENTER or button to select Video. or button to select the options (Picture Mode, Brightness, Contrast, Saturation, 3. Use the Tint, Sharpness or Color Temperature). Adjust them using the or button (The screen will button to go into the detailed settings. change to your desired setting); or press the ENTER or 4. Press the EXIT button to return to the previous menu. 5. Repeat steps 3 and 4 to adjust other options. 6.
TV SETUP AUDIO MENU 1. Press the MENU button. or button to select Audio, then press the ENTER or button to go into the Audio 2. Use the settings. 3. Use the or button to select the options (Balance, Bass, Treble, Virtual Surround, Reverb or Sound mode). Adjust them using the or button (The screen will change to your desired setting); or press the ENTER or button to go into the detailed settings. 4. Press the EXIT button to return to the previous menu. 5. Repeat steps 3 and 4 to adjust other options. 6.
TV SETUP TV MENU (For TV Mode Only) 1. Press the MENU button. 2. Use the or button to select TV. Press the ENTER or button to go into the TV settings. 3. Use the or button to select the options (Tuner Mode, Auto Scan, Auto Scan Add CH, Channel Skip, MTS or Audio Language). Adjust them using the or button (The screen will change to your desired setting); or press the ENTER or button to go into the detailed settings. 4. Press the EXIT button to return to the previous menu. 5.
TV SETUP SETUP MENU 1. Press the MENU button. 2. Use the or button to select Setup. Press the ENTER or button to go into the Setup settings. 3. Use the or button to select the options (OSD Language, Time Setup, Caption or Restore setting). Adjust them using the or button (The screen will change to your desired setting); or press the ENTER or button to go into the detailed settings. 4. Press the EXIT button to return to the previous menu. 5. Repeat steps 3 and 4 to adjust other options. 6.
TV SETUP Caption Setting Video Audio Analog Closed Caption Off Digital Closed Caption Off Video Audio Digital Caption Style TV TV Setup Setup Parental Parental Caption ENTER Enter Select EXIT Return Caption Style As Broadcaster Font Size Small Font Style Style 1 Font Color Green Font Opacity Solid Background Color Black Background Opacity Translucent Window Color White Window Opacity Transparent Digital Caption Style Select EXIT Return Analog Closed Caption : Select the a
TV SETUP Parental Control Setting 1. Use the or button to select various Parental settings. Press the ENTER or button to go into the detailed settings. 2. Use the , , and buttons to move among the rating levels. Press the ENTER button to change the mode between Blocked and Allowed. 3. Press the EXIT button to return to the previous menu. 4. Repeat steps 1 - 3 to adjust other options. 5. To exit the MAIN MENU and return to the normal screen, press the EXIT button repeatedly.
TROUBLESHOOTING GUIDE SYMPTOM No power. The remote does not function. TV Bad Picture (snow, multiple images, distortion, blurry) Black and white picture. No picture or sound. Colored patches of picture. No sound is output from the HDMI out CAUSE (AND REMEDY) • • • • • • Check that the AC power cord is connected. The unit is not turned on. Remove any obstacles between the remote and the unit. Use the remote near the unit. Point the remote at the remote sensor on the unit.
Unit : INCH 26 1/4 22 5/8 19 3/4 8 1/4 18 3/4 5 1/8 7 7/8 8 5/8 3 7/8 E - 21 FPE2608_ib_eng_14-21.