IPD-2HP OWNERS MANUAL
Congratulations on your purchase of the IPD-2HP Rear Seat Entertainment Mount. Please read the instruction manual for this product before using it. The documentation provided will alow you to enjoy all the features this product has to offer. Please save this manual for future reference. The IPD-2HP Rear Seat Entertainment Mount is Made for iPad®.
What’s In the Box? www.audiovoxproducts.
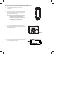
Front 1 2 13 3 Back 12 11 4 5 6 7 10 9 8 4
1. 2. 3. 4. 5. 6. 7. 8. 9. 10. 11. 12. 13. Finger Push Out Window To push out the iPad from the Protective Case. 30 Pin Connector IR Transmitter Used to broadcast audio signals to the wireless IR headphones (not included). Volume -/Volume + Buttons Power On/Off Button To turn the iPad on or off. Camera Lens Window Mounting Arm Attaches and locks the Protective Case to the Universal Seatback Dock. DC 12V Charging Port Power in jack for 12 V/1.5 A power adapter.
To insert your iPad into the Protective Case: 1. Make sure the Locking Key is in the closed (pushed in) position so that it is flush within the case. Press 2. Slide your iPad into the Protective Case. Match the iPad charging connector with the Protective Case’s 30 Pin Connector position and gently pull the Locking Key out while sliding the iPad into the case. 3. Push your iPad down into the Protective Case. 4.
To remove your iPad from the Protective Case: 1. Hold the iPad and Protective Case vertically. 2. Pull the Locking Key gently while holding the Protective Case in a vertical position. The iPad will slide down. Note: Please do not pull the Open Key too hard when removing your iPad from the Protective Case to prevent damaging the locking parts. Pull 3. Use your index finger to push your iPad out of the Protective Case using the Finger Push Out Window. Push 4.
To install the Universal Seatback Dock on the Headrest: The Universal Seatback Dock can be installed on either the driver or passenger seat. 1. Adjust the headrest position. DC 12V Charging Port 2. Plug one end of the Vehicle DC Power Adapter into the DC 12V Charging Port on the bottom of the Universal Seatback Dock. 3. Turn Screws (A) counterclockwise and remove the Screws to disassemble the Universal Seatback Dock. 4. Clamp the Front Bracket (B) and Rear Bracket (C) around the headrest posts.
To attach the Protective Case to the Universal Seatback Dock: The Mounting Arm has six depth settings to allow for proper fitting to the seat depending on the size of the headrest. Warning! Always make sure the Red Switch is in the UNLOCK position when inserting or removing the Mounting Arm, otherwise damage will occur to both units. 1. Hold the Red Switch in the UNLOCK position. 2. While holding the Red Switch in the UNLOCK position, insert the Mounting Arm into the slot in the Rear Bracket. 3.
To charge your iPad in your car or at home: In car charging: Plug one end of the Vehicle DC Power Adapter into the DC 12V Charging Port on the bottom of the Universal Seatback Dock, then plug the other end into the Vehicle DC Accessory Socket of your car. At home charging: Plug one end of the Home AC/DC Power Adapter (Part Number IPD-HPS, not included) into the DC 12V Charging Port on the back of the Protective Case, then plug the other end into an electrical outlet.
To Use the IR Transmitter: The IPD-2HP Rear Seat Entertainment Mount has a built-in two channel infrared audio transmitter for use with wireless Infrared Headphones (sold separately). IR Transmitter (The IR Transmitter will turn on after the power is connected.) Infrared Headphone (sold separately) 1. 2. Connect the power supply to the Universal Seatback Dock. Select CH A or CH B. The channel selected must match the channel of the Infrared Headphone (sold separately) that you are using.
Troubleshooting Problem Cause Solution The Protective Case does not fit into the Mounting Arm. • Red Switch is not unlocked when you are inserting the Protective Case into the Universal Seatback Dock. • Universal Seatback Dock is upside down. • Hold Red Switch in UNLOCK position. The iPad can not be charged. • Power supply is not properly connected. • Use the Vehicle DC Power Adapter for in-car application, use the Home AC/DC Power Adapter at home. The IR Transmitter does not work.
12 MONTH LIMITED WARRANTY Applies to Audiovox Mobile Video Products AUDIOVOX ELECTRONICS CORP. (the Company) warrants to the original retail purchaser of this product that should this product or any part thereof, under normal use and conditions, be proven defective in material or workmanship within 12 months from the date of original purchase, such defect(s) will be repaired or replaced with reconditioned product (at the Company’s option) without charge for parts and repair labor.
www.audiovoxproducts.