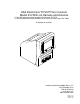
ASA Electronics TV/VCP Floor Console Model K-9 With out Harness and Antenna 12 Volt DC powered remote controlled 9” television AVT-975 12 Volt DC powered remote controlled VHS Video Cassette Player AVP-7000 Installation Instructions Audiovox Specialized Applications, LLC 23319 Cooper Drive Elkhart IN 46514 1 (219) 264-3135 www.audiovox.com Page 1 of 10 P/N 8007132 REV.
This manual contains specific instructions on how to install this automotive TV/VCP floor console. Please read this manual thoroughly before installing the console into the vehicle. **WARNING** In order to maintain a safe mounting system, this console MUST be secured to the floor of the vehicle according to the instructions contained in this manual. Failure to do so may result in the console breaking loose in the event of an accident.
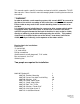
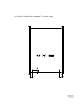
There are six (6) steps to install the K-9 TV/VCP floor console: Step # 1 Step # 2 Step # 3 Step # 4 Step # 5 Step # 6 Remove face of the console Install brackets and the straps Install console to the floor of the vehicle Install VCP Install TV Replace console face STEP #1 REMOVE THE FACE OF THE CONSOLE ⇒ Remove 4 Phillips screws securing face of console to body of console. ⇒ Set screws and face aside. Take care that screws do not get lost. 1) Disassemble shroud. P/N 8007132 Page 3 of 10 Rev.
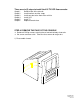
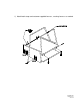
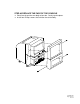
Step #2 Install brackets and straps 1) Mount brackets using four screws. Do not use center hole. 2) Use soldering iron, if necessary, to melt holes in open strap, as shown. 3) Use soldering iron, if necessary, to melt holes in closed strap, as shown. P/N 8007132 Page 4 of 10 Rev.
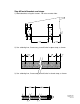
3) Pre-drill 1/8” pilot holes on bottom TV shelf for strap. P/N 8007132 Page 5 of 10 Rev.
1) Attach both straps and customer-supplied harness, securing harness as needed. P/N 8007132 Page 6 of 10 Rev.
Step #3 INSTALL CONSOLE TO FLOOR OF VEHICLE ⇒ BEFORE DRILLING ANY HOLES VERIFY THAT DRILL BIT WILL NOT ENTER INTO FRAME RAIL(S) OF VEHICLE, ELECTRICAL WIRES, FUEL LINES, BRAKE LINES, HOSES, EXHAUST SYSTEMS OR ANY OTHER ITEMS THAT WILL IMPAIR OPERATION OF VEHICLE. THE BOLTS OF THE FLOOR CONSOLE MUST SECURE TO FLOOR PANEL OF VEHICLE. CLIMB UNDER VEHICLE AND LOOK TO VERIFY THAT HOLES WILL BE IN PROPER LOCATIONS. ⇒ Set console on floor of vehicle and mark where holes are to be drilled.
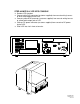
STEP #4 INSTALL VCP INTO CONSOLE ⇒ Remove VCP from box. ⇒ Connect white RCA connector (customer supplied) from console wiring harness to white audio output jack of VCP. ⇒ Connect yellow RCA connector (customer supplied) from console wiring harness to yellow audio output jack of VCP. ⇒ Connect DC power connector (customer supplied) from console to DC power jack of VCP. ⇒ Slide VCP into slot in front of console. P/N 8007132 Page 8 of 10 Rev.
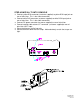
STEP #5 INSTALL TV INTO CONSOLE ⇒ Connect yellow RCA connector (customer supplied) to yellow RCA input jack on rear of television. This is the video connection. ⇒ Connect white RCA connector (customer supplied) to white RCA input jack on rear of television. This is the audio connection. ⇒ Connect DC power connector (customer supplied) to rear of television. ⇒ Connect coaxial cable antenna “F” connector (customer supplied)to rear of television “ANT” input. ⇒ Place television on shelf of console.
STEP #6 REPLACE THE FACE OF THE CONSOLE ⇒ Place face of console over body of console. Gently tap into place. ⇒ Install four Phillips screws that hold the face to the body. P/N 8007132 Page 10 of 10 Rev.