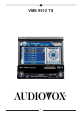
VME 9512 TS 52
D Wir gratulieren Ihnen! Durch Ihre kluge Wahl sind Sie Besitzer eines AUDIOVOX Mobile Video-Produktes geworden. AUDIOVOX Mobile Video-Produkte erfreuen sich aufgrund der hohen Qualität eines ausgezeichneten Rufes weltweit. Dieser hohe Qualitätsstandard ermöglicht es für AUDIOVOX Mobile Video-Produkte 2 Jahre Garantie zu gewähren. Die Produkte werden während des gesamten Fertigungsvorganges laufend kontrolliert und geprüft. Im Servicefall beachten Sie bitte folgendes: 1.
GARANTIEKARTE WARRANTY CARD Typ/ Type Serien-Nr./Serial-No.
Audiovox Audio Produkte GmbH Lise-Meitner-Str. 9 • D-50259 Pulheim • Germany Tel. ++49 (0) 2234 807-0 • Fax++49 (0) 2234 807-399 www.audiovox-germany.
Thank you for choosing a Audiovox product. We hope you will find the instructions in this owner’s manual clear and easy to follow. If you take a few minutes to look through it, you’ll learn how to use all the features of your new Audiovox VME 9512 TS Mobile Multimedia Receiver for maximum enjoyment.
PREPARATION Congratulations on your purchase of the Audiovox VME 9512 TS Mobile Multimedia Receiver. It’s a good idea to read all of the instructions before beginning the installation. We recommend having your Audiovox VME 9512 TS installed by a reputable installation shop.
General • Bluetooth - Bluetooth hands-free profile for safety / convenience and A2DP profile for streaming music from a PDA / PMP and Mobilphone • Navigation Ready (Nav101and NAV1352 TS) • 38-Key Infrared Remote Control with 5-way Joystick • One Composite Video Outputs for Additional Screens • Compatible with LCM 972 TS Rear Seat Monitor with Touch Screen Interface • One Audio / Video Auxiliary Input • 200-Ohm Preamp Line Output - All Audio Channels • 4VRMS Line Output - All Channels • Rotary Encoder Audio
NOTE: If the VME 9512 TS is to be installed in a car equipped with an on-board drive or navigation computer, do not disconnect the battery cable. If the cable is disconnected, the computer memory may be lost. Under these conditions, use extra caution during installation to avoid causing a short circuit. WARNING! Only connect the unit to a12-volt power supply with proper grounding. WARNING! Never install this unit where operation and viewing could interfere with safe driving conditions.
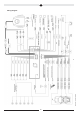
Subject to technical changes Wiring Diagram 57
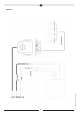
Subject to technical changes Medialink 58
INSTALLATION Pre-installation 1. Press the metal levers on both sides to remove the halfsleeve from the radio. 2. Install the half-sleeve. a. Install adapter if necessary (optional). b. Install half-sleeve into adapter or dashboard (use only the supplied screws). Do not force the sleeve into the opening or cause it to bend or bow. c. Locate the series of bend-tabs along the top, bottom and sides of the mounting sleeve.
NOTE: For proper operation of the CD/DVD player, the chassis must be mounted within 20° of horizontal. Make sure the unit is mounted within this limitation. 4. Attach one end of the perforated support strap (supplied) to the screw stud on the rear of the chassis using the hex nut provided. Fasten the other end of the perforated strap to a secure part of the dashboard either above or below the radio using the screw and hex nut provided. Bend the strap to position it as necessary.
Important! ANTI-THEFT FEATURE The VME 9512 TS is equipped with an anti-theft feature requiring the user to enter a password upon initial power on. The default user password is 012345 (6 digits). To change the anti-theft and RATINGS protection password, perform the following steps: 1. Press the SETUP button (31) on the remote control or touch the button on the screen to enter the “SETUP” menu. 2. Touch RATING to view the “RATING” sub-menu. The small "lock" icon will be “unlocked”.
CONTROLS AND INDICATORS Button Operation 1. OPEN/CLOSE Press to activate the automatic mechanical system and move the TFT monitor into viewing position. Press again to close the TFT. 2. DISP With the TFT monitor open, press to cycle through information available on the TFT screen. With the TFT monitor closed, press and hold to view the clock. In DVD Mode, press to view the top and bottom information bars. Press again to turn “Display Off”. 3.
13.Pause/Play/Enter Press to pause or resume playback or to confirm current selection. 14. (right joystick) DVD/Disc Mode: Press once to enter the next chapter or track. TUNER Mode: Press once to auto-search the next available radio station. MENU Mode: Press once to move the cursor to the right. 15. (up joystick )DVD/Disc Mode: Press once for fast forward/fast reverse. TUNER Mode: Press to go up one frequency step. MENU Mode: Press once to move the cursor up. 16. ( ) Press once for disc insertion/ejection.
REMOTE CONTROL The VME 9512 TS Remote controls both the front and rear zones. To switch from front to rear zone, move the F/R switch (32) located on the right side of the controller. Subject to technical changes NOTE: Your remote control may differ slightly from the one pictured here. The above diagram is for illustrative purposes only.
65 Subject to technical changes
66 Subject to technical changes
USING THE TFT MONITOR Open/Close TFT Monitor Open TFT Monitor Press the OPEN button (1) on the front panel or press the ( nism that moves the display panel into the viewing position. ) button (25) on the remote control to activate the mecha Close TFT Monitor Press the OPEN button (1) on the front panel or press the ( panel back into the compartment.
Aspect Ratio Press the WIDE button (28) on the remote control or WIDE button (22) on the monitor to adjust the aspect ratio as follows (only active with video source): CINEMA The entire screen is extended horizontally to the aspect ratio of 16 to 9. The extension ratio is the same at any point. NORMAL The conventional display image has a 4 to 3 ratio of horizontal to vertical, leaving a blank area on the right and left sides of the display. STANDBY Screen becomes black. Touch screen to resume.
Monitor Movement Mechanism If an obstruction occurs in the monitor path, the following protective measurements can be executed to prevent damage to the mechanism or monitor: After the protective procedure is executed, normal operation is resumed by pressing the OPEN button (1) or disconnecting and reconnecting the power. OPERATING INSTRUCTIONS Power On / Off Press the /SRC button (6) on the unit (or the / POWER button (4) on the remote control) to turn the unit on.
Playing Source Selection Press the SRC button on the front panel (6) or remote control (8) to change between available playing sources in the following order: RADIO, DVB-T, DISC, NAV, BT, iPod, SD, USB, AUX and CAMERA. The playing mode is displayed on the TFT and LCD screens. Auxiliary Devices External peripheral devices can be connected to this unit via RCA output or MediaLink4. Select “AUX” mode to access and control connected auxiliary devices.
Proper setting of the Fader and Balance complement the effects of the cabin equalizer. The Audio menu will automatically exit after a few seconds of inactivity. To exit quickly, touch the top left corner of the screen or press and hold the AUDIO button (5). Alternate Display Options A menu located on the left side of the screen provides immediate access to the Equalizer, Rear Zone screen view and PIP (Picture in Picture) features. • EQ: Touch to view Spectrum Analyzer > Equalizer.
Changing the Rear Zone Source To access the SOURCE MENU, touch the TFT screen in the top left corner of the screen. This menu allows you to select a source for the front or rear zone. Touch FRONT or REAR to choose the zone for which you would like to specify the source. Controlling the Rear Zone Screen(s) If you have a rear touch screen installed, you can touch the screen to control most rear zone functions. You can also use the remote control. The VME 9512 TS remote controls both the front and rear zones.
Accessing Menu Items Touch the sub-menu name or use the joystick to select a submenu (Language, Audio, RDS, etc.). The features available for adjustment under the highlighted sub-menu option will appear in the center of the screen. Adjusting a Feature 1. Use the touchscreen or press the or buttons on the joystick to select the feature to be adjusted. 2. Enter the option field for the feature you want to adjust by using the touchscreen or pressing the ENTER (joystick) button.
Speaker Sub-menu Features • Choose 4 CH, 4.1 CH or 5.1 CH depending on the speaker configuration in your vehicle. • Use the Test Tone feature to verify speaker settings. Make changes using the EQ/FAD-BAL menu, accessed by pressing and holding the AUDIO button (volume control). • Subwoofer Phase Adjustment: Touch the sub.w icon to access the subwoofer polarity controls and reverse the subwoofer signal polarity from 0° to 180°. Reversing polarity can improve bass response related to speaker configuration.
Rating Sub-menu Features The DVD system has a built-in parental lock feature to prevent unauthorized persons from viewing restricted disc content. By default, the rating system is set at the highest setting (with no restrictions). The parental lock is released only by entering the correct password. Once the password is entered, rating is available for setup. To reset the password, access the “RATING” menu and enter the current password.
If the monitor is in display mode, the monitor automatically switches to CAMERA mode upon reverse driving. When the reverse driving stops, the monitor return to its original input mode. P.VOL Sub-menu Features Subject to technical changes TS Cal (Screen Calibration) To access the “Screen Calibration” function from the SETUP menu, select the “TS CAL” option. After entering calibration mode, a crosshair appears in a corner quadrant of the screen.
18. MEM: View screen used to enter current channel into preset memory 19. 1/2 or 2/2: Touch this page button to view a second page of on-screen buttons 20. Touch to view the SETUP menu 21. PS (Preview Scan): Touch to scan all stations available, stopping for 5 seconds at each and continuing until a station is selected 22. LOC: Touch to tune to strong local stations 23. PTY: When PTY is pressed, the Program Type categories are listed, allowing listeners to find similar programming by genre.
Switch to Radio Tuner source • Touch the top left corner of the screen (the RADIO circle) to view the SOURCE MENU. Touch “RADIO”. • Press the SRC button (6) on the front panel or remote control (8) to switch to the AM/FM or RADIO source. Select FM/AM Band Touch the BAND button (15) on the screen, or press the BAND button on the unit (4) or remote control (20) to change between the following bands: FM1, FM2, FM3, AM1, and AM2. NOTE: The BAND button on the unit only works when the TFT is closed.
Recalling and Storing broadcaster using the presets and the Automatic Storing ( AS) Function: Recalling a Station 1. Select a band (if needed) 2. Touch an on-screen button (P1- P6) to select the corresponding stored station. Manual Storing of a Station 1. Please manual tune to the desired broadcaster (Frequency) 2. Push the MEM on-screen button and then select the desired preset (P1- P6) 3. The broadcaster will be stored at the selected one 4. Instead of the frequency the Program Service ID (i.e.
DVB-T 999 connected at the VME Monceiver using the BUS connection and controlling via the TS Monitor of the VME headunit. Adjustments at the Setup page Using of the on Screen buttons 1 To change the Source please use the SRC/Wide NAV button on the front of the VME head unit or at the remote control. 7 2 3 4 5 6 1. 2. 3. 4. 5. 6. 7.
DVD/VCD VIDEO OPERATION NOTE: When properly installed, DVD video cannot be displayed on the main TFT screen unless the parking brake is applied. If you attempt to play a DVD while the vehicle is moving, the TFT screen displays “PARKING” with a blue background. Rear video screens, if applicable, will operate normally. Opening/Closing the TFT Video Screen Opening the TFT Screen To open the TFT video screen, press the OPEN button (1). The unit beeps and then opens.
Fast Forward Playback Press the /\ button on the joystick or the >> button on the screen to fast forward. Keep pressing and releasing the button to increase the rate from “2X” to “4X”, “6X”, and “8X”. Press the joystick enter button (18) on the remote control or touch the play button (>) to resume normal playback. Fast Reverse Playback Press the \/ joystick button or touch the << button on the screen to play the current title in fast reverse.
Direct Chapter / Track Selection Remote Control Direct Entry During DVD, VCD and CD playback, you can use the numeric keypad on the remote control (29) to access a track directly. Touch Screen Direct Entry To select a title, chapter/track, or specific playback time directly, touch the screen control to display the direct entry menu. button on Use the button to select Title, Chapter, or Time entry.
DVD Playback Information The following information is displayed at the top of the screen during DVD playback: • Title: 05/08 – “05/08" indicates the fifth of 8 titles on the DVD is currently playing. • Chapter: 012/016 – “002/016" indicates that the second of 16 titles on the DVD is currently playing. • 00:41:28 – “00:41:28” indicates the playback time of the current title.
DVD/CD AUDIO OPERATION Instructions for TFT control and Insert/Eject are the same for DVD and CD operation. Please see the DVD/Disc Video Operation section for information about these topics. The VME 9512 TS will play music or other audio files from the following disc media: • CD-DA • CD-R/RW • DVD • DVD+R/RW • DVD-R/RW Upon inserting a disc with the TFT screen open, the disc and track title (if available), along with the track number and playing time appear on the screen.
CD Player User Interface The on-screen indicators and touch key areas for CD playback are outlined below. 1. Current track and total number of tracks on disc 2. Elapsed playing time/length of track 3. Current track title 4. Available track titles 5. ID3 information 6. II : Touch to pause/play disc playback 7. : Touch to stop disc playback 8. >>|: Touch to move to next track 9. |<<: Touch to move to previous track 10. / >>: Touch to navigate playlist/touch to fast forward 11.
NOTE: CD-R and CD-RW will not play unless the recording session is finalized. Fast Forward Touch h the button on screen or press the /\ button on the joystick to fast forward. Keep pressing and releasing the button to increase the rate from “2X” to “4X”, “6X”, and “8X”. Fast Reverse Touch the button on screen or press the /\ button on the joystick to fast reverse. Keep pressing and releasing the button to increase the rate from “2X” to “4X”, “6X”, and “8X”.
The VME 9512 TS player will only recognize three folder levels and does not display folders containing only other folders. In the example above, the unit will display folders 3, 4, 6, and 8, but not 2 and 7 since they do not contain any tracks directly. Folder 5 is not recognized at all since it is at the fourth level. Loading an SD Card Insert the SD card into the SD slot (21) on the front of the radio. The unit will read the files on the card automatically.
1. Current track and total number of tracks on root of disc 2. Elapsed playing time, track length 3. Current time 4. Track titles 5. ID3 information 6. II : Touch to play/pause disc playback 7. : Touch to stop disc playback 8. >>|: Touch to move to next track 9. |<<: Touch to move to previous track 10. / >>: Touch to navigate playlist/touch to fast forward 11. /<<: Touch to navigate playlist/touch to fast rewind or reverse 12. DIR -: Touch to view the previous folder 13.
Controlling MP3/WMA Disc Playback Playing MP3/WMA Files After inserting a MP3/WMA disc, files will play in the sequence of the “Root’ directory. NOTE: When burning MP3 / WMA files onto a DVD disc, use the 2X or 4X burning option, if available. This slower burning speed will help eliminate buffer errors and increase disc reading reliability. Also, use folders when burning large numbers of songs / files to a disc for easy music navigation. Select the "Disc at Once" option and close your disc.
iPod OPERATION iPod User Interface The on-screen indicators and touch key areas for iPod playback are outlined below. Subject to technical changes 1. Elapsed playing time 2. Current track and total number of files 3. Current time 4. Media titles/menu information 5. ID3 information 6. Enter 7. Touch to access photos 8. >>|: Touch to move to next track 9. |<<: Touch to move to previous track 10. Touch to access the iPod menu 11. >|| : Touch to play/pause disc playback 12. Touch to access music files 13.
Controlling Your iPod The unit will automatically switch to iPod mode when an iPod is plugged into the MediaLink4. To return to the iPod menu from any other source menu, press the SRC button (6) on the front panel or remote control (8) until the iPod menu appears on the screen.Further more the iPod will be recharged if the VME 9512 TS is switched ON. NOTE: Be sure your iPod has the latest Apple firmware installed to avoid connectivity issues.
Direct Track/File Entry To select a track/file directly, touch the button on screen control to display the direct entry menu. Subject to technical changes Enter the desired track/file using the on-screen number pad. Press the Enter button to tune to the selected station. To exit the screen without changing the station, touch Exit. To clear your entry and start over, touch Clear. You can also use the numeric keypad (29) on the remote control to access files directly.
BLUETOOTH OPERATION Before attempting to use the Bluetooth functions on the VME 9512 TS, please make sure your mobile phone supports Bluetooth functions (Headset or Handsfree profiles or both). Adhere to the following guidelines for successful operaiton. • Before using Bluetooth functions, you must pair your mobile phone to the VME 9512 TS head unit (see “Pairing the Bluetooth System with your Mobile Phone and Head Unit”).
1. Current connection status/device connected 2. Bluetooth device battery life* 3. Current time 4. Bluetooth menu* 5. Current operation status 6. Toggle Music/Phone menu 7. Transfer active call back to handset 8. Pair your Bluetooth phone (first time use) / Double click activation** 9. Connect/disconnect Bluetooth device (phone, PDA, personal music player, etc.) with hand-free function / Double click activation** 10. Exit call listing display 11.
Reconnecting Once the Bluetooth device has been paired, you can touch the connect button to reconnect.** * Function belongs to the mobile Phone or PDA ** Double click activation NOTE: You can only connect to a phone using the buttons on the on-screen Phone interface. Each time the button is pressed, the head unit will automatically reconnect with the mobile phone once (only if the mobile phone was previously paired with the head unit).
Missed Calls The Missed Calls list retrieves the list of Missed numbers from your phone. The last missed number is the first number on the list. Touch the Missed Calls menu option to view the list. To make a call from the Missed Calls list, touch the number and then touch the button. The TFT will display “Cannot get missed record” when the feature is not available. Dialed Calls The Dialed Calls list retrieves the list of dialed numbers from your phone. The last dialed number is the first number on the list.
TROUBLESCHOOTING Problem Cause Corrective Action Unit will not power on Radio Fuse blown Car battery fuse blown Illegal operation Install new fuse with correct rating Install new fuse with correct rating Press the RESET button located in the bottom right corner of the front panel Remote control does not function Battery depleted Battery installed incorrectly Replace battery with new one Remove battery and install correctly No/low audio output Improper audio output connection Volume set too low Imp
Image blurred, distorted, or dark Disc is illegally copied Use original disc PCB cannot be used during VCD playback PCB is not available on the disc while playing VCD PCB is on No repeat or searching Turn PCB off MP3 Interruption occurred during playback Incorrect playback message displayed Disc is dirty or scratched File is damaged/bad recording Clean disc or replace Recreate disc with good files Message is longer than LCD can display IPOD iPod source not available Incorrect cable connections
Subject to technical changes Care and Maintenance 1. Use only a clean silicone cloth and neutral detergent to clean the front panel or monitor. A rough cloth and nonneutral detergent (such as alcohol) may result in scratching or discoloration. 2. Do not get water or cleaning fluids on the unit. 3. If the temperature inside the player gets too hot, a protective circuit automatically stops play of the disc. If this occurs, allow the unit to cool before operating the player again. 4.
SPECIFICATIONS DVD/CD Player Compatible Disc Media: Compatible Media Formats: Signal to Noise Ratio: Dynamic Range: Frequency Response: Channel Separation: D/A Converter: Format: Output: Input: FM RDS Tuner Mono Sensitivity (-30dB): Quieting Sensitivity (-50dB): Alternate Channel Selectivity: Signal to Noise Ratio @ 1 kHz: Image Rejection: Stereo Separation @ 1 kHz: Frequency Response: AM Tuner Sensitivity (-20dB): Signal to Noise Ratio @ 1 kHz: Image Rejection: Frequency Response: Monitor Screen Size: DVD
102