English Español NAV3000 User Manual and Mounting Instructions Instrucciones de manejo y de montaje
Attention! Only use this system when it is safe to do so. It is more important to keep your eyes on the road and your hands on the wheel. Due to constantly changing traffic conditions, we unfortunately cannot guarantee 100 % precision under all circumstances. ¡Atención! Utilice el sistema sólo si lo permite el nivel de seguridad. Es más importante atender al tráfico y mantener las manos en el volante.
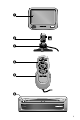
1 2 3 4 5 6 POWER NAVIGATION SYSTEM 3
Mounting instructions Instrucciones de manejo Ilustraciones Manual de instalación Page 7 Pages 3, ?? - ?? Page 47 English Illustrations Página 51 Páginas 3, ?? - ?? Página 93 5 Español Operating instructions
System Overview (see illustration on page 3). . . . . . . . . . . . . . . . . . . . . . . 8 GENERAL INFORMATION . . . . . . . . . . . . . . . . . . . . . . . . . . . . . . . . . . . 9 Tips on the use of this manual . . . . . . . . . . . . . . . . . . . . . . . . . . . . . . 9 ATTENTION! Important notes for safe usage . . . . . . . . . . . . . . . . . . . . . . . 9 Guidelines and recommendations for safe use of the Navigation System . . . . . . . 10 How does Audiovox Navigation work ? . . . . . . . . . . . .
CONTENTS SYSTEM SETTINGS . . . . . . . . . . . . . . . . . . . Display. . . . . . . . . . . . . . . . . . . . . . . . Volume . . . . . . . . . . . . . . . . . . . . . . . Route selection . . . . . . . . . . . . . . . . . . . Language . . . . . . . . . . . . . . . . . . . . . . Guidance screen . . . . . . . . . . . . . . . . . . Measuring units. . . . . . . . . . . . . . . . . . . Speed correction . . . . . . . . . . . . . . . . . . Date / Clock . . . . . . . . . . . . . . . . . . . . .
English GENERAL INFORMATION Tips on the use of this manual To make reading this manual easier you are given the following aids: ☞ informs you to do something. : shows the reaction of the set. – marks an enumeration. A This is a security or warning advice. It contains important information on the safe use of your navigation sytem. In case of disregard of this advice the danger of material damage, injury or even death may result. Please observe this advice carefully.
GENERAL INFORMATION Guidelines and recommendations for safe use of the Navigation System A Glance at the display only when necessary and safe to do so. If prolonged viewing of the screen is necessary, pull over and stop in a safe and legal manner. A Do not input destinations, change settings or access any functions requiring a prolonged view of the display and/or remote control while you are driving. Pull over and stop in a safe and legal manner before attempting to access the system.
How does Audiovox Navigation work ? The Audiovox Navigation System is a powerful tool to assist the driver in daily traffic. Automatic route planning and guidance allows you to concentrate on the essential things in today’s growing traffic – especially in congested areas. Complicated and time-consuming planning with conventional city and road maps is no longer required. You simply enter the destination before driving off, activate ‘Guidance’ and the Navigation System does the rest.
GENERAL INFORMATION Important notes on the function of your Navigation System In general the navigation system is operational even with bad GPS reception (GPS = Global Positioning System by satellites), but the accuracy of positioning may decrease and errors in position evaluation may occur, resulting in wrong position display. Start-up behaviour When the vehicle is parked for a long period of time, the satellites change their orbital positions.
Limited GPS Reception System performance may adversely affected if GPS reception is interrupted or interference occurs over a distance of several miles. GPS reception may be interrupted or interference could occur: – In between tall buildings. – In multi-level parking garages, in tunnels and under bridges. – In forests or tree-lined avenues. – During heavy rain showers and thunderstorms.
GENERAL INFORMATION The digital road map To plan a route to a destination address not only the current car position is needed by the navigation system but also a digital road map is required where the destination address itself as well as the roads leading to the destination address are stored. This digital road map is located on the map CD you insert in your navigation computer.
Monitor If mounted on the supplied support, the monitor can be removed from the holder for advanced theft protection. Removing the monitor ☞ A Push the release button on the back of the support and gently pull the monitor upwards. Do not push on the display screen to avoid damage of the LCD. Installing the monitor ☞ Gently slide the monitor onto the support until it clicks into position. Adjusting the LCD monitor If mounted on the supplied support, the monitor can be adjusted to your viewing angle.
OPERATION Keyboard illumination The keyboard of the remote control is illuminated when you press one of the keys. The illumination is switched off automatically after a few seconds. When inserted in the holder the keyboard is illuminated permanently as long as the ignition is switched on. Switching on / off The navigation system is switched on / off together with the ignition. ☞ Turn on the ignition.
English MENUS Cursor The cursor is used to select menu options or characters. It is shown as white characters on black background. ☞ For moving the cursor use the cursor keys 8, 2, 4 or 6. ☞ Confirm your selection by pressing the OK key. : The cursor is briefly displayed as a frame around the selected field. Menu title Active option 1 Active option 2 Active option 3 Inactive option Options currently not available are shown in faint. Scroll bars Several menus have more than four options.
MENUS Intelligent “keyboard” When entering names for a city, road or point of interest the system compares the character sequence already entered with that of the database on the map CD. If you have already entered one character you will note, that only certain letters are still selectable. The navigation system automatically fills in the missing characters if there is only one possible entry left.
Main menu You can select the following menu options in the main menu: Main menu Destination input Guidance Stand-by Settings Destination input This option enters the “Destination input” menu. Select this option to enter the city, road, intersection or a point of interest as the destination. Guidance This option enters the guidance screen and activates the guidance function (only if a destination address is entered).
DESTINATION INPUT Destination input menu ☞ Select “Destination input” from the main menu. : The Destination input menu is shown. The following options are available: Country To select the destination country, if more than one country is stored on the inserted map CD. City/Road To enter the city name and the road name of the destination address. Destination input Country City/Road Intersection Guidance Intersection To enter an intersection for a more precise destination selection.
Entering a destination address You can enter a destination address in various different ways: – enter city, road and intersection letter-by-letter by means of the “keyboard”; – load an address from the personal address book; – select a Point of interest (hotels, gas stations, etc.) from the database stored on the map CD; – load one of the 10 destination addresses last used. Entering city and road ☞ : ☞ Select “Destination input” in the main menu. The “Destination input” menu is displayed.
DESTINATION INPUT Entering house numbers In 100% digitized areas, house numbers are available in the data base. After entering the road name with the “keyboard” you can also enter the desired house number. Entering an intersection You can specify your destination address more precisely by entering an intersection: ☞ Select “Intersection” from the destination input menu. : The “Intersection:” input menu appears.
Points of interest You can also specify your destination by selecting a Point of interest (special facility) stored in the database. This could be for example: – airports, – hotels, – gas stations, – garages, etc. Points of interest Info on dest. Info on car pos. National import. Return Depending on which information you have already entered in the destination input menu you are presented with a list of facilities of general interest stored on the inserted map CD.
DESTINATION INPUT Facilities of national importance ☞ ☞ : ☞ Select “Points of interest” from the destination input menu. Select “Nation. importance”. A list of categories specifying the facilities of national importance is presented (for example AIRPORT, PARK / RECREATION / FITNESS...). Continue as described on page 21. Note: Some map CDs may not support the “National importance” option. In this case enter a city as your destination address and select the “Info on dest.
English GUIDANCE Guidance screen The guidance screen appears as soon as you have: – entered a valid destination address and – selected “Guidance” in the main menu or the destination input menu See the following example for the information offered by the guidance screen: 2 3 4 5 Main St 400 ft ¦ £ 7,7mls ¢ ª 14:45 1 1 Visual guidance advice: Diagram of the next junction or turning. In addition, direction changes are announced by voice messages. 2 Road you have to turn into next.
GUIDANCE Voice messages As soon as you have activated the guidance function the Navigation System will give you verbal guidance advice in addition to the diagrams in the guidance screen. Usually a guidance advice consists of two messages: preliminary advice W CHEYENNE AVE 1.
English GUIDANCE Guidance in partly digitized areas As long as you are driving on digitized roads the navigation system will give you guidance advice. On the open road without junctions or exits the display shows a direction arrow which follows the course of the road. AVORY DRV 2.8 mls ¦ £ 4,1mls ¢ ª 02:45 Leaving the digitized area In rural areas and smaller cities it may occur that not every road is digitized (stored on the map CD).
GUIDANCE Display of the route list As soon as a route is planned this option is available in the guidance screen. ☞ Confirm the “¢” icon in the guidance screen. : The list of sections of the planned route is shown. ☞ Push the cursor keys 8 or 2 to scroll through the list. ☞ Select “Quit” to leave the route list. The route list is only available if you are on a digitized road. Information screens During guidance you have access to different information screens.
i4 Trip computer The trip computer shows you the following information: – Current vehicle speed – Average vehicle speed – Elapsed travel distance – Elapsed travel time i4 Trip computer 35 mph 24 mph 235 mls 12:08 h Resetting trip computer ☞ ☞ ☞ Select “Settings” from the main menu. Select “Trip computer” from the “System settings” menu. Select “Reset Trip comp” to set all values to zero. Speed warning You can specify a speed limit in the trip computer.
ALTERNATIVE ROUTE Alternative route You can force the Navigation System to calculate an alternative route during guidance. Use this function for example to get around traffic jams or if you don’t agree with the planned route. The alternative route is calculated from the current car position for the selected distance. The following points have to be fulfilled to plan an alternative route: – a route has to be planned by the system, and – the system has to be in guidance screen mode.
English ADDRESS BOOK Address book The Audiovox Navigation System allows you to store 30 destination addresses in a personal address book. The destination store gives you additional helpful functions. ☞ Select “Address book” from the destination input menu. : The address book menu is shown. The following menu options are available: Load address To recall a destination address previously stored in the personal address book. Load last dest.
ADDRESS BOOK Contents of an address book entry You can store the following data in an address book entry: – Name: A name of your choice for the destination address consisting of a maximum of 10 characters *; – City: The city name of the destination address; – Road: The road name of the destination address*; – Intersection: An intersection to specify your destination more precisely*; – or a facility from “Points of interest”*.
English ADDRESS BOOK Storing the current location Do you want to store for example a new restaurant you have found? Then just store your current vehicle position as follows: ☞ Select “Store current loc.” from the address book menu. : The keyboard menu for name entry appears. ☞ Enter a name or abort name entry by selecting £. : The current vehicle position is stored in the address book.
SYSTEM SETTINGS System settings To adjust the Navigation System to your own preferences you can modify various settings. ☞ Select “Settings” from the main menu. System settings : The “System settings” menu is shown. The Display following options are available: Display To rotate the display contents 180 degrees for over-head mounting of the display. Volume Route selection Language Volume To adjust the volume level of voice messages and to turn off verbal guidance advice.
Display For overhead mounting of the display it is possible to rotate the display contents 180 degrees. ☞ Select the “Display” option from the “System settings” menu. ☞ Select the desired setting according to the mounting position of the display. Volume ☞ Select the “Volume” option from the “System settings” menu. : A volume slider with the current volume setting is shown. Adjusting the volume: ☞ ☞ : ☞ : ☞ Place the cursor on the volume slider. Confirm by pushing the OK key.
SYSTEM SETTINGS Language ☞ Select the “Language” option from the “System settings” menu. ☞ Select one of the languages loaded in the system, or: ☞ ☞ : ☞ ☞ Select “Other language” to replace one of the loaded languages with a different one from the supplied system software CD. Select the language to be replaced. You are prompted to insert the software CD. Insert the Audiovox system software CD in the navigation computer. Follow the instructions given by the system to load other languages.
English SYSTEM SETTINGS Date / Clock ☞ Select the “Date/Clock” option from the “System settings” menu. : The currently selected timezone (offset) and the date and time are shown. You can set the format for time and date display as well as the timezone. Timezone: The Navigation System receives the Universal Time Co-ordinates (UTC) via the GPS system. Time: Standard Daylight Saving EST - 5.0 - 4.0 CST - 6.0 - 5.0 MST - 7.0 - 6.0 PST - 8.0 - 7.
SYSTEM SETTINGS SDVC Mode (Speed Dependent Volume Control) This is to compensate the surrounding noise by increasing the volume level of guidance advice depending on the vehicle’s speed. You can select between 5 different SDVC settings (OFF = off; 4 = maximum increase). ☞ Move the cursor to the Mode value. ☞ Push the OK key. ☞ Select the desired SDVC mode. ☞ Push the OK key to store the selection. Find a suitable compensation by trying out the different modes.
Map CDs The Audiovox Navigation System is based on a database stored in a special format on a CD. It is recommended always to use the latest update of this map CD. Changing the map CD ☞ Press the W key on the navigation computer once, if the red power LED is on ☞ : ☞ (normally when the ignition is switched on). Press the W key twice, if the red power LED is not on. The CD is ejected. Take out the CD and gently insert the new map CD with the printed side facing up until it is retracted.
MAP CDs Map CDs with travel guide information You can recognize map CDs containing travel guide information on special destinations by the I icon in the display. If you have inserted such a map CD, you will get additional information on many of the stored special destinations. You can for example inform yourself about the room rate when looking for a hotel and recall the phone number for reservation. ☞ Select the desired facility by means of one of the options from the “Points of interst” menu.
Replacing batteries of the remote control You have to replace the batteries of the remote control, if you use the remote control outside of its holder and the navigation system does no longer respond to key presses. ☞ Open the battery compartment on the back of the remote control. ☞ Remove the discharged batteries. ☞ Insert two new LR6 type (Size AA) batteries. Pay attention to correct polarity (marked in the compartment). ☞ Close the battery compartment.
TROUBLESHOOTING There may be times when you suspect that your Audiovox Navigation System is not functioning as you expect it to. Before calling for service please read the operating instructions and check the following list. You may find that an apparent malfunction can easily be rectified. Symptoms Possible cause / Remedy System dos not start. Nothing on the display. • Turn on the ignition. Ignition already turned on: System is in stand-by mode. • Push one of the keys on the remote control.
Menu option Menu title Main menu Mounting angle i4 Trip computer Return Menu option Menu Measuring units i3 GPS position Points of interest i5 Current settings Guidance screen i2 Destination English Return Trip computer Service System information Address book SDVC Mode Date / Clock Speed correction Route selection Volume Display System settings Settings Language Stand-by i1 Car position ¦: Repeat £: Return ¢: Route list ª: Altern. route ¦ £ 6,5mls ¢ ª 02:45 1.
English MOUNTING INSTRUCTIONS IMPORTANT NOTES A A A Installation may only be carried out by trained specialists! Observe all quality standards of the automobile industry! Fire hazard! When drilling pay attention to the location of cable harnesses, tank and fuel pipes! A Never drill into car parts which are load bearing or are important for safety reasons! When installing components in the interior of the car remember the following: A A The driver's field of vision must not be obstructed! Increase
MOUNTING INSTRUCTIONS Insert metal sleeve into the DIN opening and press appropriate tags outwards with a screwdriver. Take care not to damage hidden parts in the dashboard. Mounting the navigation computer with brackets If the navigation computer should or can not be installed in a DIN opening, it can be mounted with the supplied mounting brackets in other places, for example in the glove compartment, in the luggage boot or under the seats.
Mounting monitor, ill. 8 A Never install the monitor in an area where the head could impact in case of an accident! The monitor can be fastened with the supplied support either in normal or in suspended position. If it is mounted in suspended position, make sure that the display contents is rotated 180 degrees (“System settings” menu, option “Display”). Glueing the support 1. Fix the mounting plate with two Phillips head screws to the bottom of the monitor support. 2.
MOUNTING INSTRUCTIONS Completing electrical connections, ill. 12 Lay all cables carefully. Refer to the connecting diagram on the fold-out page at the end of the booklet and to the table below. Power supply cable 6 (ISO connector A): Pin no.
Mounting the navigation computer 1. 2. 3. 4. Connect the GPS antenna. Connect power supply cable 6 to ISO connector A’ at the navigation computer. Connect signal cable 5 to ISO connector B’ at the navigation computer. Insert yellow plug C1 of the monitor cable into the left chamber of ISO connector C1’ at the navigation computer. 5. If you want to connect system extensions, take care to slide all the C plugs together before connecting them to ISO connector C’ at the navigation connector.
MOUNTING INSTRUCTIONS Checking the car functions A Only check safety functions when the car is standing still or driving at low speed! Always carry out checks in open areas! Check brake system, alarm system, lights, immobilizer, speedometer, trip computer, radio (coding) and hi-fi stereo, clock. Checking the navigation functions Check the following functions when the car is stationary: Remote control Put remote control in the holder. The keys on the remote control must light up.
CONTENIDO . . . . . . . . . . . . . . . . . . . . . . . . . . . . . . . . . . . . . . . . . . . . . . . . . . . . . . . . . . . . . . . . . . . . . . . . . . . 53 53 53 55 58 MANEJO . . . . . . . Monitor LCD . . . Telemando . . . . Encender/Apagar . Modo Stand-by . . Ajuste de volumen . . . . . . . . . . . . . . . . . . . . . . . . . . . . . . . . . . . . . . . . . . . . . . . . . . . . . . . . . . . . . . . . . . . . . . . . . . . . . . . . . . . . . . . . . . . . . . . .
CONTENIDO CONFIGURACION . . . . . Display. . . . . . . . . . Volumen. . . . . . . . . Selección de ruta . . . . Idioma . . . . . . . . . . Pantalla de guía. . . . . Unidades de medida . . Corrección de velocidad Fecha / Hora . . . . . . . Modo SDVC . . . . . . . Información de sistema. Servicio . . . . . . . . . Ordenador de a bordo . . . . . . . . . . . . . . . . . . . . . . . . . . . . . . . . . . . . . . . . . . . . . . . . . . . . . . . . . . . . . . . . . . . . . . . . . . . . . . . . . . . . .
INFORMACIÓN GENERAL Para facilitar la lectura de las instrucciones, se utilizará la siguiente ayuda: ☞ le exigirá que haga algo. : muestra la reacción del aparato. – caracteriza una enumeración. A Las indicaciones de seguridad o de advertencia contienen información muy importante para la utilización segura del equipo. Si no se tienen en cuenta estas indicaciones pueden existir riesgos de daños materiales o peligro para la vida o integridad física. Por ello deben tenerse especialmente en cuenta.
INFORMACIÓN GENERAL Directrices y recomendaciones para el manejo seguro A Mire la pantalla sólo cuando sea posible hacerlo sin peligro. Si debe Ud. mirar la pantalla de forma prolongada, detenga el vehículo en un lugar apropiado. A Le recomendamos que los ajustes y la introducción de nuevas metas sólo se realicen con el vehículo parado, o por parte del acompañante. A Las indicaciones de guía a la meta proporcionadas por el sistema de navegación constituyen meras propuestas.
INFORMACIÓN GENERAL El sistema de navegación Audiovox les ofrece un instrumento eficiente para prestar ayuda al conductor en el tráfico cotidiano. La planificación automática de las rutas y la guía al destino, les permite una mejor concentración en el tráfico cotidiano, cada vez más denso - sobre todo en aglomeraciones urbanas -. Quedan por tanto relegados al olvido los mapas de carreteras y ciudades convencionales.
INFORMACIÓN GENERAL Observaciones importantes sobre el funcionamiento de su sistema de navegación En principio, el sistema también funciona aunque la recepción GPS sea mala; sin embargo, en caso de recepción GPS mala o defectuosa puede reducirse la precisión de la determinación de posición o pueden aparecer fallos en la misma que den lugar a indicaciones de posición erróneas.
INFORMACIÓN GENERAL Cuando tras varios kilómetros de trayecto se hayan producido interrupciones o interferencias en el receptor GPS, pueden suceder igualmente limitaciones en el funcionamiento. No tener recepción GPS o tener interferencias se puede deber a: – Encontrarse entre dos edificios altos. – Encontrarse en garajes, túneles o debajo de puentes. – Encontrarse en bosques o avenidas. – Encontrarse bajo lluvias fuertes o en tormentas.
INFORMACIÓN GENERAL El mapa digital de carreteras Para poder planificar una ruta a una dirección de destino, el sistema de navegación no sólo necesita la posición actual del vehículo, sino también un mapa digital de carreteras donde están almacenadas la dirección de destino y las carreteras y calles que llevan a dicha dirección. Este mapa digital de carreteras se encuentra en el CD de mapas, que debe introducir en el ordenador de navegación.
MANEJO Monitor LCD Retirar el monitor ☞ A Pulse la tecla de desbloqueo situada al dorso del soporte del monitor y retire el monitor con cuidado hacia arriba. No toque la pantalla del monitor para evitar que se dañe la indicación LCD. Colocar el monitor ☞ Coloque el monitor con cuidado sobre su soporte hasta que encastre. Ajuste del monitor Si el monitor está sujeto al soporte suministrado, podrá ajustarlo perfectamente a su ángulo visual. ☞ Gire el monitor hasta alcanzar el mejor ángulo visual.
MANEJO Iluminación de teclas Las teclas del telemando se iluminan cuando son activadas. La luz se apagará automáticamente al cabo de unos momentos. Introducido en su soporte, el telemando estará siempre iluminado cuando el encendido esté conectado. Encender/Apagar El ordenador de navegación es encendido y apagado junto con el encendido del vehículo. ☞ Conecte el encendido del vehículo.
MENÚS Cursor Título del menú Opción activa 1 Opción activa 2 Opción activa 3 Opción inactiva Español Se denomina cursor a la línea elegida así como al campo seleccionado de la pantalla. El cursor será mostrado mediante una inversión del color de las letras (letras en blanco en fondo negro). ☞ Desplace el cursor mediante las teclas 8, 2, 4 ó 6. ☞ Confirme su selección pulsando la tecla OK. : Para la confirmación, el cursor se muestra brevemente en forma de recuadro alrededor del campo seleccionado.
MENÚS “Máquina de escribir” inteligente Al introducir nombres de ciudades y calles así como destinos especiales, el sistema comparará el orden de las letras seleccionadas con todo el contenido de la base de datos del CD de mapas. Cuando haya seleccionado una letra, observará que se sólo se mostrarán determinadas letras. El sistema de navegación completa automáticamente los datos, cuando ya sólo quede una posibilidad de entrada.
MENÚS En el menú principal se dispone de las siguientes opciones: Menú principal Introducir destino Guía meta Stand-by Ajustes Introducir destino Esta opción activa el menú “Introducir destino”. Seleccione esta opción para introducir ciudad, calle, cruce o un enclave de interés general como dirección de destino. Guía meta Con esta opción llegará hasta la pantalla de guía meta, para activar la función de guía a la meta (siempre que haya indicado una dirección de destino).
INTRODUCIR DESTINO Menú “Introducir destino” ☞ Seleccione en el menú principal la opción “Introducir : El menú “Introducir destino” será visualizado. destino”. Dispondrá de las siguientes opciones de menú: País Selección del país de destino, cuando en el CD de mapas introducido se encuentre almacenado más de un país. Ciudad/Calle Introducir ciudad y calle de la dirección de destino.
INTRODUCIR DESTINO Las direcciones se pueden introducir de las siguientes maneras: – Introducir ciudad, calle y cruce, letra por letra con la “Máquina de escribir”. – Cargar una dirección memorizada de la agenda personal; – Selección de un destino especial (por ejemplo: hotel, gasolinera, estación) obtenido del banco de datos y disponible en el CD de mapas. – Llamada a los últimos 10 destinos utilizados. Introducir ciudad y calle ☞ : ☞ Seleccione en el menú principal la opción “Introducir destino”.
INTRODUCIR DESTINO Introducción de números de portal En algunas ciudades podrá seleccionar aparte del nombre de la calle también el número del portal, mediante la “Máquina de escribir”, y de esta forma podrá definir más concretamente su destino. Introducción de un cruce Para determinar con más exactitud la dirección de destino podrá introducir un cruce: ☞ Seleccione “Cruce” en el menú de introducción de destino. : Aparecerá el menú “Cruce:”.
INTRODUCIR DESTINO También puede introducir la dirección de destino, seDestino especial leccionando destinos especiales que se encuentren alInfo sobre destino macenados en la base de datos. Dichos destinos pueInfo pos. coche den ser: – Aeropuertos, Interés nacional – Hoteles, Retorno – Gasolineras, – Talleres de reparaciones, – Aparcamientos, etc.
INTRODUCIR DESTINO Enclaves especiales de interés nacional ☞ ☞ : ☞ Seleccione “Destino especial” en el menú de introducir destino. Seleccione “Interés nacional”. Se mostrará una lista de los enclaves de interés nacional por categorías (por ejemplo, AEROPUERTO, FERRY...). Continúe como se describe en página 65.
GUIA META Pantalla de guía a la meta Español La pantalla de guía a la meta aparecerá en el momento en que Ud. – haya introducido una dirección de destino y – haya seleccionado “Guía meta” en el menú principal o en el menú de introducir destino. Se mostrarán las siguientes informaciones en la pantalla de guía a la meta: Main St 2 400 ft 3 4 5 ¦ £ 7,7mls ¢ ª 14:45 1 1 Aviso de guía a la meta: Representación gráfica del siguiente cruce o desvío.
GUIA META Mensajes acústicos En cuanto haya seleccionado la guía a la meta, el sistema de navegación le dará instrucciones acústicas de recorrido - aparte de los símbolos en la pantalla de guía a la meta -. Por lo general, una instrucción de giro consiste de dos mensajes acústicos: Un aviso preliminar W CHEYENNE AVE 1.
GUIA META Guía a la meta en zonas de digitalización parcial AVORY DRV 2.8 mls ¦ £ 4,1mls ¢ ª 02:45 Español Mientras se esté moviendo en zonas digitalizadas, el sistema de navegación le mostrará indicaciones de guía a la meta. En largos trayectos largos sin desvíos o sin cruces, se mostrará una flecha de dirección que seguirá el recorrido de la carretera.
GUIA META Visualización del listado de vías En cuanto haya planeado una ruta, tendrá además a disposición en esta pantalla la opción “Listado de vías”. ☞ Confirme “¢” en la pantalla de guía a meta. : Aparecerá la lista de tramos de la ruta planeada. ☞ Con las teclas de cursor 2 y 8 puede ir desplazando la lista línea a línea. ☞ Seleccione “Retorno” para abandonar el listado de vías. El listado de vías sólo está disponible si se encuentra usted en una vía digitalizada.
GUIA META En el ordenador de a bordo se visualizan las siguientes informaciones: – Velocidad actual – Velocidad media – Distancia recorrida – Tiempo de viaje transcurrido i4 Ord. abordo 35 mph 24 mph 235 mls 12:08 h Inicialización del ordenador de a bordo ☞ ☞ ☞ Seleccione “Configuración” en el menú principal. Seleccione “Ord. abordo” en el menú “Configuración”. Seleccione “Reset” para poner a cero todos los valores.
RUTA ALTERNATIVA Ruta alternativa Puede ordenar al sistema de navegación que durante la guía a la meta planifique una ruta alternativa. Utilice esta función, si por ejemplo desea desviarse de un atasco o si desea planear otra ruta. La ruta alternativa se calcula desde la posición actual del vehículo hasta la distancia seleccionada.
MEMORIA DE DESTINO El sistema de navegación Audiovox le ofrece la posibilidad de memorizar hasta 30 direcciones de destino en una agenda personal. Además esta memoria dispone de otras funciones muy útiles. ☞ Seleccione la opción “Memoria de dest.” en el menú de introducir destino y confirme la selección. : Se mostrará el menú de memoria de destino. Se dispone de las siguientes opciones: Cargar dirección Solicitar una dirección de destino almacenada en la agenda.
MEMORIA DE DESTINO Contenido de un registro de la agenda Podrá almacenar los siguientes datos en un registro de la agenda: – Nombre: Un nombre de libre selección para la dirección de destino compuesto de un máximo de 10 caracteres*; – Ciudad: El nombre de la ciudad de destino; – Calle: El nombre de la calle de destino*; – Cruce: Un cruce para una especificación más exacta de la dirección de destino* o – un enclave de interés general del menú “Destino especial”.
MEMORIA DE DESTINO ¿Desea almacenar en la memoria de destino, por ejemplo, un restaurante que le guste? Entonces almacene su posición de la siguiente manera: ☞ Seleccione “Almacenar posición” en el menú memoria de destino. : Aparecerá el menú para introducir el nombre. ☞ Introduzca un nombre o interrumpa la introducción del nombre mediante £. : La posición actual del vehículo se almacenará como dirección.
CONFIGURACION Configuración Para ajustar el sistema de navegación a sus exigencias personales, podrá modificar muchos ajustes. ☞ Seleccione “Ajustes” en el menú principal. : El menú “Configuración” será visualizado. Dispondrá de las siguientes opciones de menú: Display Configuración Display Volumen Selección de ruta Idioma Giro de 180° del contenido de la pantalla, para montaje del monitor por encima de la cabeza.
CONFIGURACION Display Español Para montar el monitor por encima de la cabeza, es posible girar el contenido de la pantalla en 180°. ☞ Seleccione “Display” en el menú “Configuración”. ☞ Escoja el ajuste deseado de acuerdo a la posición de montaje del monitor. Volumen ☞ Seleccione “Volumen” en el menú “Configuración”. : Aparecerá un regulador deslizante que le mostrará el ajuste actual del volumen. Ajustar el volumen: ☞ ☞ : ☞ : ☞ Marque el regulador deslizante con la ayuda del cursor.
CONFIGURACION Además tiene la posibilidad de excluir carreteras de peaje al planear la ruta: ☞ Active la opción “No por peajes”, si desea utilizar la mayor cantidad posible de carreteras libres de pago. : Aparecerá una marca delante de la opción. Si no hubiera carreteras libres de pago, también se seleccionarán carreteras de peaje en la planificación de la ruta. Aviso: Si está activada esta opción, la planificación de la ruta podría tardar más que si la función estuviera desactivada.
CONFIGURACION Fecha / Hora ☞ Seleccione “Fecha / Hora” en el menú “Configuración”. : Se indicará la hora zonal ajustada actualmente (Offset) así como la hora y la fecha. Existe la posibilidad de ajustar el formato para hora y fecha así como la hora zonal. Hora zonal: El sistema de navegación recibe la hora mundial actual (UTC) a través del sistema GPS. Zona Horario: Horario de invierno Horario de verano EST - 5.0 - 4.0 CST - 6.0 - 5.0 MST - 7.0 - 6.0 PST - 8.0 - 7.
CONFIGURACION Modo SDVC Para compensar los ruidos del entorno, el volumen de los avisos acústicos será elevado en función de la velocidad del vehículo. Tendrá la posibilidad de elegir entre cinco diferentes niveles (DES = sin elevación; 4 = máxima elevación). ☞ Sitúe el cursor sobre el valor ajustado. ☞ Pulse la tecla OK. ☞ Seleccione el modo SDVC deseado. ☞ Pulse nuevamente la tecla OK para confirmar el ajuste. Pruebe diferentes opciones para descubrir el modo SDVC más idóneo para su vehículo.
CD DE MAPAS CDs de mapas Cambio de un CD de mapas ☞ Cuando se ilumine el diodo luminescente (LED) rojo, pulse una sola vez la tecla de ☞ : ☞ expulsión W en el ordenador de navegación (éste será el caso cuando esté conectado el encendido del vehículo). Si no se iluminara el diodo LED, pulse dos veces la tecla de expulsión W. El CD será expulsado. Retire el CD e introduzca con cuidado el nuevo CD de mapas con el rótulo hacia arriba dentro del lector de CD.
CD DE MAPAS CDs de mapas con información de ruta Los CDs de mapas con información de ruta para destinos especiales llevan el símbolo I en el display. Si hubiera introducido un CD de mapas de este tipo, recibirá informaciones adicionales acerca de muchos de los destinos especiales almacenados. Así pues se podrá informar, por ejemplo, cuando seleccione un hotel, sobre los precios de las habitaciones y podrá llamar al número de teléfono para hacer la reserva.
MANTENIMIENTO Y CONSERVACION Cambio de pilas Las pilas del telemando deben ser cambiadas cuando se utilice el telemando fuera del soporte y el sistema de navegación no reaccione más al pulsar las teclas. ☞ ☞ ☞ Abra el compartimento de pilas que se encuentra al dorso del telemando. Retire las pilas gastadas. Introduzca dos nuevas pilas del tipo AA (Mignon, LR 6). Preste atención a la polaridad correcta (impresa en el compartimento de pilas). Vuelva a cerrar el compartimento de pilas.
LOCALIZAR FALLOS En casos muy raros, puede ocurrir que el sistema de navegación no funcione como Usted esperaba. Antes de llamar al servicio técnico, léase detenidamente las instrucciones de uso y verifique la lista de comprobación, ya que una aparente avería se puede a veces eliminar muy fácilmente. Síntomas Posible causa / Solución El sistema no arranca. En monitor no indica nada. • Conecte el encendido del vehículo.
Síntomas Posible causa / Solución La posición indicada no coincide con la posición real del vehículo. La recepción GPS sufrió interferencias durante demasiado tiempo (p.ej., debido a malas condiciones de recepción). Teniendo una recepción GPS satisfactoria, la posición se corregirá automáticamente. • Dado el caso, espere unos cuantos minutos. Los avisos no coinciden con la situación real del tráfico. Probablemente la posición determinada por el sistema de navegación sea incorrecta en ese momento.
VISTA GENERAL DE MENÚS Menú principal Título del menú Opción del menú Introducir destino Guía meta AVORY BLVD 1.5 mls ¦ £ 6,5mls ¢ ª 02:45 Stand-by Ajustes Correción veloci. Configuración Display Fecha / Hora Modo SDVC Volumen Selección de ruta Pantalla de guia Ord. abordo ¦: Aviso £: Retorno ¢: Listado de vías ª: Ruta alternativa i1 Posición actual Unidades de medida Retorno Informac.
INSTRUCCIONES DE MONTAJE NOTAS IMPORTANTES A A A ¡El sistema sólo debe ser montado por personal especializado debidamente formado! ¡Deben respetarse las normas de calidad propias de los trabajos en el automóvil! Español ¡Peligro de incendio! ¡Al taladrar debe tenerse cuidado de no dañar mazos de cables ocultos ni el depósito o las conducciones de combustible! A ¡No debe taladrarse nunca en piezas de la carrocería con función estructural o importante para la seguridad! Al montar componentes en el habi
INSTRUCCIONES DE MONTAJE Consideraciones a tener en cuenta antes del montaje, Fig. 4: – Para acceder a la ranura de CD, delante del ordenador de navegación debe existir un espacio libre de al menos 130 mm. – Para una ventilación suficiente, detrás del ordenador de navegación debe existir un espacio libre de al menos 50 mm. – El ordenador debe montarse horizontalmente. Pueden seleccionarse desviaciones – entre -10 y +30 grados en el menú “Ángulo de montaje”, véase “Primera puesta en marcha”.
INSTRUCCIONES DE MONTAJE Montaje del monitor, Fig. 8 A Adherir el soporte del monitor 1. Atornillar la placa de montaje con los 2 tornillos de estrella debajo del soporte del monitor. 2. Atornillar el conector del monitor al pedestal del monitor con los 2 tornillos de cabeza avellanada, Fig. 9. 3. Enchufar el monitor al conector del monitor hasta que encaje. 4. Determinar la posición de montaje para el monitor. 5. Desenchufar de nuevo el monitor del conector.
INSTRUCCIONES DE MONTAJE Conexiones eléctricas, Fig. 12 Tienda todos los cables cuidadosamente. En relación con el cableado, consulte el diagrama de conexiones de la solapa posterior y la tabla situada a continuación.
INSTRUCCIONES DE MONTAJE 1. 2. 3. 4. Conecte la antena GPS. Enchufe el cable de alimentación 6 en la hembrilla ISO A’ del ordenador de navegación. Enchufe el cable de señal 5 en la hembrilla ISO B’ del ordenador de navegación. Enchufe el conector amarillo C1 del cable del monitor en la cámara izquierda de la hembrilla ISO C1’ del ordenador de navegación. 5.
INSTRUCCIONES DE MONTAJE Compruebe las funciones del vehículo A ¡Las funciones del vehículo importantes para la seguridad sólo deben comprobarse con el vehículo parado o a velocidad lenta! ¡Las pruebas siempre deben realizarse en un recinto abierto! Sistema de frenado, alarma, iluminación, inmovilizador, tacómetro, ordenador de a bordo, radio (¡codificación!) y equipo de audio, reloj Comprobación de las funciones de navegación Con el vehículo parado, compruebe las dos funciones siguientes: Telemando Col
1 2 96 3
NAV GPS C1 A 60 40 80 100 120 A B A1 140 20 0 B C' B' A' 160 053.450.
NAV3000 11/00 ri