
User Guide

NEXTGEN CONFIGURATION
The Nextgen radio can be programmed to change options and factory
settings. Follow the steps outlined in the following pages to modify the
radio as required for the options installed and for the mode of operation
intended.
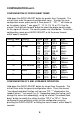
SETTING THE CLOCK FOR 12 OR 24 HOUR DISPLAY
Hold down the AUDIO ADJUST button for greater than 3 seconds. The
unit will then enter the general configuration menu. You should see CL-
24 or CL-12. To select 12 hour clock operation, press the manual “tune
up/track forward” button once or until CL-12 is displayed. If 24-hour
clock operation is desired, press the manual “tune up/track forward”
button until CL-24 is displayed. You can either press AUDIO ADJUST
again or let the configuration menu timeout, within about 5 seconds.
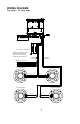
CONFIGURATION OF AUXILLARY LOW-LEVEL AUDIO INPUT
Hold down the AUDIO ADJUST button for greater than 3 seconds. The
unit will enter the general configuration menu. Press the manual “tune
down/track down” button until you see “IN--**”. To configure the radio to
accept low-level audio signal, scroll through menu items until “AUX--**”
(where ** can equal Y or N) is displayed. Use the manual “tune up/track
forward” button to change the option to “AUX-Y”. To disable this feature,
use the manual “tune up/track forward” button to change back to “AUX-
N”. To exit configuration, press AUDIO ADJUST or let the menu timeout,
within about 5 seconds.
4