BN68-00990N-03Eng_0824 8/24/06 9:18 AM Page 1 PDP-TELEVISION (PLASMA DISPLAY PANEL) Owner’s Instructions Before operating the unit, please read this manual thoroughly, and retain it for future reference. ON-SCREEN MENUS Picture In Picture (PIP) Energy Saving TELETEXT (Option) SRS TruSurroundXT Digital Natural Image engine Register your product at www.samsung.
BN68-00990N-03Eng_0824 8/24/06 9:18 AM Page 2 User Instructions ◆ Screen Image retention Do not display a still image (such as on a video game or when hooking up a PC to this PDP) on the plasma monitor panel for more than 2 hours as it can cause screen image retention. This image retention is also known as “screen burn”. To avoid such image retention, reduce the degree of brightness and contrast of the screen when displaying a still image.
n t d e BN68-00990N-03Eng_0824 8/24/06 9:18 AM Page 3 Contents ◆ GENERAL INFORMATION ■ ■ ■ ■ ■ ■ ■ User Instructions ................................................................................................... Checking Parts...................................................................................................... Control Panel ........................................................................................................ Connection Panel..................................
BN68-00990N-03Eng_0824 8/24/06 9:18 AM Page 4 Contents ◆ WISELINK ■ ■ ■ ■ ■ ■ ■ ■ ■ ■ Using the WISELINK Function................................................................................. Using the WISELINK Mode..................................................................................... Using the Photo (JPEG) List.................................................................................... Copying Photo Files........................................................................
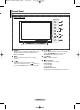
BN68-00990N-03Eng_0824 8/24/06 9:18 AM Page 5 Control Panel ➢ The product colour and shape may vary depending on the model. Front (or Side) Panel Speaker Œ SOURCE Displays a menu of all of the available input sources (TV, Ext.1, Ext.2, AV, S-Video, Component, PC, HDMI1, and HDMI2). ¨ C/P. Press to change channels. In the on-screen menu, use the C/P. buttons as you use the … and † buttons on the remote control. ´ MENU Press to see the on-screen menu of your TV’s features.
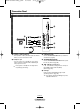
BN68-00990N-03Eng_0824 8/24/06 9:18 AM Page 6 Connection Panel ➢ The product colour and shape may vary depending on the model. Side Panel ˇ Œ ¨ or ˆ Ø ´ Œ S-VIDEO or VIDEO / AUDIO L/R - Video (S-Video or Video) and audio inputs for external devices, such as a camcorder or VCR. ˇ CF/MD/MAGICSTOR Insert an CF/MD/MAGICSTOR memory card into the slot.
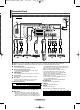
BN68-00990N-03Eng_0824 8/24/06 9:18 AM Page 7 Connection Panel ➢ The product colour and shape may vary depending on the model. Rear Panel ” Œ or Cable Television Network ’ or ∏ Ø ˆ ´ ˇ ¨ ☛ Whenever you connect an audio or video system to your set, ensure that all elements are switched off. ☛ When connecting an external device, match the colour of the connection terminal to the cable. Œ ANT IN VHF/UHF (75Ω) - 75Ω Coaxial connector for Aerial/Cable Network.
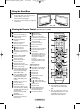
BN68-00990N-03Eng_0824 8/24/06 9:18 AM Page 8 Using the Stand-Base ➢ ➢ Two or more people should carry the PDP. Never lay the PDP on the floor because of possible damage to the screen. Always keep the PDP upright. The PDP can rotate 20 degrees in right and left directions.
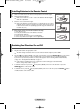
BN68-00990N-03Eng_0824 8/24/06 9:18 AM Page 9 Installing Batteries in the Remote Control 1 Lift the cover at the back of the remote control upward as shown in the figure. 2 Install two AAA size batteries. ➢ Make sure to match the “+” and “–” ends of the batteries with the diagram inside the compartment. 3 ➢ Close the cover as shown in the figure. Remove the batteries and store them in a cool and dry place if you won’t be using the remote control for a long time.
BN68-00990N-03Eng_0824 8/24/06 9:18 AM Page 10 Viewing the Menus TV Input Source List Edit Name WISELINK Move 1 Press the MENU ( ) button. The main menu is displayed on the screen. Its left side has five icons: Input, Picture, Sound, Channel, and Setup. 2 Press the … or † button to select one of the icons. ) button to access the icon’s sub-menu. Press the ENTER ( 3 Press the … or † button to move to items in the menu. ) button to enter items in the menu.
. BN68-00990N-03Eng_0824 8/24/06 9:18 AM Page 11 Plug & Play Feature When the television is initially powered on, several basic customer settings proceed automatically and subsequently. The following settings are available. 1 2 3 Plug & Play If the television is in standby mode, press the POWER ( ) button on the remote control. The message to start Plug & Play is displayed. Start Plug & Play The Language menu will automatically appear after several seconds.
BN68-00990N-03Eng_0824 8/24/06 9:18 AM Page 12 Viewing an External Signal Sources TV You can switch between viewing signals from connected equipment, such as a VCR, DVD, Set-Top Box, and the TV source (broadcast or cable). Input Source List Edit Name WISELINK Move TV : TV Enter Return Source List TV Ext.1 Ext.2 AV S-Video Component PC More Move : : : : : : 1 Press the MENU ( ) button to display the menu. 2 Press the ENTER ( ) button to select Source List.
BN68-00990N-03Eng_0824 8/24/06 9:18 AM Page 13 Storing Channels Automatically You can scan for the frequency ranges available to you (availability depends on your country). Automatically allocated programme numbers may not correspond to actual or desired programme numbers. However you can sort numbers manually and clear any channels you do not wish to watch. 1 Press the MENU ( 2 Press the … or † button to select Channel, then press the ENTER ( ) button to display the menu.
BN68-00990N-03Eng_0824 8/24/06 9:18 AM Page 14 Storing Channels Manually You can store television channels, including those received via cable networks. When storing channels manually, you can choose: ◆ Whether or not to store each of the channels found. ◆ The programme number of each stored channel which you wish to identify.
BN68-00990N-03Eng_0824 8/24/06 9:18 AM Page 15 Adding / Locking Channels Using the Channel Manager, you can conveniently lock or add channels. 1 Press the MENU ( TV ) button to display the menu. 2 Press the … or † button to select Channel, then press the ENTER ( 3 Press the … or † button to select Channel Manager, then press the ENTER ( ) button. ) button. Move ◆ Adding channels Using the Channel Manager, you can add channels.
BN68-00990N-03Eng_0824 8/24/06 9:18 AM Page 16 Sorting the Stored Channels TV This operation allows you to change the programme numbers of the stored channels. This operation may be necessary after using the auto store. Channel Country : Belgium Auto Store Manual Store Channel Manager Sort Name Fine Tune Move TV Enter Return Sort Prog. Ch. Press the MENU ( ) button to display the menu.
BN68-00990N-03Eng_0824 8/24/06 9:18 AM Page 17 Fine Tuning Channel Reception nels. If the reception is clear, you do not have to fine tune the channel, as this is done automatically during the search and store operation. If the signal is weak or distorted, you may have to fine tune the channel manually. 1 Press the MENU ( 2 Press the … or † button to select Channel, then press the ENTER ( button. 3 Press the … or † button to select Fine Tune, then press the ENTER ( button. on. n.
BN68-00990N-03Eng_0824 8/24/06 9:18 AM Page 18 Changing the Picture Standard You can select the type of picture which best corresponds to your viewing requirements. TV Picture Mode Size Digital NR SMD DNIe Demo PIP : Dynamic : Auto Wide : On : On : Off Move TV Enter Return 1 Press the MENU ( ) button to display the menu. 2 Press the … or † button to select Picture, then press the ENTER ( button.
al BN68-00990N-03Eng_0824 8/24/06 9:18 AM Page 19 Selecting the Picture Size You can select the picture size which best corresponds to your viewing requirements. 1 Press the MENU ( 2 Press the … or † button to select Picture, then press the ENTER ( button. TV ) button to display the menu. ) 3 Press the … or † button to select Size, then press the ENTER ( 4 Select the required option by pressing the … or † button, then press the ENTER ( ) button. ) button.
BN68-00990N-03Eng_0824 8/24/06 9:18 AM Page 20 Viewing the Picture in Picture (PIP) You can display a sub picture within the main picture. In this way you can watch TV program or monitor the video input from any connected devices. TV Picture Mode Size Digital NR SMD DNIe Demo PIP Move TV : Dynamic : 16:9 : On : On : Off Enter 1 Press the MENU ( 2 Press the … or † button to select Picture, then press the ENTER ( button.
BN68-00990N-03Eng_0824 8/24/06 9:18 AM Page 21 Sound Features 1 TV ) button to display the menu. 2 Press the … or † button to select Sound, then press the ENTER ( 3 Select the required option by pressing the … or † button, then press the ENTER ( ) button. 4 When you are satisfied with your setting, press the ENTER ( 5 Press the EXIT button to exit. ) button. : Custom : Off : Off : Off Move ) button.
BN68-00990N-03Eng_0824 8/24/06 9:18 AM Page 22 Time Features TV Setup Plug & Play Language Time Game Mode Blue Screen Melody PC More Move TV : English : Off : Off : Off Enter 1 Press the MENU ( 2 Press the … or † button to select Setup, then press the ENTER ( ) button. 3 Press the … or † button to select Time, then press the ENTER ( ) button. 4 Select the required option by pressing the … or † button, then press the ENTER ( ) button.
on. n. ons BN68-00990N-03Eng_0824 y 9:18 AM Page 23 Language / Blue Screen / Melody / Energy Saving 1 2 3 Press the MENU ( TV ) button to display the menu. Press the … or † button to select Setup, then press the ENTER ( ) button. Select the required option by pressing the … or † button, then press the ENTER ( ) button. 4 When you are satisfied with your setting, press the ENTER ( 5 Press the EXIT button to exit.
BN68-00990N-03Eng_0824 8/24/06 9:18 AM Page 24 Screen Burn Protection TV To reduce the possibility of screen burn, this unit is equipped with screen burn prevention technology. This technology enables you to set picture movement up/down (Vertical Line) and side to side (Horizontal Dot). The Time setting allows you to program the time between movement of the picture in minutes.
s BN68-00990N-03Eng_0824 9:18 AM Page 25 Setting the Blue Eye You can set the power of Blue LED to be on. If the power is off when Blue Eye is off, the Blue LED goes off after 5 seconds. This will save power and reduce eye fatigue. TV Setup More Energy Saving 1 Press the MENU ( 2 Press the … or † button to select Setup, then press the ENTER ( button.
BN68-00990N-03Eng_0824 8/24/06 9:18 AM Page 26 Input Mode (PC) Both screen position and size will vary depending on the type of PC monitor and its resolution. The table below shows all of the display modes that are supported: Video Signal Resolution (Dot X Line) 640 x 350 720 x 400 640 x 480 IBM PC / AT Compatible 800 x 600 848 x 480 1024 x 768 1280 x 720 1360 x 768 ◆ ◆ ◆ ◆ ◆ ➢ Vertical frequency (Hz) Horizontal frequency (kHz) Vertical polarity Horizontal polarity 70.086 70.087 59.940 70.
BN68-00990N-03Eng_0824 8/24/06 9:18 AM Page 27 Setting the PC ➢ Preset to the PC mode by pressing the SOURCE ( 1 Press the MENU ( TV ) button. ) button to display the menu. 2 Press the … or † button to select Setup, then press the ENTER ( 3 Press the … or † button to select PC, then press the ENTER ( 4 Select the required option by pressing the … or † button, then press the ENTER ( ) button. Setup Plug & Play Language Time Game Mode Blue Screen Melody PC More ) button. ) button.
BN68-00990N-03Eng_0824 8/24/06 9:18 AM Page 28 Using the WISELINK Function This function enables you to view and listen to photo (JPEG) and audio files (MP3) saved on a memory device. Side Panel ´ ´ Œ Œ USB - Insert an USB device containing JPEG and/or MP3 files into the WISELINK jack (USB jack) on the side of the TV. ´ Memory card - Insert a memory card containing JPEG and/or MP3 files into the slot on the side of the TV first. - Insert an SD/SM/MMC/MS/MSPRO/XD memory card into Memory slot 1.
BN68-00990N-03Eng_0824 8/24/06 9:18 AM Page 29 Using the WISELINK Mode 1 2 Press the MENU ( ) button to display the menu. Press the ENTER ( ) button to select Input. Press the … or † button to select WISELINK, then press the ENTER ( button. TV ) Input Source List Edit Name WISELINK : TV Move Enter Return Press the … or † button to select a corresponding memory device, then ) button.
BN68-00990N-03Eng_0824 8/24/06 9:18 AM Page 30 Using the Photo (JPEG) List You can play back the JPEG files saved on a memory device in various ways. Move Enter 1 After switching the mode to WISELINK, select a memory device that you have installed. (Refer to page 29) 2 Press the œ or √ button to select Photo, then press the ENTER ( button. JPEG files and existing folders are displayed. 3 Press the …/†/œ/√ buttons to select a file, then press the ENTER ( button.
BN68-00990N-03Eng_0824 8/24/06 9:19 AM Page 31 Using the Photo (JPEG) List Using the Options Menu ◆ Slide Show: Starts a slide show. (Refer to “Viewing a Slide Show” on page 32) ◆ Rotate: You can rotate images in full screen mode. Images are rotated in the order of 90°, 180°, 270° and 0° (original state). (Refer to “Rotating” on page 34) ➢ n o You cannot save a rotated image. ◆ Zoom: You can zoom into images in full screen mode.
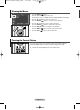
BN68-00990N-03Eng_0824 8/24/06 9:19 AM Page 32 Using the Photo (JPEG) List Viewing a Slide Show Move Enter 1 After switching the mode to WISELINK, select a memory device that you have installed. (Refer to page 29) 2 Press the œ or √ button to select Photo, then press the ENTER ( button. JPEG files and existing folders are displayed. 3 Press the INFO ( ) button to display the option (View, Slide Show, Copy, Copy All Files, Delete, Delete All Files, Print).
3 o K BN68-00990N-03Eng_0824 8/24/06 9:19 AM Page 33 Using the Photo (JPEG) List Using the Menu during a Slide Show ◆ Speed: Select to control the slide show speed. Each time the ENTER ( ) button is pressed, the speed changes repeatedly. (Normal Slow Fast) Fast ◆ Background Music: Select to choose whether you want to play MP3 file during a slide show. Each time the ENTER ( ) button is pressed, the background music activation changes repeatedly.
BN68-00990N-03Eng_0824 8/24/06 9:19 AM Page 34 Using the Photo (JPEG) List Rotating Move Enter 1 After switching the mode to WISELINK, select a memory device that you have installed. (Refer to page 29) 2 Press the œ or √ button to select Photo, then press the ENTER ( button. JPEG files and existing folders are displayed. 3 ) Press the …/†/œ/√ buttons to select a file, then press the ENTER ( button. Pressing the button over a photo icon shows the currently selected photo in full screen.
BN68-00990N-03Eng_0824 8/24/06 9:19 AM Page 35 Using the Photo (JPEG) List Zooming-In 1 After switching the mode to WISELINK, select a memory device that you have installed. (Refer to page 29) 2 Press the œ or √ button to select Photo, then press the ENTER ( button. JPEG files and existing folders are displayed. 3 ) Press the …/†/œ/√ buttons to select a file, then press the ENTER ( button. Pressing the button over a photo icon shows the currently selected photo in full screen.
BN68-00990N-03Eng_0824 8/24/06 9:19 AM Page 36 Copying Photo Files You can copy files between different memory devices installed. Move Enter 1 After switching the mode to WISELINK, select a memory device that you have installed. (Refer to page 29) 2 Press the œ or √ button to select Photo, then press the ENTER ( button. The corresponding files and existing folders are displayed. 3 Press the …/†/œ/√ buttons to select a file to be copied, then press the ENTER ( ) button.
BN68-00990N-03Eng_0824 8/24/06 9:19 AM Page 37 Deleting Photo Files You can remove any files saved on a memory device. 1 After switching the mode to WISELINK, select a memory device that you have installed. (Refer to page 29) 2 Press the œ or √ button to select Photo, then press the ENTER ( button. The corresponding files and existing folders are displayed. 3 Press the …/†/œ/√ buttons to select a file to be deleted, then press the ENTER ( ) button.
BN68-00990N-03Eng_0824 8/24/06 9:19 AM Page 38 Printing the Photo Image By connecting the TV to printers with PictBridge support (sold separately), you can send photo images from the memory device directly to the printer with a few simple operations. To Connect a Printer Using a USB Cable Side Panel Œ Turn your printer power off. ´ Connect an USB cable (sold separately) between the PictBridge jack on the TV and the USB jack on the printer.
n K BN68-00990N-03Eng_0824 8/24/06 9:19 AM Page 39 Using the Music (MP3) List You can play back the MP3 files saved on a memory device in various ways. 1 After switching the mode to WISELINK, select a memory device that you have installed. (Refer to page 29) 2 Press the œ or √ button to select Music, then press the ENTER ( button. MP3 files and existing folders are displayed. 3 Press the … or † buttons to select a file to be played, then press the ENTER ( ) button.
BN68-00990N-03Eng_0824 8/24/06 9:19 AM Page 40 Copying Music Files You can copy files between different memory devices installed. Move Enter After switching the mode to WISELINK, select a memory device that you have installed. (Refer to page 29) 2 Press the œ or √ button to select Music, then press the ENTER ( button. The corresponding files and existing folders are displayed. 3 Press the … or † button to select a file to be copied, then press the ENTER ( ) button.
BN68-00990N-03Eng_0824 9:19 AM Page 41 Deleting Music Files You can remove any files saved on a memory device. 1 After switching the mode to WISELINK, select a memory device that you have installed. (Refer to page 29) 2 Press the œ or √ button to select Music, then press the ENTER ( button. The corresponding files and existing folders are displayed. 3 Press the … or † button to select a file to be deleted, then press the ENTER ( ) button.
BN68-00990N-03Eng_0824 8/24/06 9:19 AM Page 42 Using the Setup Menu Setup displays the user settings of the WISELINK menu Move Enter After switching the mode to WISELINK, select a memory device that you have installed. (Refer to page 29) 2 Press the œ or √ button to select Setup, then press the ENTER ( button. The Setup menu is displayed. 3 Press the … or † button to select an item you want, then press the ENTER ( ) button.
BN68-00990N-03Eng_0824 8/24/06 9:19 AM Page 43 Using the Setup Menu ◆ Music Repeat: On: Plays back a music file or all music files repeatedly. Off: Doesn’t play back repeatedly. Slide Show Speed : Fast Slide Show Effect : No Transition Slide Show Repeat : Off Off : Off Music Repeat On : On Background Music Background Music Setting Screen Saver : Off VERSION P42E-13 Move ◆ Background Music: Select to determine whether to play an MP3 file during a slide show.
BN68-00990N-03Eng_0824 8/24/06 9:19 AM Page 44 Teletext Feature (depending on the model) Most television stations provide written information services via teletext. The index page of the teletext service gives you information on how to use the service. In addition, you can select various options to suit your requirements by using the remote control buttons. ☛ Œ For teletext information to be displayed correctly, channel reception must be stable.
BN68-00990N-03Eng_0824 8/24/06 9:19 AM Page 45 Teletext Feature (depending on the model) The teletext pages are organized according to six categories: Part A B C D E F ➢ ➢ Contents Selected page number. Broadcasting channel identity. Current page number or search indications. Date and time. Text. Status information. FASTEXT information.
BN68-00990N-03Eng_0824 8/24/06 9:19 AM Page 46 How to Install the Wall Mount Bracket ➢ This installation guide may be different from the PDP User’s manual. Please refer to the proper installation guide for your product. Installation Notes ◆ Contact a technician for installing the wall bracket. ◆ Samsung Electronics is not responsible for any damages to the product or harm to customers when the installation is done by the customer. ◆ This product is for installing on cement walls.
s o BN68-00990N-03Eng_0824 8/24/06 9:19 AM Page 47 How to Install the Wall Mount Bracket 3 Tighten the screws of the plastic hanger (shown in picture 2) to the back side of the PDP. 4 Remove the Safety Pins. Fasten the 4 plastic latches assembled at step (#) on the back side of the PDP using the guide holes of the wall mount, push (!) and hook (@) down to secure the PDP on the wall mount as illustrated. Secure the PDP by inserting the Safety Pins, not to fall from the wall mount.
BN68-00990N-03Eng_0824 8/24/06 9:19 AM Page 48 Setting Up Your Remote Control After it has been set up properly, your remote control can operate in five different modes: TV, VCR, Cable, DVD, or Set-Top Box. Pressing the corresponding button on the remote control allows you to switch between these modes, and control whichever piece of equipment you choose. ➢ The remote control might not be compatible with all DVD Players, VCRs, Cable boxes, and Set-Top Boxes.
BN68-00990N-03Eng_0824 8/24/06 9:19 AM Page 49 Setting Up Your Remote Control Setting Up the Remote to Operate Your DVD 1 Turn off your DVD. 2 Press the DVD button on your TV’s remote control. 3 Press the SET button on your TV’s remote control. 4 Using the number buttons on your remote control, enter three digits of the DVD code listed on page 52 of this manual for your brand of DVD. Make sure you enter three digits of the code, even if the first digit is a “0”.
BN68-00990N-03Eng_0824 8/24/06 9:19 AM Page 50 Setting Up Your Remote Control Remote Control Codes VCR Brand SAMSUNG ADMIRAL AIWA AKAI AUDIO DYNAMICS BELL&HOWELL BROKSONIC CANDLE CANON CITIZEN COLORTYME CRAIG CURTIS MATHES DAEWOO DB DIMENSIA DYNATECH ELECTROHOME EMERSON FISHER FUNAI GENERAL ELECTRIC GO VIDEO LG(Goldstar) HARMAN KARDON HITACHI INSTANT REPLAY JC PENNEY JCL KENWOOD KLH LIOYD LOGIK LXI JVC MAGNAVOX MARANTZ MARTA KONIA ORION MEI MEMOREX MGA MIDLAND MINOLTA Code 000 001 002 003 004 005 077
BN68-00990N-03Eng_0824 8/24/06 9:19 AM Page 51 Setting Up Your Remote Control CABLE BOX Brand SAMSUNG GI HAMLIN HITACHI JERROLD MACOM MAGNAVOX OAK PANASONIC PHILIPS PIONEER RCA REGAL Code 000 001 002 003 004 005 006 007 041 003 024 031 025 030 038 039 025 030 019 023 028 026 003 022 027 037 044 019 021 023 028 004 018 020 044 014 022 040 003 Brand REGENCY SA SCIENTIFIC ATLAN SPRUCER STARGATE 2000 SYLVANIA TEXSCAN TOCOM UNIVERSAL VIEWSTAR WARNER AMEX ZENITH Code 015 023 042 043 042 043 022 036 016 016
BN68-00990N-03Eng_0824 8/24/06 9:19 AM Page 52 Setting Up Your Remote Control SAMSUNG DVD Product DVD DVDR BD Record VCR COMBO VCR Record DHR COMBO Code 000 001 002 003 004 005 006 007 008 009 010 011 012 013 Product Home Theater VCR COMBO HDD Record COMBO TWIN TRAY COMBO STB DVD COMBO DVD Receiver AV Receiver Code 014 015 016 017 018 019 020 021 Code 030 075 085 072 070 071 074 086 083 084 088 111 112 114 062 074 122 123 027 065 077 078 079 082 080 125 081 095 066 146 067 068 090 060 061 089 133 13
BN68-00990N-03Eng_0824 8/24/06 9:19 AM Page 53 Troubleshooting Before contacting the Samsung after-sales service, perform the following simple checks. If you cannot solve the problem using the instructions below, note the model and serial number of the television and contact your local dealer. No sound or picture ◆ Check that the mains lead has been connected to a wall socket.
BN68-00990N-03Eng_0824 8/24/06 9:19 AM Page 54 This page is intentionally left blank.
BN68-00990N-03Eng_0824 8/24/06 9:19 AM Page 55 Correct Disposal of This Product (Waste Electrical & Electronic Equipment) (Applicable in the European Union and other European countries with separate collection systems) This marking shown on the product or its literature, indicates that it should not be disposed with other household wastes at the end of its working life.
BN68-00990N-03Eng_0824 8/24/06 9:19 AM Page 56 Contact SAMSUNG WORLD-WIDE If you have any questions or comments relating to Samsung products, please contact the SAMSUNG customer care centre. Country BELGIUM CZECH REPUBLIC DENMARK FINLAND FRANCE GERMANY HUNGARY ITALIA LUXEMBURG NETHERLANDS NORWAY POLAND PORTUGAL RUSSIA SLOVAKIA SPAIN SWEDEN U.