PCD120U Owner's Manual/Manual de L'Utilisateur/Manual del Usario AM/FM/CD Receiver / Receptor AM/FM/CD PCD120U AM / FM / CD RECEIVER PWR AM/FM/CD Ampli-Syntoniseur SEL/MENU MOD TRACK >> MUTE >> SCN RPT LOU
PCD120U Pour des instructions en Francais, référez-vous à la page 30. Para obtener instrucciones en Español, diríjase a la página 16. PREPARATION Getting Started Tools and Supplies Disconnect Battery It’s a good idea to read all of the instructions before beginning the installation. The following tools and supplies are needed to install the radio. Before you begin, disconnect the battery negative terminal.
PCD120U INSTALLATION INSTRUCTIONS Installation Using Mounting Sleeve 1. 2. 3. 4. Slide the mounting sleeve off the chassis. If it is locked into position, use the removal tools (supplied) to disengage it. Check the dashboard opening size by sliding the mounting sleeve into it. If the opening is too small, carefully cut or file as necessary until the sleeve easily slides into the opening. Do not force the sleeve into the opening or cause it to bend or bow.
PCD120U INSTALLATION INSTRUCTIONS Installation Using a Kit 1. 2. 3. 4. 5. If your vehicle requires the use of an installation kit to mount this radio, follow the instructions included with the installation kit to attach the radio to the mounting plate supplied with the kit. Wire and test the radio as described in step 4 of “Installation Using Mounting Sleeve” on page 3. Install the radio mounting plate assembly to the sub-dashboard according to the instructions of the installation kit.
PCD120U WIRING Amplifier Wiring Connect line out for optional external amplifiers. The red connector is for the right and the white connector is for the left. Gray Antenna Connector Power Antenna Connect to power antenna or amplifier. If not used, tape bare end of wire. Blue WARNING! Never combine (bridge) outputs for use with 1 speaker. Ground Connect to ground terminal. Black WARNING! Never ground negative speaker leads to chassis ground.
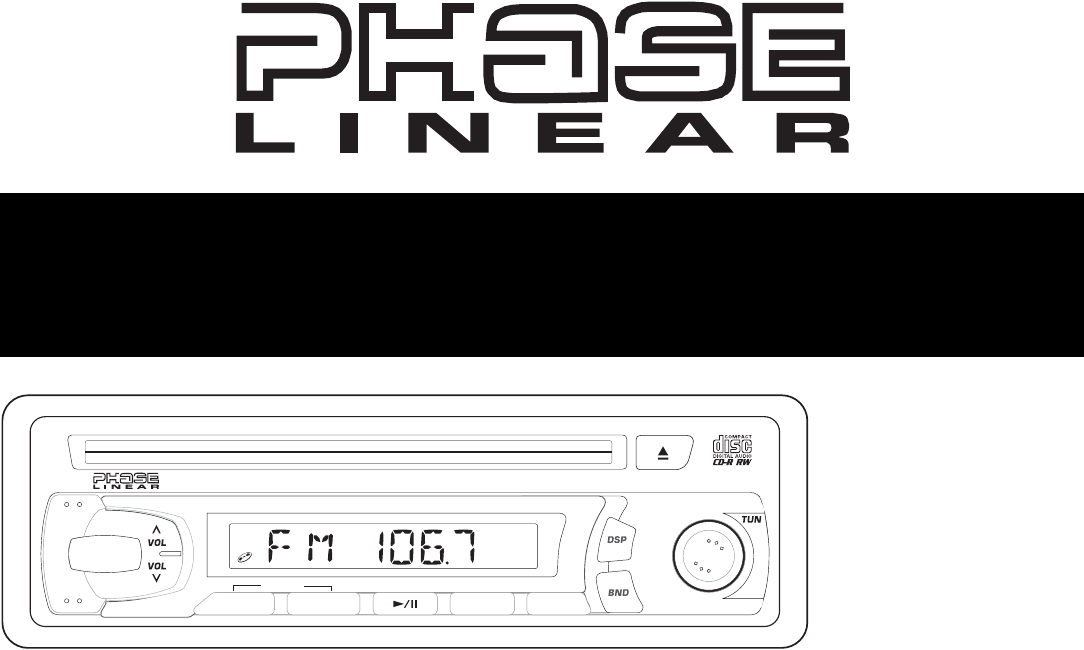
PCD120U OPERATING INSTRUCTIONS 1 Power On/Off Button Press the PWR button (1) to turn the unit on and off when the vehicle ignition switch is on. When the unit is off, the clock is automatically displayed on the Liquid Crystal Display (LCD) panel unless the ignition switch is off. If the radio is off when the ignition switch is turned off, the PWR button must be pressed to turn on the radio after the ignition switch is turned on.
PCD120U OPERATING INSTRUCTIONS 4 Bass Control To adjust the bass level, press the SEL/MENU button (4) until “BAS” appears on the display panel. Within five seconds, press the VOL buttons (3a and 3b) to adjust the bass from “BAS -6” to “BAS 06”. “BAS 00” represents a flat response. 4 Treble Control To adjust the treble level, press the SEL/MENU button (4) until “TRE” appears on the display panel.
PCD120U OPERATING INSTRUCTIONS 9 Display Selector (DSP) This unit can display either the clock time or radio frequency/CD player functions. Ordinarily, the radio frequency or CD player track indication is displayed, but the display can also show the time when the DSP button (9) is pressed. The time will then be displayed for approximately 5 seconds after which it will return to the radio or CD player function display. The correct time of day can also be set into the unit by pressing the DSP button.
PCD120U CD PLAYER OPERATING INSTRUCTIONS next lower track number will be selected as shown on the display panel. 10 Disc Slot 12 Forward Track Selector With the label surface facing up, fully insert a compact disc into the slot (10) until the mechanism engages and pulls the disc in. The disc symbol ( ) and “S -- CDP” will appear on the display. Play will begin from the first track on the disc and the track number and elapsed time of track play will appear on the display.
PCD120U CD PLAYER OPERATING INSTRUCTIONS 14 Track Scan Select (SCN) 16 Disc Eject Button During disc play, press the SCN button (14) to play the first 10 seconds of each track. (“S -SCN” is displayed with the track number). When a desired track is reached, press the SCN button again to cancel the function and play the selected track. Track Scan mode can also be canceled by activating the Repeat Play (15) function. Press the eject button (16) to stop disc play and eject the disc.
PCD120U CARE AND MAINTENANCE Your new radio/CD player does not require any maintenance. However, proper understanding of its use and handling will help you obtain maximum enjoyment of its capabilities. We recommend that you keep this manual for reference on the many features of this unit as well as how to set the clock. The following points should be observed: • When cleaning the interior of the vehicle, do not get water or cleaning fluids on the unit.
PCD120U SPECIFICATIONS CD-R and CD-RW Capability Technical Specifications Depending on media type and method of "recording/burning", some CD-R/RWs may be incompatible with this unit. After "recording/ burning" the session must be closed. Please refer to your software's recommended procedures for closing a disc/session. Review your recording software to familiarize yourself with the correct "recording/burning" procedures. We recommend using the latest versions of ROXIOTM or NEROTM burning software.
PCD120U 90 DAY LIMITED WARRANTY AUDIOVOX CORPORATION (the Company) warrants to the original retail purchaser of this product that should this product or any part thereof, under normal use and conditions, be proven defective in material or workmanship within 90 days from the date of original purchase, such defect(s) will be repaired or replaced with new or reconditioned product (at the Company's option) without charge for parts and repair labor.
PCD120U 14
PCD120U Manual del Usario
PCD120U Para obtener instrucciones en Francés, diríjase a la página 30. For instructions in English, refer to page 2. PREPARACIÓN Comenzando Herramientas y Provisiones Es buena idea leer completamente las instrucciones antes de iniciar la instalación. Las siguientes herramientas y provisiones son necesarias para instalar el radio: Contenido • Instrucciones De Instalación ................... 17 Cableado ................................................. 19 Instrucciones de Operación...................
PCD120U INSTRUCCIONES DE INSTALACIÓN Instalación Utilizando una Manga de Montaje 1. 2. 3. 4. Deslice la manga de montaje fuera del chasis. Si está trabada, utilice la herramienta para quitarla (provista). Verifique el tamaño de apertura del tablero deslizando la manga de montaje adentro del mismo. Si la apertura no es lo suficientemente grande, cuidadosamente córtela o límela hasta que la manga se deslice hacia adentro sin dificultad.
PCD120U INSTRUCCIONES DE INSTALACIÓN Equipo de Instalación INSTALACIÓN ISO Si su vehículo requiere el uso de un equipo de instalación par amontar este radio, siga las instrucciones incluidas con el equipo de instalación para adherir el radio al plato de montaje provisto en el equipo. 1. 2. 3. 4. Conecte el cable y verifique el radio como se determina en las instrucciones de Instalación Universal.
PCD120U CABLEADO Conexión del Amplificador Conecte la línea de salida para una amplificación externa óptima. El conector rojo es para la derecha y el blanco para la izquierda. Gris Conector para la Antena Alimentación Antena Conectar a la antena o al amplificador. Si no se utilizara el cable, se debe recubrir la punta del cable. Azul ¡CUIDADO! Nunca combine (hacer puente) las salidas para utilizar sólo 1 altavoz. Conexión a Tierra Conectar a la terminal de tierra.
PCD120U INSTRUCCIONES DE OPERACIÓN 1 Botón de Encendido / Apagado Presione el botón PWR (1) para encender o apagar la unidad cuando la ignición del vehículo esté en marcha. Cuando la unidad está apagada, automáticamente aparece el reloj en el Panel de Cristal Líquido (LCD por sus siglas en inglés), a menos que la ignición del vehículo esté apagada. Si el radio está apagado cuando la ignición se apaga, se debe presionar el botón PWR para encender el radio luego de que se encienda la ignición.
PCD120U INSTRUCCIONES DE OPERACIÓN 4 Control de Graves Para ajustar el nivel de graves, presione el botón SEL/MENU (4) hasta que "BAS" aparezca en la pantalla del panel. Dentro de los cinco segundos siguientes, presione los botones de VOL (3a y 3b) para ajustar los sonidos graves desde "BAS -6" a "BAS 06". "BAS 00" representa un sonido neutro. 4 Control de Agudos Para ajustar el nivel de agudos, presione el botón SEL/MENU (4) hasta que "TRE" aparezca en la pantalla del panel.
PCD120U INSTRUCCIONES DE OPERACIÓN 9 Selector de Visualización (DSP) Esta unidad puede exhibir ya sea el reloj o la frecuencia del radio y las funciones de reproducción de CD. Generalmente lo que se exhibe es la frecuencia del radio o la indicación de la pista de CD, pero cuando se presione el botón DSP (9) la unidad mostrará la hora. La hora será exhibida por 5 segundos luego de lo cual se volverá a mostrar la función de radio o CD.
PCD120U FUNCIONAMIENTO DEL LECTOR DE CD 10 Ranura para Disco Con el sello hacia arriba, inserte completamente un CD dentro de la ranura (10) hasta que el mecanismo lo enganche y jale hacia adentro. El símbolo de disco ( ) y "S-CDP" aparecerán en pantalla. La reproducción iniciará desde la primera pista del disco y el número de pista y tiempo de reproducción aparecerán en pantalla. NOTA: La unidad está diseñada para pasar discos compactos estándar de 5" solamente (12 cm.).
PCD120U FUNCIONAMIENTO DEL LECTOR DE CD 14 Selector de Exploración de Pistas (SCN) Durante la ejecución de un disco, presione el botón SCN (14) para reproducir los primeros 10 segundos de cada pista ("S -- SCN" y el número de pista aparecerá en pantalla). Cuando se alcance la pista deseada, presione SCN nuevamente para cancelar la función y reproducir esa pista seleccionada. El modo de Exploración de Pistas también se puede cancelar activando la función de Repetición (15).
PCD120U CUIDADOS Y MANTENIMIENTO Su nuevo reproductor de radio/CD no requiere mantenimiento. Sin embargo, el entender cómo se lo utiliza y mantiene adecuadamente le ayudará a sacar el máximo provecho de sus capacidades. Recomendamos que conserve este manual para utilizarlo como referencia sobre las funciones de esta unidad así como también la manera en poner en hora el reloj.
PCD120U ESPECIFICACIONES Dependiendo del tipo de medio y método de grabación, algunos CD-R/RW pueden ser incompatibles con esta unidad. Luego de grabar el CD, se debe cerrar la sesión. Por favor, siga los procedimientos recomendados por su programa de grabación para cerrar un disco. Revise su programa de grabación para familiarizarse con los procedimientos correctos de grabación de CD.
PCD120U GARANTIA LIMITADE DE 3 MESES AUDIOVOX CORPORATION (la Compañía) garantiza al comprador minorista original del presente producto que en el caso de que este producto o cualquiera de las partes del mismo, bajo circunstancias y condiciones de uso normal, tuviera algún defecto, tanto en el material como en la mano de obra, dentro de un plazo de 3 meses a partir de la fecha de compra original, dicho(s) defecto(s) serán reparados o reemplazados (a criterio de la Compañía) sin cargo alguno por las piezas y
PCD120U 28
PCD120U Manual de L'Utilisateur
PCD120U Para obtener instrucciones en Español, diríjase a la página 16. For instructions in English, refer to page 2. PRÉPARATION Mise en Marche C'est une bonne idée de lire toutes les instructions avant de commencer l'installation. Table des Matières Instructions d’Installation ......................... 31 Câblage ................................................... 33 Instructions d'Operation .......................... 34 Opération de la Platine CD...................... 37 Soin et Entretien..............
PCD120U INSTRUCTIONS D'INSTALLATION Installation en Utilisant un Manchon de Montage 1. 2. 3. 4. Glissez le manchon de montage du châssis. S'il est verrouillé, utilisez les outils d'enlèvement (fournis) pour le désengager. Vérifiez la taille d'ouverture sur le tableau de bord en glissant dedans le manchon de montage. Si l'ouverture n'est pas assez grande, coupez ou nivelez à la lime comme il faut jusqu'à ce que le manchon glisse facilement dans l'ouverture.
PCD120U INSTRUCTIONS D’INSTALLATION Installation de la Trousse INSTALLATION ISO Si votre voiture exige l'usage d'une trousse d'installation pour monter la radio, suivez les instructions qui accompagne la trousse pour attacher la radio au plateau de montage fourni avec la trousse. 1. 2. 3. 4. Câblez et testez la radio en suivant les instructions pour l'installation universelle.
PCD120U CÂBLAGE Câblage Amplificateur Branchez le fil pour un amplificateur externe facultatif. Le fil rouge est pour la droite et le fil blanc pour la gauche. Gris Connecteur de Antenne Antenne motorisée Branchez à l’antenne motorisée ou à é l’amplificateur. S’il n’est pas utilis , recouvrez l’extrémité dénudée du fil de ruban adhésif. Bleu AVERTISSEMENT ! Ne combinez jamais des sorties (ponts) pour utilisation avec un haut parleur. Mise à la tere Connectez à la borne de mise à la terre.
PCD120U INSTRUCTIONS D'OPERATION 1 Bouton de Puissance en Marche/en Arrêt Appuyez sur le bouton PWR (1) pour mettre l'appareil en marche ou en arrêt lorsque le commutateur d'allumage est allumé. Lorsque l'appareil est en arrêt, l'horloge est automatiquement affiché dans le panneau d'affichage à cristaux liquides à moins que le commutateur d'allumage ne soit éteint.
PCD120U INSTRUCTIONS D'OPERATION 4 Contrôle de Basse Pour ajuster le niveau de basse, appuyez sur le bouton SEL/MENU (4) jusqu'à ce que BAS apparaisse sur le panneau d'affichage. Dans cinq secondes appuyez sur les boutons VOL (3a et 3b) pour ajuster le niveau de basse d'un minimum de BAS -6 jusqu'à un maximum de BAS 06. BAS 00 représente une réponse plate. 4 Contrôle d'Aigu Pour ajuster le niveau d'aigu, appuyez sur le bouton SEL/MENU (4) jusqu'à ce que TRE apparaisse dans le panneau d'affichage.
PCD120U INSTRUCTIONS D'OPERATION 9 Sélectionneur d'Affichage (DSP) Cet appareil peut afficher soit l'heure de l'horloge ou les fonctions fréquence radio/ platine CD. D'habitude, la fréquence radio ou l'indication de piste platine CD sont affichés, mais l'affichage peut aussi montrer l'heure lorsque vous appuyez sur ce bouton. L'heure sera affichée pendant cinq secondes après quoi l'affichage reviendra à l'affichage de la radio ou de la platine CD.
PCD120U OPÉRATION DE LA PLATINE CD 10 Fente du Disque 12 Sélectionneur de Piste Avant Avec l'étiquette en haut, insérez un disque compact dans la fente (10) jusqu'à ce que le mécanisme s'engage et tire le disque vers l'intérieur. Le symbole du disque ( ) et S-CDP vont apparaître sur le panneau d'affichage. La reproduction commencera à partir de la première piste du disque et le numéro de piste et le temps écoulé de la reproduction de piste vont apparaître sur le panneau d'affichage.
PCD120U OPÉRATION DE LA PLATINE CD 14 Sélectionneur de Balayage Piste (SCN) Appuyez sur le bouton SCN (14), alors qu'un disque est en train de jouer, pour jouer les dix premières secondes de chaque piste. (S -SCN sera affiché avec le numéro de piste). Lorsqu'une piste désirée est atteinte, appuyez de nouveau sur le bouton SCN pour annuler la fonction et jouer la piste sélectionnée. La mode balayage de piste peut aussi être annulé en activant la fonction Répétition (14).
PCD120U SOIN ET ENTRETIEN Votre nouvelle platine CD/radio n'a pas besoin d'être entretenu. Cependant, une compréhension correcte de son utilisation et manipulation vous aidera à obtenir une jouissance maximum de ses capacités. Nous recommandons que vous gardez ce guide comme référence pour les fonctions multiples de cet appareil, aussi bien que pour régler l'horloge.
PCD120U SPECIFICATIONS Capacité CD-R et CD-RW Spécifications Techniques Dépendant du type de média et des méthodes d'enregistrement quelques CD-R/RW peuvent être incompatible avec cet appareil. La séance doit être close après l'enregistrement. Référez-vous aux procédures recommandées de votre logiciel pour clore un disque/séance. Revoyez votre logiciel d'enregistrement afin de vous familiariser avec les procédures d'enregistrement correctes.
PCD120U GARANTIE LIMITÉE DE 3 MOIS AUDIOVOX CORPORATION (la Société) garantit à l’acheteur initial du produit que si tout ou partie de ce produit, en cours d’utilisation et sous des conditions normales, venait à présenter des vices de matière primitive ou des défauts de fabrication, dans les 3 mois suivant la date d’achat initial, ce(s) défaut(s) sera(seront) réparé(s) ou remplacé(s) par un produit neuf ou reconditionné (au choix de la Société), sans frais de pièces ni de maind’oeuvre.