OWNER'S MANU AL MANUAL ACD-88 POWER BND CD-R/RW PLAYBACK LOUD LOC EQ AF TA TP MP3 PTY EQ SEL CLAS POP ROCK CDP EON LOC REG ST MONO SW LOUD D.DIR T/F EJECT M A N U / S K I P MONO OPEN MODE MUTE AS/PS 1 PAU 2 SCN 3 RPT 4 SHF 5 D.DN 6 D.UP SCN ACD-88 AM/FM/MPX RADIO WITH FOLD-DOWN REVERSIBLE FRONT PANEL, COMPACT DISC PLAYER, CD CHANGER CONTROLS WIRELESS REMOTE CONTROL AND QUARTZ CLOCK Released 10-4-02.
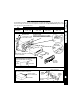
INSTRUC T IONS INSTALL ALLA INSTRUCT ALL ATAION T IONS INST ALL T IONINSTRUC INSTALL ALLA INSTRUCT INST INSTALLATION INSTRUCTIONS This unit is designed for installation in cars, trucks, and vans with an existing radio opening. In many cases, a special installation kit will be required to mount the radio to the dashboard. These kits are available at electronics supply stores and car stereo specialist shops. Always check the kit application before purchasing to make sure the kit works with your vehicle.
DAY MON. - FRI.
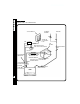
RRAADIO DIO WIRING SPE A K ER WIRING SPEA RADIO WIRING REFER TO PAGE 5 FOR SPEAKER WIRING AUTOMATIC ANTENNA CAR FUSEBLOCK RED “RADIO” OR “ACCESSORY” FUSE 0.
REFER TO PAGE 4 FOR RADIO WIRING WARNING! ! THE AMPLIFIERS IN THIS RADIO ARE ONLY DESIGNED FOR USE WITH 4 SPEAKERS. ! NEVER COMBINE (BRIDGE) OUTPUTS FOR USE WITH 2 SPEAKERS. ! NEVER GROUND NEGATIVE SPEAKER LEADS TO CHASSIS GROUND. ! FAILURE TO WIRE EXACTLY AS SHOWN BELOW MAY CAUSE ELECTRICAL NOTE: CHECK WITH YOUR RAMPAGE/AUDIOVOX CAR STEREO SPECIALIST OR CALL 1-800-645-4994 FOR RECOMMENDATIONS OF THE CHANGER MODELS THAT WILL WORK WITH YOUR RADIO.
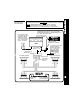
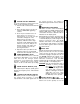
OPER AT ING INSTRUC OPERA INSTRUCTT IONS 1 3, 4, 5, 6, 7 18 17, 33 ACD-88 POWER TA TP MP3 PTY CDP EQ SEL LOUD CLAS POP ROCK EON LOC REG ST MONO SW LOUD D.DIR T/F 8 10 BND CD-R/RW PLAYBACK LOC AF 2 20 (BEHIND PANEL) 28 EQ EJECT M A N U / S K I P 11 21 22 36 37 MONO OPEN MODE 1 PAU AS/PS MUTE 2 SCN 3 RPT 4 SHF 5 D.DN 6 D.UP SCN 19 34 32 9 14 23 24 38 POWER ON/OFF BUTTON ( ) Press this button to turn the unit on or off.
2 5 3 2 OPERA INSTRUCTT IONS OPER AT ING INSTRUC 3 so the FAD indication appears on indication 5 seconds after the last button adjustment or when another function is the display panel. Within 5 seconds of activated. choosing the Fader mode, press the audio to adjust the frontadjust Down button TREBLE CONTROL rear speaker balance to the front speakers To adjust the treble level, first select the or the Up button to adjust it to the rear Treble mode by pressing the SEL button speakers.
OPER AT ING INSTRUC OPERA INSTRUCTT IONS on the display panel to show that a disc is signals, including weaker (more distant) stations. still loaded in the unit. bl BAND SELECTOR (BND/LOUD) Each time this button is pressed, the radio band is changed. The indication AM, F1, F2 or F3 will appear on the display panel according to your selection.
STATION PRE-SET MEMORIES To set any of the 6 pre-set memories in each band, use the following procedure: 1. Turn the radio on and select the desired band. 2. Select the first station to be pre-set tuning using the MANU/SKIP controls. 3. Press the pre-set button to be set and continue to hold it in for approximately 2 seconds.
OPER AT ING INSTRUC OPERA INSTRUCTT IONS beginning of a particular track when a disc is in play. Each time the Forward TRACK ) side of the button is pressed, Select ( the next higher track number will be selected as shown on the display panel. Similarly, each time the Backward TRACK Select ) side of the button is pressed, the next ( lower track number will be selected as shown on the display panel.
bu cu TIME/FREQUENCY SELECTOR (T/F) During radio operation, press this button to call the time display on the incorporated quartz clock. The current time will appear together with an A or P indication. The display will return to the radio frequency indication after 5 seconds. During disc play press of this button to call the time display. The display will return to the disc indication after 5 seconds. dl EQUALIZER BUTTON (EQ) The EQ button applies preset sound effects to the unit’s audio output signal.
OPER AT ING INSTRUC OR CODES OPERA INSTRUCTT IONS / SET SETTT ING THE CLOCK / CD ERR ERROR 12 3.To restore the front panel to its normal operating position, press the release button in the upper right corner of the blank panel; the panel will then flip down to expose the operating controls in the horizontal position. Simply push in on the bottom edge of this side to engage the panel in its normal vertical position.
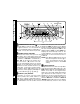
Size: 7" W x 2" H x 6-5/16" D 178 mm x 50 mm x 160 mm Operating Voltage: 12 volts DC, negative ground Fuse Ratings: Constant (Yellow wire): 15 AMP. Switched (Red wire): 0.5 AMP. Output Power: 160 watts maximum (40 watts x 4 channels) Output Wiring: Floating-ground type designed for 4 speaker use. Front and rear channels CANNOT be combined (bridged) for use with 2 speakers. RCA low-level outputs (front and rear channels). Output Impedance: Compatible with 4 – 8 ohm speakers.
CD CH A NGER CONTR OL S CHA CONTROL OLS CD CH A NGER CONTR OL S CHA CONTROL OLS Built into this radio are controls to operate an optional CD changer. Please check with your Rampage/Audiovox car stereo specialist or call 1-800-645-4994 for recommendations of the models that will work with this radio. Adjustment of the audio functions (volume, tone, balance, and fader) for the CD changer operate in the same manner as they do for radio play.
button will also select tracks in the shuffled order instead of the normal progression. The Shuffle Track mode can be canceled by pressing the SHF button or by activating the Scan or Repeat Play functions. When the SHF button is pressed and held, the DSF indication will appear on the display panel and the discs in the magazine will be played in a random, shuffled order, as well as the tracks on each disc.
REMO TE CONTR OL OPER AT ION REMOTE CONTROL OPERA WIRELESS REMOTE CONTROL OPERATION cm The wireless remote control supplied with this model is capable of operating most of the features of the unit from a remote location. Each button on the remote control functions in the same way as the referenced button on the main unit. For optimal operation of the remote control, always aim it toward the Remote Sensor on the front panel of the main unit.
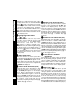
3 2 4 6 3.Depending on the recording status, conditions of the disc and the equipment used for the recording, some CDRs/CD-RWs may not be played on this unit. 7 CARE AND MAINTENANCE 5 17 16 10 The radio section of your new sound system does not require any maintenance. We recommend you keep this manual for reference on the many features found in this unit as well as how to set the clock.
CARE AND MAINTENA INTENANCE CA RE A ND MA INTENA NCE MP3 PL AYBACK OPER AT ION PLA OPERA ! When not using the disc player, always remove the compact disc. ! When the vehicle warms up during cold weather or under damp conditions, moisture may condense on the lens of the disc player. Should this occur, the player will not operate properly until the moisture has evaporated.
CA RE A ND MA INTENA NCE CARE AND MAINTENA INTENANCE AUDIOVOX CORPORATION (the Company) warrants to the original retail purchaser of this product that should this product or any part thereof, under normal use and conditions, be proven defective in material or workmanship within 12 months from the date of original purchase, such defect(s) will be repaired or replaced with new or reconditioned product (at the Company's option) without charge for parts and repair labor.
© 2002 Audiovox Electronics Corp.