OWNER'S MANU AL MANUAL AND INST ALLA TION GUIDE INSTALLA ALLATION AV-455 DET ACHABLE FRONT P ANEL DETACHABLE PA ELECTRONICALL Y-TUNED AM/FM/MPX RADIO ELECTRONICALLY WITH A U T O-REVERSE CASSETTE PLA YER TO-REVERSE PLAY AND QUARTZ CLOCK Released 5-27-99.
INSTALLATION INSTRUCTIONS INSTALLATION INSTRUCTIONS This unit is designed for installation in cars, trucks, and vans with an existing radio opening. In many cases, a special installation kit will be required to mount the radio to the dashboard. These kits are available at electronics supply stores and car stereo specialist shops. Always check the kit application before purchasing to make sure the kit works with your vehicle.
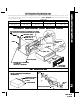
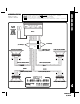
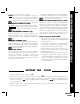
UNIVERSAL INST ALLA TION USING MOUNTING SLEEVE INSTALLA ALLATION EXISTING DASH OPENING (FILE EDGES TO FIT IF NECESSARY-DO NOT OVERFILE) : IF DASH IS SOLID, USE MOUNTING SLEEVE AS A TEMPLATE & CUT OPENING NOTE: NOTE NUT PERFORATED STRAP FASTEN THIS END TO SCREW STUD ON REAR OF CHASSIS BEND TOP TABS UPWARD BEND BOTTOM TABS DOWNWARD SCREW INSTALLATION INSTRUCTIONS Toll-FreeInstallationAssistance The installation and wiring connections for this unit are so simple, we doubt you'll need our help, but, if yo
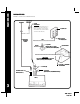
RADIO WIRING RADIO WIRING REFER TO PAGE 4 FOR SPEAKER WIRING ANTENNA AUTOMATIC ANTENNA BLUE IMPORTANT THE BLUE WIRE CAN BE USED TO REMOTELY ACTIVATE AN AUTOMATIC ANTENNA OR AN EXTERNAL AMPLIFIER (SEE ANTENNA OR AMPLIFIER MANUAL) EXISTING ANTENNA CABLE FUSEBLOCK "RADIO" FUSE + 12V ACCESSORY RED SCREW BLACK METAL PART OF DASH (DRILL HOLE IF NECESSARY) CAR BATTERY YELLOW IMPORTANT YELLOW WIRE MUST BE CONNECTED AS SHOWN OR RADIO WILL NOT OPERATE PROPERLY 4 PIN PLUGS POSITIVE (+) TERMINAL 12V BATTERY
WARNING! l l l l REFER TO PAGE 3 FOR RADIO WIRING THE AMPLIFIERS IN THIS RADIO ARE O N L Y DESIGNED FOR USE WITH 4 SPEAKERS. N E V E R COMBINE (BRIDGE) OUTPUTS FOR USE WITH 2 SPEAKERS. N E V E R GROUND NEGATIVE SPEAKER LEADS TO CHASSIS GROUND. FAILURE TO WIRE EXACTLY AS SHOWN BELOW MAY CAUSE ELECTRICAL DAMAGE TO THE RADIO.
OPERATING INSTRUCTIONS 5 OPERATING INSTRUCTIONS ON-OFF POWER BUTTON Press this button to turn the unit on (“P ON” will briefly appear on the display panel) or off. VOLUME/LEVEL CONTROL To increase the volume level, turn the knob clockwise. The volume will increase and the level will be shown on the display panel from a minimum of “VOL 00”to a maximum of “VOL 63”. To decrease the volume level, turn the knob counter-clockwise.
AUDIO MUTE SELECTOR (MUTE) Press this button momentarily to mute the volume from the system (“MUTE” will flash on the display panel). Pressing the button again or adjusting the will return to the volume level Volume control setting in use before the Mute function was activated. AM/FM BAND SELECTOR (BAND) RADIO MODE SELECTOR Each time this button is pressed, the radio band is changed. The indications “AMI”, “AMII”, “FMI”, “FMII” or “FMIII” will appear in the display panel according to your selection.
OPERATING INSTRUCTIONS 7 from the display panel). To return to stereo reception mode, press the button again so that the “ST” indication appears on the display panel. PRE-SET SCAN (PS) AUTO-STORE TUNING (AS) Press this button momentarily to scan the stations pre-set into the memories of the band in use. The unit will stop at each pre-set station for 5 seconds before continuing to the next pre-set station (the pre-set number on the display panel will flash during Pre-Set Scan operation).
1. Uponinitialinstallationafterallwiringiscompleted. 2. If there is a malfunction of any of the switches on the unit, pressing the Re-Set button may clear the system and return to normal operation. FRONT PANEL RELEASE BUTTON (OPEN) This button is used to release the mechanism that holds the front panel to the chassis. To detach the front panel, press the button so that the panel drops to the lowered position. Grasp the panel at the middle and pull it off of the chassis.
SPECIFICATIONS SPECIFICATIONS//CARE CAREAND ANDMAINTENANCE MAINTENANCE SPECIFICATIONS Size: 7" W 178 mm x x 2" H 50 mm x x 6" D 150 mm Operating Voltage: 12 volts DC, negative ground Output Power: 100 watts maximum (25 watts x 4 channels) Output Wiring: Floating-ground type designed for 4 speaker use. The amplifiers in this unit are N O T designed for use with 2 speakers. RCA pre-amp level outputs. Output Impedance: Compatible with 4 - 8 ohm speakers Pre-Amp Output: 500 mv.
PROBLEM PROBABLE CAUSE CHECK FOLLOWING Incorrect power connection Red wire to +12V ACC.
MONTH LIMITED W ARRANTY WA AUDIOVOX CORPORATION (the Company) warrants to the original retail purchaser of this product that should this product or any part thereof, under normal use and conditions, be proven defective in material or workmanship within 12 months from the date of original purchase, such defect(s) will be repaired or replaced with new or reconditioned product (at the Company's option) without charge for parts and repair labor.