OWNER'S MANUAL ELECTRONICALLY-TUNED AM/FM/MPX RADIO WITH AUTO-REVERSE CASSETTE PLAYER, CD PLAYER, CD CHANGER CONTROLS AND QUARTZ CLOCK Model GC-600
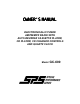
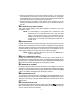
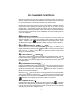
OPERATING INSTRUCTIONS u 12 dl b 345 678 1 cl b o b p b s 9bt ct dc br b o m u q drc cs nd b cc pd qm d n blm s c qdt crd o u d c pd b n ON/OFF POWER BUTTON Press this knob to turn the unit on or off. 2 VOLUME CONTROL To increase the volume level, turn this knob clockwise. The volume will increase with each detent position of the control and the level will be shown by the bars on the display panel. To decrease the volume level, turn the knob counterclockwise.
the volume higher than the memory setting, the unit will return to the memory setting when turned back on. If, however, the unit is turned off with the volume lower than the memory setting, the unit will return to the lower setting when turned back on. 4 BASS CONTROL To adjust the bass level, first select the Bass mode by pressing the Select knob once so that the “BAS” indication appears on the display panel.
8 FRONT/REAR FADER CONTROL To adjust the front-rear speaker balance, first select the Fader mode by pressing the Select knob five times so the “FAD” indication appears on the display panel. Within 5 seconds of choosing the Fader mode, turn the knob clockwise to fade the sound to the rear speakers or counter-clockwise to fade the sound to the front speakers. The fader position will be shown by the bars on the display panel from F R ( full front ) to F R ( full rear ).
3. Press the pre-set button to be set and continue to hold it in. The volume will be momentarily muted and the pre-set number will appear on the display panel indicating that the station is now set into that memory position and can be recalled at any time by pressing that pre-set button. 4. Repeat the above procedure to enter stations in the remaining 4 pre-set memories on that band and the 5 memories on each of the other 2 bands of the unit.
bu EJECT BUTTON ( ) Tape playback is stopped and the cassette is ejected by pushing this button. Radio, CD player or CD changer operation will automatically resume when the cassette is ejected, depending on which mode was in operation prior to cassette play. cl DISC SLOT With the label surface facing up, gently insert the disc into the slot until the softloading mechanism engages and disc play begins. The rotating disc indicator and track number will appear on the display panel.
cq REPEAT PLAY SELECTOR (RPT) During disc play, press this button to repeat the play of the selected track (“RPT” will appear on the display panel). Play of the track will continue to repeat until the button is pressed again and the “RPT” indication disappears from the display panel. The Repeat Play mode will also be cancelled by activating the Track Scan or Shuffle Play functions.
SETTING THE CLOCK 1. Switch the vehicle ignition “on” and the radio “off” (the time will be shown on the display panel). 2. Press and hold the Time/Frequency Selector (T/F) seconds until the time display begins flashing. cu for approximately 2 3. Within 5 seconds of the display beginning to flash, press the Manual Down Tuning ( ) side of button to adjust the hours and the Manual Up Tuning ( ) side of the button to adjust the minutes to the correct time. bl 4.
CD CHANGER CONTROLS Built into this radio are controls to operate an optional 10-disc or 6-disc CD changer. Please check with your SPS/Audiovox or Prestige car stereo specialist for recommendations of the models that will work with this radio. Adjustments of the audio functions (volume, tone, balance, and fader) operate in the same manner during CD changer play as they do for radio, CD, and cassette play. The following controls will operate the CD changer when it is installed and connected to this radio.
ds TRACK/DISC SCAN (SCAN) When the Scan button is pressed, the “SCAN” indication will appear on the display panel and the first 10 seconds of each track on the disc will be played in order. When a desired track is reached, press the Scan button again and play of that track will continue (“SCAN” will disappear from the display panel). The Track Scan mode will also be cancelled by activating any other disc function (Select, Cue, Review, Shuffle or Repeat).
CD CHANGER ERROR SIGNS If a problem should develop while operating the CD changer, the following error sign indications may appear on the display panel. E:01 Indicates abnormal disc changer function. Consult your car stereo specialist or service facility for further assistance. E:02 Indicates excessive temperature conditions. The error sign will go off and play will resume when the changer temperature returns to the normal range. E:07 Indicated disc may be loaded in the magazine upside-down.
CARE AND MAINTENANCE The radio and CD player sections of your new sound system do not require any maintenance. We recommend you keep this manual for future reference on how to set the clock and for general reference of the many features found in this unit. As with any cassette player, the cassette section of this sound system does require a minimum of maintenance to keep it in good working condition.