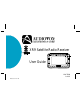
XR9 Satellite Radio Receiver User Guide SATELLITE RADIO 1 2 3 4 5 6 7 8 9 0 128-7220 1 of 32 Released: 10-11-04
Congratulations You are one step closer to experiencing the latest innovation in XM Satellite Radio. XM will revolutionize your in-home or vehicle entertainment with: • Over 130 channels of original programming, including – 68 channels of 100% commercial-free music – guaranteed, Over 60 channels of world-class sports, news, talk and information. Your Audiovox XR9 receiver must be used with an adapter kit, such as the Audiovox Home Kit, Boom Box or Vehicle Kit as required by your specific installation needs.
Contents Antenna Aiming (Home Installation) ................ 18 Channel Add/Skip ............................................ 18 Memory Options ............................................... 19 Time Options .................................................... 19 Clock ................................................................. 19 Time Format ................................................. 20 Time Zone ..................................................... 20 Set Alarm ...............................
Cautions and Warnings 1. Do not install the XR9 in a position that hinders your view through the windshield, or obstructs viewing of the dashboard indicators and displays. 2. Do not install the unit where it may obstruct the operation or deployment of safety devices, such as airbags, etc. 3. Do not allow operation of the unit to detract from safe driving practices; remember that you are responsible as the vehicle operator to adhere to all safe driving and traffic regulations. 4.
NOTE: The XM® signal can be received and processed virtually anywhere as long as there are no obvious satellite signal obstructions such as nearby buildings, high terrain, parking garages or tunnels. The XR9 is typically installed in an accessible location of the vehicle (dash area), consistent with line-of-sight operation of the remote control, and/or within easy reach of the driver. For home use, situate the XR9 close to your stereo receiving equipment.
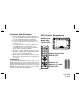
(b) Call XM at 1-800-XM RADIO (967-2346). One of XMs friendly Customer Care representatives will take the necessary information and walk you through the activation process. DISPLAY BUTTON PRESET/DIRECT BUTTON MENU (FM) BUTTON SELECT (ENTER) BUTTON MEMORY (T-SEL) BUTTON POWER BUTTON XM XR9 Controls The Audiovox XM® XR9 Unit provides 10 control buttons and 10 number keys. Power Button: This button applies power to and removes power from the XM® XR9 as follows: 1.
Channel Up/Down Buttons and Select Button: The CH ∧/∨ buttons are the primary controls for navigating through the various lists and option menus available on the unit. In the default mode, these buttons provide sequential tuning through the available program channels. The Up ( ∧ ) button, when pressed, tunes up one channel, while the Down ( ∨ ) button, when pressed, tunes down one channel.
Preset Button: Each momentary press of the PRESET button allows the user to switch between 3 banks of Channel presets (10 presets each A, B, and C, plus Direct (Dir) channel entry. When in any of the three preset banks, momentarily pressing any of the number buttons will recall the stored channel. In the Direct (Dir) mode, use the number buttons to directly enter the desired channel number. Keypad Buttons 0-9: These buttons are used to directly enter a desired channel number.
the SELECT button will display all the available channel numbers and channel information. The first press will display the channel name. The second press of the DISPLAY button will display all currently available artists. The third press of the DISPLAY button will display song titles. While viewing the Channel List, pressing the Display button changes Channel List to Artist List to Song List. The available content listing now displays information by the Artist Name.
Select the desired channel you wish to save into memory by using the CH Up/Down buttons, the direct tuning method or the category tuning method. With the desired channel playing, press and hold any of the numbered keypad buttons (0-9). A confirmation tone is heard, and a confirming message (Channel Stored) is displayed. Continue this procedure for storing all desired channels. To retrieve a preset channel, momentarily press and release the number button corresponding to the desired channel.
Memory Button (T SEL Function): This feature allows the user to capture and store the current program data information (Artist & Song title) with up to 30 listings (30 Artist/Song Title combinations). The unit also has the capability to search the current incoming XM signal and alert the user when a saved song is being played. 1. While the XR9 is in any of the standard display modes, momentarily pressing and releasing the MEMORY button stores the current program data information within the unit’s memory.
Momentarily pressing the SELECT button will exit the current artist/song title information and return to the memory list. 3. When the T SEL function is active, each time the XR9 is turned on, it automatically searches the incoming signal to determine if a match exists between the signal and the currently saved information stored in receiver memory. If one or more matches are found, an audible beep tone will be heard indicating that a match has been found.
4. If the MEMORY button is pressed to save a currently-playing selection, and all of the memory spaces are full, Memory Full will flash on the display for 1 second. 10 Country A 12:34AM America Stored 1 Black Data Eyed Peas / Jo .. Memory Delete Paul Taylor Memory Full Yes NO Undercover To delete a selection from memory, press and hold the Memory button to display the list; then highlight the selection you wish to delete using the Channel Up/Down buttons.
Menu Descriptions Menu Display Operations To enter the Menu Options page, press the MENU Button. The Main Menu list will appear on the LCD display. Using the CH Up/Down buttons, highlight the option you wish to adjust and then press the SELECT button.
The current numerical setting (1-10) is indicated above the bar graph. Pressing the CH Up/Down buttons adjusts the bar graph indication and function accordingly.
FM Options The following adjustments are possible: NOTE: The internal wireless FM transmitter allows you to play the XR9 audio through any standard FM receiver, eliminating the need to hardwire connections. FM On/ Off Frequency Setting FM On/Off: Upon entering this mode, press the CH Up/ Down buttons to toggle between the FM ON or FM OFF function/display selection. To select and/or exit this function, press the SELECT button. (No button activity for 10 seconds will exit this function.
Lock Option When this feature is selected, the following options appear on the display: Lock Option Lock/UnLock Edit Code Lock / Unlock Edit Code Upon entering this mode, the user is prompted to enter a four digit numerical code that is used to lock/unlock channel access. Once the code has been entered, press the SELECT button; the channel list will be displayed with the current channel in play highlighted. Use the Channel Up/Down buttons to navigate the list and highlight the channel to be adjusted.
Lock Options Lock Options Enter Code Enter Code The current setting is indicated by number of bars in the graph. Moving the antenna location should maximize the number of bars in the respective graph, thus ensuring optimum reception. To exit this function, press the SELECT Button. **** Lock Options Lock Options New Code New Code NOTE: Terrestrial repeaters are typically used in large urban areas where structures may affect the line of sight satellite signal.
Once a channel has been highlighted, pressing the SELECT Button displays a check mark (ü) next to the channel, and prevents the channel from being accessible during any of the tuning modes. Skipped channels can only be accessed either through direct channel number entry or by returning to this menu and going through the same process to return the skipped channel to the list. Upon adding a channel, the check mark is removed from alongside the channel number/name.
Daylight Savings Time, if used. The clock data is provided via the XM channel, and will update based on the received signal. Time Zone (GMT-09:00) Alaska (GMT-08:00) Pacific (GMT-07:00) Mountain (GMT-06:00) Central Time Format: The clock format option provides: 12 Hour (Default) 24 Hour Use the Channel Up/Down buttons to highlight the desired format and press the SELECT button. Use the Channel Up/Down buttons to highlight the desired time zone and press the SELECT Button.
Set Alarm: When this menu option is highlighted and selected, you will be able to set the unit to turn on at a specific time. The last selected channel prior to shutdown will be present when the Alarm feature is activated. Additionally, a series of beep tones will be heard. Time Options Clock Set Alarm Sleep Mode Set Alarm Alarm On/ Off AlarmOn/Off On/ Off Alarm On Off Alarm Time Press any button on the front panel to silence the alarm tones.
Sleep Off (Factory Default) 60 minute 120 minutes 180 minutes Sleep Off is the factory default setting. Use the Channel Up/Down buttons to scroll through the desired sleep times. When the desired time is highlighted, press the SELECT button. The unit will now turn off after the selected time has expired.
Press CH to Change Char Press CH to Change Char BAB BA BAA Stored BAB BAC You now have the option to either search this list for the desired symbol or further fine-tune your search by entering the next significant character. Use the Channel Up/Down buttons to search the list or, by pressing the Category Down button and then the Category Up button, highlight the next character. Repeat this procedure to access other required characters and then press the SELECT button to enter the stock symbol list.
Once highlighted, press the SELECT button to display the pop-up confirmation screen with the Yes/No options. Highlight the Yes selection to erase the current stock symbol. A pop-up screen appears to confirm Stock Erased. If Erase All is highlighted and selected, all of the currently stored stock symbols will be erased from memory if the Yes option is highlighted and selected.
• • • • • NOTE: 1. From the Artist/Song Title default display, repeatedly pressing the Display button will cycle through the following available display formats: Headlines World National Artist/Song Title>Artist /Song Title (Large Font)> Stock Ticker>Info Extras Sports Entertainment News and associated options are only available during XM Transmissions Use the Channel Up/Down buttons to highlight the desired news report, and press the SELECT button to enter.
Scroll Speed When Scroll Speed is highlighted and selected, Normal Speed and Slow Speed options are displayed. Use the Channel Up/Down buttons to high light the desired speed and press the SELECT button to enter. If Slow Speed is selected, it takes approximately 20 seconds for the ticker to scroll across the screen; in Normal Speed, the ticker crosses the screen in about half the time.
Upon entering this mode, pressing the Channel Up/Down buttons toggles between the Yes or No function/display selection. If Yes is chosen, the unit reverts to the original factory settings for the following parameters: • • • • • • • • • All Presets revert to empty Normal Tuning Mode Display Contrast to 50% FM Modulator to On FM Frequency to 88.
Remote Control Unit 1 2 1 2 3 4 5 6 7 8 9 13 12 0 11 3 10 4 5 6 9 AUDIO OX 8 7 1. POWER Turns the XR9 on and off. 2. Presets 0-9 These buttons are used to directly enter a desired channel number. They are also used when entering and recalling preset channel numbers into memory. 3. CH+/- Used to access streams in ascending and descending order. Also used for adjustments in the various menus. 4. PRE Used to switch between the three preset bands A, B and C, and DIR (tuning). 5.
Troubleshooting Specifications PROB AB L E C AU SE REMEDY XR9 does not turn on Blown fuse, power cable not properly connected Check fuse check power cable Check antenna display message Satellite antenna not connected Check satellite connection to XR9 Antenna or cable is faulty Contact system installer or vendor FM modulator frequency contains static Switch to another FM frequency Vehicle antenna not connected to radio Check vehicle antenna cable.
THIS PAGE LEFT BLANK INTENTIONALLY -30- 128-7220 30 of 32
12 MONTH LIMITED WARRANTY AUDIOVOX CORPORATION (the Company) warrants to the original retail purchaser of this product that should this product or any part thereof, under normal use and conditions, be proven defective in material or workmanship within 12 months from the date of original purchase, such defect(s) will be repaired or replaced with new or reconditioned product (at the Company's option) without charge for parts and repair labor.
© 2004 Audiovox Electronics Corporation 128-7220 128-7220 32 of 32