PROGRAMMING AND TROUBLESHOOTING MANUAL The SECURIKEY+ system is designed for use in vehicles equipped with the factory installed Power Door Lock System Table of Contents Topic Preparation for System Programming Programming New or Replacement Transmitters Testing the System Programming the Selectable Features Transmitter / Receiver Information Clearing Transmitter Codes from Memory Turning The Arm / Disarm Chirps On Turning The Arm / Disarm Chirps Off Troubleshooting Form Number 128 - XXXX Pg.
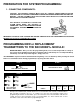
PREPARATION FOR SYSTEM PROGRAMMING: 1. CONNECTING COMPONENTS: CAUTION: THE SECURITY HARNESS MUST HAVE ALL VEHICLE CONNECTIONS INSTALLED PROPERLY AND ALL SECURITY COMPONENTS CONNECTED BEFORE CONNECTING THE VEHICLE’S BATTERY . FAILURE TO COMPLY WITH THIS CAUTION COULD RESULT IN SYSTEM FAILURE AND OR FAILURE TO PROGRAM PROPERLY. THE SECURITY SYSTEM WILL GO INTO THE ALARM MODE WHEN THE BATTERY IS CONNECTED. PRESS THE UNLOCK BUTTON ON THE REMOTE TRANSMITTER TO DISARM THE SYSTEM.
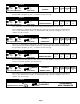
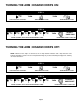
STEP 4 E E VALET SWITCH ON THEN OFF 2 BEEPS CHANNEL 2 " UNLOCK " HORN SOUNDS MEMORY MEMORY POSITION POSITION #1 #2 MEMORY MEMORY POSITION POSITION #3 #4 Now press the UNLOCK button ( hold the button for 3 seconds until the horn sounds ) on all transmitters that you want to program ( up to 4 ), or continue on to the next step.
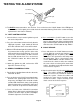
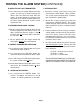
TESTING THE ALARM SYSTEM: Lock Button Unlock Button LED Light Green Button A. Test BOTH remote transmitters, one at a time. Press and release the "LOCK" button. If the LED light on the transmitters fails to glow, you need to check the transmitter battery. (Refer to the section on battery replacement in the Owner's Manual.) B. VALET CONTROL SWITCH: 1. Sit in the driver's seat, insert the ignition key and turn to the ON position. 2. Press the valet control switch and verify that the LED light responds.
TESTING THE ALARM SYSTEM [CONTINUED]: E. DEFECTIVE OR LOST TRANSMITTER: I. INTRUSION TEST: 1. Press and release the "LOCK" button to arm the system. Use the key to unlock and open the driver's door. The alarm will sound. Enter the vehicle, insert the ignition key and turn to the on position. Press the valet control switch once, the alarm should deactivate and the vehicle should now start. 1. Rearm the security system by pressing and releasing the "LOCK" button. Open any door.
PROGRAMMING THE SELECTABLE FEATURES: The SECURIKEY+ system offers a number of selectable features that can be changed, allowing you to custom fit the system to your customer. The following is a list of the features that are selectable and can be changed using the valet switch and any transmitter that is programmed to the system installed in the vehicle.
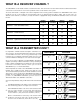
WHAT IS A RECEIVER CHANNEL ? The SECURIKEY+ control module includes a 6 Channel Receiver, and each channel can learn and memorize four different transmitter codes. Each receiver channel is reserved for a particular remote control function of the system. The chart shown below is a diagram of the actual configuration of the memory positions available in the SECURIKEY+ main control module.
WHY IS THIS INFORMATION IMPORTANT ? Let's first consider that any SECURIKEY+5 transmitter code or button can be programmed into any one of the six receiver channels of the system. The system will allow you to program transmitter code 1 ( lock button ) into receiver channel 4 ( headlight activation ), but since the lock and unlock buttons are clearly marked with icons describing their function, these two buttons should always be programmed into receiver channels 1 and 2.
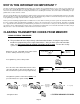
TURNING THE ARM / DISARM CHIRPS ON: STEP 1 E THEN THEN START WITH VALET SWITCH OFF TURN IGNITION KEY TO ON TURN IGNITION KEY TO OFF STEP 2 E E E E E E 1 CHIRP = CHIRPS ON THEN HORN SOUNDS 1 CHIRP = CHIRPS ON WITHIN 5 SECONDS, VALET SWITCH ON AND THEN OFF 3 TIMES TURNING THE ARM / DISARM CHIRPS OFF: NOTE : Whenever the chirps are turned off, the 4 chirp intrusion indicator and 3 chirp defective zone indicator will always operate.
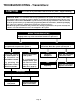
TROUBLESHOOTING - Transmitters: SYMPTOM One or both of my transmitters doesn't work any more ( stopped working ). HELPFUL HINT : If a transmitter has been programmed to the system at one time, it will remain programmed. Disconnecting the vehicle's battery or removing the transmitter battery will not erase transmitter codes from the SECURIKEY+ system's memory.
TROUBLESHOOTING - Horn / Chirps: My system does not chirp when Arming and Disarming. I cannot turn my chirps on ( or off ). The alarm will set, but will not sound when opening a door. SYMPTOMS HELPFUL HINTS : 1) The arm and disarm chirps are turned on and off by using the L.E.D. / Valet switch in combination with the ignition switch. The SECURIKEY+ system does not use dip switches to turn the chirps on and off.
TROUBLESHOOTING: 4. Reading the Connection Points at the 24 pin Main Alarm Connector : A. When checking the 24 pin main alarm connector, be sure that it is disconnected from the alarm control module. All other connections to the main alarm harness should remain connected. 1 2 3 4 5 6 7 8 9 10 11 12 13 14 15 16 17 18 19 20 21 22 23 24 24 PIN MAIN ALARM CONNECTOR ( TERMINAL VIEW ) PIN 1 - DOOR TRIGGER - BROWN WIRE Pin 1 to Ground Approximately 12 Volts with all doors closed.