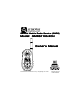
General Mobile Radio Service (GMRS) Model : GMRS1100-2CH Owner ’s Man ual Owner’s Manual EMG PWR F © 2002 Audiovox Electronics Corp.
CAUTION NEVER ATTEMPT TO CHARGE ALKALINE OR DRY CELL BATTERIES, AS BATTERIES MAY BURST CAUSING PERSONAL INJURY AND DAMAGE TO THE PRODUCT. WHEN RECHARGING NICKEL METAL HYDRIDE (NiMH) BATTERIES WITH THE SUPPLIED AUDIOVOX CHARGER AND WALL ADAPTER, USE ONLY AUDIOVOX-APPROVED RECHARGEABLE BATTERIES. USE OF THE AUDIOVOX CHARGER WITH OTHER BRANDS OF BATTERIES IS NOT RECOMMENDED, AS BATTERY CHARGING TIMES WILL VARY WITH DIFFERENT BRANDS.
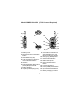
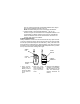
Model GMRS1100-2CH (FCC License Required) SP. MIC CHG 5 7 6 4 3 16 8 M 9 15 17 2 14 EMG 10 PWR F 11 1 13 1. Battery Cover 2. Monitor/Function Confirmation Button 3. Detachable Carry Clip 4. Push-To-Talk (PTT) and Function Confirmation Button 5. Antenna 6. External Speaker (SPK), Microphone (MIC)/CHG Jacks 7. Built-in Speaker 8. Liquid Crystal Display (LCD) 3 12 9. Combination Transmit Indicator (Red)/Receive and Monitor Indicator (Green) 10. Emergency (EMG) Button 11.
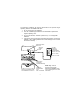
Model GMRS 1100-2CH DISPLAY 1 2 EMG 3 8 9 10 11 4 5 12 6 13 14 7 1. Beep Tone Indicator: Icon appears when beep button confirmation tone is selected; icon disappears when tone is off. 2. Key Lock Indicator: Icon appears when the keypad is locked. This function disables keys such as channel up/down and Function (F). 3. Monitor Indicator: Icon appears when the Monitor (M) button is pressed and the channel monitor function is activated. 4.
11. Roger Beep Tone Indicator: This icon appears when the Roger Beep tone is on, and disapppears when the tone is not in use. 12.Small Segment Display: Indicates the CTCSS tone code (1-38) function is active for the main channel in use. 13.Dual Watch Mode Indicator: Icon appears when dual watch mode is active. 14.Voice Activated Transmission (VOX) Indicator: This icon appears when the VOX mode is activated. Equipment and Accessories Supplied 1. 2. 3. 4. 5.
Use only Audiovox-approved rechargeable batteries and charger when charging batteries internal to the unit. NOTE: To extend battery life, avoid overcharging the batteries. 3. Various Brands of Rechargeable Batteries - Use of the Audiovox charger with other brands of rechargeable batteries is not recommended, as battery charging times will vary with different brands of batteries. Refer to the manufacturer’s instructions for charging other brands of batteries.
The following guidelines will improve performance and provide longer operating times for the GMRS1100-2CH: 1. Do not mix old and new batteries. 2. The use of alkaline-type batteries is recommended to provide the longest operating time. 3. Do not mix alkaline, standard (carbon-zinc) or rechargeable batteries. 4. If the unit is not to be used for an extended period of time, remove the batteries. Old or leaking batteries can cause damage to the unit and will void the warranty.
GMRS1100-2CH OPERATIONAL MODES FUNCTION (F) BUTTON CHANNEL SELECT CTCSS SELECT POWER SELECT VOX SELECT DUAL WATCH BUTTON BEEP ROGER BEEP CALL SELECT NOTE: To differentiate between operating modes, look for HI or LO indication below the battery power level indicator when in GMRS mode.Refer to the appropriate section of this manual for de tailed operating instructions for each mode.
volume. The display will indicate the current volume level (UL) followed by the number (0-7). As volume is increased upward, the beep sound (if enabled) also increases, and vice-versa. When the minimum and maximum volume settings are reached, a unique tone will sound. Monitor/Display Backlight Button (2) This button is used to to check activity on the current frequency before transmitting.
The PTT Button can also be used as a two-way call ringer. Pressing the button twice quickly will call another party on the same channel. The transmit LED will light red for approximately 3 seconds and then go out. Up Channel/Volume Button (16) In the standby mode, pressing this button will increment the listening volume. When in function edit mode this button will be used to adjust the unit’s settings.
Operating Modes and Features GRMS/FRS Operation: - From GMRS/FRS standby mode, press and hold the PWR button for 2 seconds to turn on power. - Press the Function (F) button so the Channel number flashes. - Select the desired channel with the Up (16) and Down (13) Buttons. When receiving a call, the signal strength meter appears to indicate incoming received signal strength and the Monitor section of the Transmit/Monitor LED(9) lights green.
To change the channel: - From GMRS/FRS standby mode, press the Function (F) button (14) until the channel number flashes. - Press the Up Button (16) briefly to move to the next higher main channel number. - Press the Down Button (13) briefly to move to the next lower main channel number. - Press the PTT or PWR button momentarily to confirm selection. CTCSS Mode (Sub-Channel) Selection The Coded Tone Controlled Squelch System (CTCSS) has 38 Sub-Frequencies.
Transmit Power Selection Mode (GMRS Channels Only) This feature permits selection of the transmitting power level to high or low. Using low power, the unit will have a lower transmit range, but battery life will be increased. NOTE: You will find that for the majority of your needs, the low-power setting will provide adequate communications on all channels; there should seldom be any need to use high power, except in situations where you need absolute maximum range.
- Momentarily press the PTT or PWR button to confirm the VOX selection. - The VOX icon will appear steady on the LCD display. VOX can be turned off by selecting oF as the setting. Dual Watch Mode This feature allows you to monitor two channels at the same time. While in dual watch mode, the unit will continuously monitor both the primary and dual watch channel. Received signals will be heard for 5 seconds, then the unit will resume scanning the two channels.
Button Beep (Key Tone) This feature allows the transceiver to sound a confirmation tone whenever the following keys are pressed: Monitor (M) Button, Up/Down Buttons, Function Button, SCAN Button or the EMG Button. To turn the key tones on or off: - From GMRS/FRS standby mode, press the MODE Button six times until bP, the Bell ( ) icon, and On or oF flash on the LCD display. - Press the Up or Down Button to toggle the key tone feature On or Off. - Press the PTT or PWR button momentarily to confirm selection.
- Press the Up or Down Button to preview and hear the 5 available call melodies. - Press the PTT or PWR button momentarily to confirm selection. Refer to the PTT button (4) to transmit ring signal. Channel Scan Operation This feature allows you to monitor all channels automatically for valid signals. While scanning, you can transmit and receive. When a signal is received, the scan is interrupted and will return to scan mode approximately 5 seconds after reception is terminated.
Key Lock Selection Mode This feature prevents accidental channel change to the preferred settings of the unit. The Key Lock function temporarily disables the Up, Down and Function (F) Buttons. To access the Key Lock selection menu: - From FRS standby mode, press and hold the Scan Button for over 2 seconds to Lock the Key function; the ( ) icon appears on the display. - The PTT and Monitor Buttons are not effected.
To turn the Emergency Channel feature on or off: - Press and release the EMG Button; EMG appears on the display together with a Channel 20 indication. - When the transceiver is set to Emergency Channel 20, The transceiver transmits and receives on a special frequency (CH20: 462.6750 MHz). - To turn off the Emergency Channel feature, press and release the EMG Button Battery Alert When the battery icon ( ) blinks on the LCD panel, recharge unit or install fresh batteries.
Warning • Do not operate the transceiver unless you are licensed to do so. • Remove the batteries from the transceiver if it is not expected to be used for long periods. This will eliminate the possibility of chemicals leaking from the batteries and corroding the transceiver. • Avoid exposing the transceiver to water or extremes of temperature. • Do not use this device in or near a mining facility, which uses remotely triggered explosives or in areas labeled “Blasting Area”.
Troubleshooting Problem Possible cause Correction No transmission while pressing the PTT Button Weak batteries Incorrect battery polarity Charge or replace batteries Install the batteries following the directions in paragraph Installing the Batteries.
Tec hnical Specif ica tions: echnical Specifica ications: General Frequency Range: Channels 1 through 7 are shared with FRS radios. Channels 8 through 14 are FRS only. Channels 15 through 22 are GMRS only. Channel Spacing Privacy Codes Dimensions (W x H x D) (Without Antenna) Refer to frequency chart on next page. Refer to frequency chart on next page. Refer to frequency chart on next page. 12.5kHz 38 for each main channel 2.125 W x 4.0 H x 1.325 D (54.0 mm x 101.6 mm x 33.
This transceiver complies with FCC regulations for use in the United States of America. Use in other countries may be prohibited or restricted by local regulation. Please check with the local regulating agency before using this device outside the United States of America. Main Channel Frequencies: CHANNEL /TYPE FREQ (MHz ) CHANNEL /TYPE FREQ (MHz ) 1 GMRS/FRS 462.5625 12 FRS 467.6625 2 GMRS/FRS 462.5875 13 FRS 467.6875 3 GMRS/FRS 462.6125 14 FRS 467.7125 4 GMRS/FRS 462.
Continuous Tone Coded Squelch System Tone Frequencies (in Hz) CTCSS Freq. Hz CTCSS 1 2 3 4 5 6 7 8 9 10 11 12 13 14 15 16 17 18 19 67.0 71.9 74.4 77.0 79.7 82.5 85.4 88.5 91.5 94.8 97.4 100.0 103.5 107.2 110.9 114.8 118.8 123.0 127.3 20 21 22 23 24 25 26 27 28 29 30 31 32 33 34 35 36 37 38 * oF = No Tone 23 Freq. Hz 131.8 136.5 141.3 146.2 151.4 156.7 162.2 167.9 173.8 179.9 186.2 192.8 203.5 210.7 218.1 225.7 233.6 241.8 250.
90 DAY LIMITED WARRANTY Applies to Audiovox Family Radio and General Mobile Service Products. AUDIOVOX CORPORATION (the Company) warrants to the original retail purchaser of this product that should this product or any part thereof, under normal use and conditions, be proven defective in material or workmanship within 90 days from the date of original purchase, such defect(s) will be repaired or replaced with new or reconditioned product (at the Company's option) without charge for parts and repair labor.