AUDIOVOX OPERATOR’S GUIDE A F X 3 5 . 0 0 INTEGRATED PERSONAL FACSIMILE Please read this Operator’s Guide carefully before using your new AFX-2500.
These limits are designed to provide reasonable protection against harmful interference in a residential installation. This equipment generates, uses, and can radiate radio frequency energy and, if not installed and used in accordance with the instructions, may cause harmful interference to radio communications. However, there is no guarantee that interference will not occur in a particular installation.
DOC Information Q The following information is applicable only to AFX-2500 facsimile machine installed in Canada. Notices The Canadian Department of Communications (DOC) label identifies certified equipment. This certification means that the equipment meets certain telecommunications network protective, operational and safety requirements. The Department does not guarantee the equipment wil operate to the user’s satisfaction.
Renseianements du Minis&e des Communications Les renseignements suivants ne s’appliquent L’utilisateur devrait s’assurer que les raccordements qu’aux tekopieurs install& au Canada. de mise a la terre de I’alimentation, des lignes telephoniques et du systeme de tuyauterie Avis hydraulique, si present, soient tous relies L’etiquette du Ministere des Communications e n s e m b l e s .
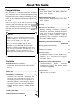
About This Guide Congratulations Receiving . . . . . . . . . . . . . . . . . . . . . . . . . . . . . . . . . . . . . . . . . . . . . . . . . . . . . . . . . . . . . . . . . . . . . . . . 14 AUTO RCV. Mode, TEL Mode, ANS/FAX Mode, Voice Request ! Your facsimile is a compact electronic facsimile (fax) machine that uses advanced telephone and computerized image-sending technology to send copies of your important documents anywhere ir the world. Your fax is easy to set up and use, but you should.
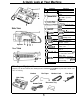
A Quick Look at Your Machine Function Part Name No. iT supports the document. 1 Document Tray 2 Document Guide IT adjusts the document oaded. sLIDE it towards the front 3f the unit to open the aper cover. : controls the operating Jnctions. Document feeds out from lere. same as the regular elephone. .
A Quick Look at Your Machine continued _ One-Touch Keys _ Dial Keypad Control Panel [OHD] HOLD Key and OHD Indicator LCD Window Press to dial numbers without picking up the handset. The indicator lights when speaker activates. Or, press the key to put a call on hold. The window displays messages that instruct you when operating your facsimile. In standby mode, the windows displays the current time and date. One-Touch Keys POWER indicator Lights when the unit is on.
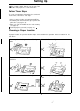
Setting Up 0 This section shows how to set up your fax machine and prepare it to send and receive. Follow These Steps To set up your machine and prepare it to send and receive faxes, follow these four steps: Choose a proper location to install your machine Assemble your unit and hook it up to power and phone line (see pages 8, 9). l Enter your unit’s ID number into the unit’s memory (see page 12). 0 Install fax paper in your unit (see page 11).
Assembling & Connecting Installing the Handset l Plug one end of the handset cord to the jack on the bottom of the handset. Then, plug the other end of the cord to the HANDSET jack on the left side of the machine. Many modern office buildings feature identical wall jacks for telephone lines and data lines for computers. If the computer terminals in your office plug into wall jacks, make sure that you plug your unit into a live telephone jack, not a data jack.
Assemblina & Connecting Connecting the Power Plug the power cord to the power receptacle. Plug the other end of the cord into a properly grounded, three-pin AC power outlet. Note: Use an outlet not shared with equipment that generates electrical noise or consumes large amounts of electricity, such as an air conditioner or off ice copier. Choosing Dial Mode Set the DIAL Mode switch on the left side of the unit for the type of service you have (pulse or tone).
Assembling & Connecting continued Setting Speaker Volume The VOLUME switch on the left side of the unit controls the loudness of the dialing tones you hear through the speaker when you dial with the handset down. You can set the volume to low (all the way to the right), medium (center), or high (all the way to the left). Setting Ringer Volume The RINGER switch on the left side of the unit lets you adjust the ringer volume to three different settings. Try all three to see which volume level is best for you.
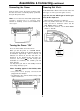
Loading Fax Paper PAPER RUNNING OUT 3 3. Pull the paper edge out about an inch from the edge of the fax machine. You’re running low when the edge of the paper is pink or black. When you’re out of paper, the NO PAPER indicator lights to let you know. 1. Open the paper cover by pulling the release button toward the front of the unit. Alert tones sound and the NO PAPER indicator lights when the cover is lifted. Remove the empty paper roil core, if any. 4.
Setting Up Basic Information Setting Date and Time Your fax machine has a timer function. Note that the time must be entered in 24-hour format (refer to the box below). The date and time also appear in various reports. In addition, they are added to the top of all transmitted copies along with your name and number if you set the feature to be activated through the user options (see page 25). For times before Noon or after Midnight, use the same numbers as 12hour time.
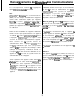
Setting Up Basic Information continued How To Enter Name 1. Press the number key labeled with the character 3. The number appears on the display. Check the number and if it is correct, press [YES]. you want. Press it once to obtain the number, twice or four times to obtain the proper character. (see below chart) ENTER N A M E 2. When the character you want appears on the display, press [*] to confirm it. 4. Enter your name, for example, AUDIOVOX as described below.
Receiving 0 This section shows how to receive faxes and control the functions that affect the way you receive faxes. Manual vs. Automatic Fax Machines Facsimile machines come in two basic types: Manual fax machines require the sender to dial the number, listen for a fax tone from the receiving machine (or tell the receiving operator to press the [START] key on their machine), and then press [START/COPY] to send. Notes: D Your unit is preset to the TEL MODE when it comes out.
Receiving Receiving in ANS/FAX Mode continued l Note: To use ANS/FAX receiving mode, you have to install an answering machine (see page 8). This mode is not applicable for the standard phone installed in EXT.TEL jack. l 1. To select the ANS/FAX mode, press [AUTO RECEIVE] repeatedly until the indicator flickers 2. When a call is received, the answering machine answers and plays the recorded outgoing message.
Receiving continued Receiving Using the Extension Canceling a Reception Telephone Press [STOP] twice. Even after pressing [STOP] once, your unit will keep receiving until you press [STOP] again. Once pressed [STOP], following message appears to remind you of that your unit is communicating. When you are using a standard telephone and if the telephone is connected to the EXT.TEL jack on your fax machine (see page 8), you can transfer a fax transmission to the fax machine using the extension telephone. 1.
Important Receiving Facts Voice Request Window Messages If you want to speak to the remote party who is sending a document to you: During receiving, the window will display a message similar to the one below to inform you of its status or activity. 1. Press [V.REQUST] during the reception. The V. REQUEST indicator lights to confirm your request. But your request will not go through until the unit finishes receiving the last document. 2.
Important Receiving Facts . Clearing Paper Jams If the fax paper jams, DO NOT pull it out. Doing so could damage your fax unit. To clear a fax paper jam, open the paper cover by pulling the release button toward the front of the unit. Then remove the jammed paper. B Avoid storing faxes in contact with blueprint (diazo) copies and plastic film or binders. The chemicals in these materials may fade the image. Reload the fax paper as described in “Loading Fax Paper.
Sendina Q This section shows how to prepare a document and send it. it also shows how to take advantage of features that save time or improve the quality of your transmission, such as onetouch or speed dialing, changing resolution and contrast, and using your fax machine to make copies. slightly and insert the sheets with a slight push to assure smooth feeding. Be sure the bottom sheet enters first as shown below. Sending a Document 1.
Important Sending Facts Memory Dialing If you have stored frequently used numbers in the unit’s memory, and if the remote party you are calling is set to receive documents automatically, you can send a document at the touch of a key or using [SPEED] key and 2-digit number. For information on storing numbers for memory dialing, see “Storing One-Touch & Speed Dial Numbers” on page 24.
Important Sending Facts continued Window Messages During sending, the window will display a message similar to the one below to inform you of its status or activity. In this example, the number in the top of the window is the telephone number of the receiving fax. SEND’ means you are sending, "G3" indicates the communications standard observed by both fax machines, ‘9.6’ indicates the transmission speed (9600 bps), and the number following ‘P:’ is the number of the page being sent.
Important Sendina Facts continued Voice Request Confirmation Report If you are sending a document and want to speak to the remote party; A confirmation report will be printed out after every send operation if you have selected this feature to be activated by answering [YES] to the prompt ‘CONF. REPORT ?’ while setting “User Options” (see page 25). Example is provided on page 26. 1. Press [V.REQUEST] while sending. The V. REQUEST indicator lights to confirm your request.
Controlling Transmission Quality Preparing a Good Original 2 or more To prevent jamming and ensure good results on the receiving fax machine: . Remove all staples, clips and tape from the original documents. . If you must re-fax a document that was faxed to you, we recommend that you make a copy of it on a regular office copier, and fax the copy for better transmission quality. To create good quality original documents, do the following: l l l Type them instead of writing.
Storing One-Touch & Speed Dial Numbers 0 Instead of manually dialing numbers, you can use either one-touch keys or 2digit speed dial numbers to quickly dial the numbers that have been stored in your unit’s memory. You c a n store up to 20 telephone numbers of up to 34 digits each and the corresponding destination names of up to 20 digits each. Storing name is optional. (ENTER] 4.
Settina User Options The option settings for your machine are preset at our factory. If you do need to change the settings, first print out the options list to see the current option settings (see page 27). ~ Note: To return the unit to the standby mode in the middle of setting user options, press [STOP]. To set or change options, press [FUNCTION] and then press [2]. Following message appears. jSET1 1. Press [YES]. TEPd. ID ? Notes: l You can enter any number digit from [0] to [9] by using dial keypad.
Printing Reports Q The report function of your fax unit is used to see what numbers you have stored, what settings you have made, or what faxes you have sent and received. Before making changes, print out the list to check the current settings. After making changes, print the list to confirm the new settings.
Printing Reports Options List continued Reception Report The options list shows the current settings for the user options. The reception report shows the records of your receiving activity and its results. The report shows who received it, the date and time, the elapsed Before changing options, print this report to check how the options are currently set. Also print this report after making changes to confirm the new time, how many pages were received and its results.
Maintenance and Troubleshooting Troubleshooting Guide Many common problems have simple solutions. Check quickly through the following list before calling for service. Symptom Nothing appears on the window when the power switch is turned on. The unit does not receive faxes. Receiving fails after you press [START/COPY] The unit does not send faxes. Received faxes are dirty or hard to read. The unit does not make copies. You get no dial tone.
Maintenance and Troubleshooting continued Cleaning Components Sate : Be careful not to lose the bushing on one md of the roller when disassembling. When the copied documents are hard to read, clean the machine’s scanning glass and white roller. If they are dirty, the quality of the transmission image and copy becomes degraded. 1. Lift the control panel using hand. 3. Wipe the roller clean with a soft cloth dampend with alcohol. Then dry throughly. 2. Disassemble the white roller.
Maintenance and Troubleshootina continued 5. If a ‘DOCUMENT JAM’ occurs, dampen the lintfree cloth with water, and wipe the ADF rubber and ADF roller clean as shown below. How a Fax Works Facsimile is a system of sending printed or other graphic information from one location to another by producing a copy or “facsimile” of that information d the remote location. A fax unit transmits audio ones over the same telephone lines you use for lerson-to-person conversation.
Specifications Type of Unit Desktop Transceiver Communication Line Public Switched Telephone Network and PABX Compatibility CCITT Group 3 Compression Scheme Modified Huffman, Modified READ (MH/MR) Modem Speed 9600/7200/4800/2400 bps Resolution 3.85 line/mm, 7.7 line/mm Scanning Method Flat-Bed scanning using CIS (Contact Image Sensor) Print Method Thermal Input Document Size 216 mm (8.5 “) Effective Scanning Width 210 mm (8.27 “) +/- 1% Effective Recording Width 216 mm (8.