DV-T27N-SJ 99.11.
DV-T27N-SJ 99.11.26 5:17 PM ˘ ` A2 Safety information CAUTION RISK OF ELECTRIC SHOCK DO NOT OPEN CAUTION: TO REDUCE THE RISK OF ELECTRIC SHOCK, DO NOT REMOVE COVER (OR BACK). NO USER-SERVICEABLE PARTS INSIDE. REFER SERVICING TO QUALIFIED SERVICE PERSONNEL.
DV-T27N-SJ 99.11.26 5:3 PM ˘ ` A4 Safety information, continued 13 Power Lines- An outside antenna system should not be located in the vicinity of overhead power lines, other electric light or power circuits, or where it can fall into such power lines or circuits. When installing an outside antenna system, extreme care should be taken to keep from touching or approaching such power lines or circuits as contact with them might be fatal.
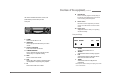
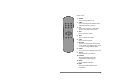
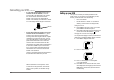
Overview of the equipment, continued 8 This section summarizes the buttons, controls, and terminals that you will use with your VCR. Front panel RECORD/OTR Press to record the program currently airing on the channel. Press multiple times to process one.touch-recording (OTR) time options. 9 Remote Sensor This sensor receives a signal from your remote control. Do not block sensor view from remote control. 10 Display panel Displays information to assist you in operating the VCR successfully.
Remote control 1 POWER Press to turn your VCR on or off. 2 INPUT Press to select between the VCR tuner and the Audio/Video Input jacks (auxiliary). 3 0-9 Press to select channels or to make certain selections when using the menu system. 4 PLAY Press to play a video cassette. 5 REW Press to rewind a video cassette. 6 STOP Press to stop tape movement. 7 REC/OTR Press to record the program currently airing on the channel. Press multiple times to process one-touch-recording (OTR)time options.
Overview of the equipment, continued Installing the remote control batteries 1 Open the battery compartment on the back of the remote control. 2 Install two AAA size batteries as shown. Make sure the “+” and “–” terminals are oriented correctly. 3 Replace the cover. Using the remote control Hold the remote control within an angle range of about 30° from either side of the remote sensor. The remote control range is about 23 feet (7m) from the VCR.
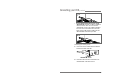
Connecting your VCR, continued VCR ANT.IN • If your antenna system has two sets of twin 300-ohm leads, purchase a combiner (available at electronics stores). Place one set of twin leads underneath the screws on the combiner and tighten the screws. Do the same with the other set of twin leads. Press the cable from the combiner onto the ANT. IN terminal on the back of your VCR. VCR ANT.IN Connecting your VCR to your TV 1 Connect one end of a coaxial cable to the RF OUT terminal on the back of the VCR.
3 Connect a audio cable to the AUDIO OUT terminal on the back of the VCR. 4 Connect the other end of the audio cable to the AUDIO IN terminals on the TV. If you have a stereo TV, connect only the white (left) terminal. 3 4 Connecting a cable system If your cable set-up is not described below, please contact your cable company for more information. • If your cable system does not require the use of a cable box, simply press or screw the incoming cable onto the ANT IN terminal on the back of your VCR.
Connecting your VCR, continued • If your cable system requires you to use a converter box for all channels, connect the incoming cable to the IN terminal on the converter box. Connect another cable between the OUT terminal on the converter box and the ANT. IN terminal on the VCR. Keep your VCR tuned to channel 3 or 4 and change channels using the converter box. Setting up your VCR Once you have connected your VCR and put batteries in the remote control, you are ready to use the VCR.
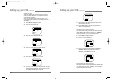
DV-T27N-SJ 99.11.26 5:3 PM ˘ ` 13 Setting up your VCR, continued Setting up your VCR, continued Setting the clock The clock displays the current time and is used for timer recording. Therefore, it is important to set the time and date accurately. If you are setting the clock for the first time, or if a power failure has erased the clock settings, the clock will display --:--. 1 Press MENU to display the menu.
DV-T27N-SJ 99.11.26 5:3 PM ˘ ` 15 Setting up your VCR, continued ✔ • Detect Automatically ;A strong cable or antenna signal in your area may cause Auto Detect to mis-detect. If this should happen, select 1 or 2 for the system you have. Setting up your VCR, continued Setting channels automatically (Auto Channel Search) Make sure that you use the auto channel search feature during daytime broadcast hours.
DV-T27N-SJ 99.11.26 5:3 PM ˘ ` 17 Setting up your VCR, continued 4 Press 2 to select Add/Remove Channels. ADD/REMOVE CHANNELS Channel 06 is now REMOVED. DISPLAY Add MENU Exit 5 Using video cassettes ✔ Audio-visual material may include works of copyright which must not be recorded without authorization of the copyright owner. Press DISPLAY to add the channel. ADD/REMOVE CHANNELS Channel 06 is now ADDED. CLEAR Remove MENU Exit 6 Press MENU three times to exit from the menus.
DV-T27N-SJ 99.11.26 5:3 PM ˘ ` 19 Watching recorded programs, continued Watching recorded programs To watch a program recorded on a video cassette tape: •Turn on the television. •Set the TV to channel 3 or 4 or to the video input. •Insert a video cassette. Playing a video cassette ✔In the searching forward, searching backward and Pause mode, the picture noise may be appeared on the screen. If the video cassette has no safety tab(e.g.
DV-T27N-SJ 99.11.26 5:3 PM ˘ ` 21 Recording programs, continued Timer recording Recording programs You have three options for recording TV programs: Manual, Timer, and One touch recording. ✔See “Selecting cable or antenna viewing. “p.14, for information on setting the viewing mode. ✔Press P/S if you would like to momentarily stop the recording. Press REC/OTR to resume recording.
Recording programs, continued 8 Use 0-9 to enter the recording start time. Reviewing timer programs If you want to review the timer programs that you set up: 1 2 9 Use 0-9 to enter the recording end time. AM/PM and the current date/year will be selected automatically. Press MENU to display the menu. Press 1 to select Timer Recordings.
3 Press 2 to select Review/Cancel Programs. Press MENU to cycle the programs. 4 When the program contents to be erased is displayed, press CLEAR to cancel it. 5 Press MENU repeatedly to return to normal viewing. One touch timer recording (OTR) One touch timer records a program for a preset recording time (30 minutes to 4 hours). 1 Be certain to do the tasks in the section, “Preparing to record a program”. 2 Use 0-9 or –CH/TRK+ to select the channel to record. 3 Press REC/OTR to begin recording.
DV-T27N-SJ 99.11.26 5:3 PM ˘ ` 27 Using advanced features, continued - Select OFF if you want the VCR to remain in the TV mode. This is useful if you watch your VCR on the TV’s video input and you don’t want your antenna/cable signal interrupted by the VCR. Using advanced features, continued 2 3 Press 4 to choose Functions. Press 4 to display Go-To Search.
Using advanced features, continued Duplicating video cassettes tape with another VCR You can duplicate a video cassette tape if you connect a second VCR to this VCR. Connecting another VCR to this VCR Make all connections before turning on the power. Be sure to press INPUT on the recording VCR.
Setting up the VCRs for video cassette duplication To duplicate a video cassette: 1 Load a blank video cassette tape with the safety tab intact into the recording VCR. Press INPUT on the recording VCR. 2 Load a previously recorded cassette into the playback VCR or camcorder. 3 Press REC/OTR on the recording VCR, then press P/S. 4 Press PLAY on the playback VCR or camcorder, then press P/S. 5 Press PLAY on the playback VCR and REC/OTR on the recording VCR simultaneously to begin the duplicating process.
DV-T27N-SJ 99.11.26 5:3 PM ˘ ` 33 Troubleshooting, continued Troubleshooting • If you have a problem with your VCR, try the solutions listed below. The front panel display is blank. Make sure the VCR is plugged in. The power is on but the VCR does not operate. Make sure there is a video cassette inserted in the VCR. A timer recording failed to record on the video cassette. • Make sure the VCR is plugged in. • Make sure there is a video cassette in the VCR.
DV-T27N-SJ 99.11.26 5:3 PM ˘ ` 35 Specifications System Video signal Channel coverage VHF output signal Video Input: Video line in Output: Video line out Signal to noise ratio Horizontal resolution Audio Input: Audio line in Output: Audio line out Frequency response Signal to noise ratio Audio distortion Tape transport Tape width Tape speed 35 VHS NTSC color VHF Channel 2-13 UHF Channel 14-69 CATV Channels A1-A5, A8, A-W, W+1-W+84 Channel 3 or 4 (selectable) Phono-type connector 1.