
User's Guide Video Cassette Recorder AVR-1040

18
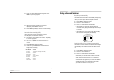
Using video cassettes
Before you play or record on a video cassette tape, be
certain to read this information on the proper care and
use of video cassettes.
Only use video cassettes that bear the VHS mark: .
There are four types of video cassettes: T-60, T-90,
T-120, and T-160. The amount you can record on a tape
is dependent upon the tape speed at which you record.
The table below lists the recording time(hours:minutes)
for each tape type according to recording speed.
Tape SP Mode EP Mode
Type (Standard Play) (Extended Play)
T-60 1:00 3:00
T-90 1:30 4:30
T-120 2:00 6:00
T-160 2:40 8:00
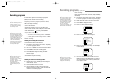
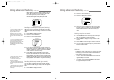
Protecting video cassettes from accidental erasure
Cassettes have a safety tab to prevent
erasure. Break off the safety tab
with a screw driver. If you wish to
record on a cassette without a safety
tab, cover the hole with cellophane
tape.
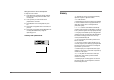
Inserting video cassettes
Firmly insert the cassette into the cassette compartment
with the label up. An inverted cassette cannot be inserted.
Removing video cassettes
Press STOP/EJECT on the VCR front panel and the VCR
will eject the tape. Pull the cassette out gently.
✔Audio-visual material
may include works of
copyright which must not be
recorded without
authorization of the
copyright owner.
✔If you insert a video
cassette without a safety tab
into the VCR:
•After setting the timer
recording program, “ ” will
blink on the display panel
in the power off mode and
the VCR will automatically
eject the cassette.
• In the power on mode, the
VCR will playback
automatically
✔If you insert a video
cassette with a safety tab
intact into the VCR:
• After setting the timer
recording program,the VCR
will be stand-by mode in
power off mode.
!
• Do not attempt to pull out
the video cassette once the
VCR begins to load the
video cassette.
• Do not insert fingers or
any foreign object
beyond the door flaps of
the cassette compartment;
this could lead to injury or
equipment damage.
• Do not attempt to insert a
video cassette if the VCR
in unplugged.
17
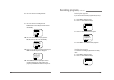
4 Press 2 to select Add/Remove Channels.
5 Press DISPLAY to add the channel.
6 Press MENU three times to exit from the menus.
Setting the Cable Box (Cable Box Setup)
1 Press MENU to display the menu.
2 Press 3 to select Channel Set.
3 Press 4 to process Cable Box setup
4 Press the channel number (01~13) or input key
which matches to the output of the Cable Box to
connect between Cable Box and VCR.
5 Press CLEAR on the remote to correct setup status.
6 Press MENU when you are finished.
7 Press MENU to exit the menu system.
✔When you make a timer
recording, the preset
channel number will be
displayed automatically.
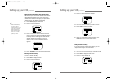
ADD/REMOVE CHANNELS
Channel 06
is now REMOVED.
DISPLAY Add
MENU Exit
ADD/REMOVE CHANNELS
Channel 06
is now ADDED.
CLEAR Remove
MENU Exit
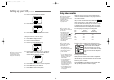
CABLE BOX SETUP
On what channel do you
want to receive from
the cable box?
MENU Cancel
0 – 9 01 –13
INPUT Video
CABLE BOX SETUP
On what channel do you
want to receive from
the cable box?
MENU Save
CLEAR Correct
0 5
Setting up your VCR,continued
DV-T27N-SJ 99.11.26 5:3 PM ˘`17