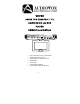
VE720 UNDER THE COUNTER 7” TV, AM/FM RADIO and DVD PLAYER OWNER’S and INSTALL 12:00 ON/OFF SET ADD DEL TV FM/AM AV VOLUME DVD CH P1 P2 P3 SEEK • Slot-in DVD Player & 9” TFT LCD Monitor • Multi-function Remote Control • Cable Ready 125 Channel TV Tuner • AM/FM Radio • 2 A/V Inputs • Internal Stereo Speakers • Under Cabinet / Table Top Mounting 0 P4 MUTE
INTRODUCTION WARNING – To prevent fire or shock hazard, do not expose this unit to moisture. CAUTION: TO REDUCE THE RISK OF ELECTRIC CAUTION SHOCK, DO NOT REMOVE COVER (OR BACK). NO USER-SERVICEABLE PARTS INSIDE. CAUTION: TO REDUCE THE RISK OF ELECTRIC SHOCK, DO NOT REFER SERVICING TO QUALIFIED SERVICE REMOVE COVER (OR BACK). NO USER-SERVICEABLE PARTS PERSONNEL. INSIDE. REFER SERVICING TO QUALIFIED SERVICE PERSONNEL .
INFORMATION Installation of this equipment shall be in strict accordance with the manufacture’s instructions. Failure to follow these instructions may cause or result in the reception of unwanted interference. This unit complies with FCC Rules Part 15, which are designed to provide reasonable protection against interference in a residential installation. However, there is no guarantee that interference will not occur in a particular installation.
IMPORTANT SAFETY INFORMATION 1. Read Instructions – All the safety and operating instructions should be read before the product is operated. 2. Retain Instructions – The safety and operating instructions should be retained for future reference. 3. Heed Warnings – All warnings on the product and in the operating instructions should be adhered to. 4. Follow Instructions – All operating and use instructions should be followed. 5. Cleaning – Unplug this product from the wall outlet before cleaning.
13. Power-Cord Protection – Route the power supply cord in a manner that protects it from being stepped on or pinched by items placed on it. Pay particular attention to the power cord’s plug, and the point where the power cord exits from the product. 14. Outdoor Antenna Grounding – If an outside antenna or cable system is being connected to the product, verify that it is properly grounded to insure some type of protection against voltage surges and static build-up.
21. Replacement Parts – When replacement parts are required, be sure the service technician has used replacement parts specified by the manufacturer or that have the same characteristics as the original part. Unauthorized substitutions may result in fire, electric shock or other hazards. 22. Safety check – Upon completion of any service or repairs to this product, ask the service technician to perform safety checks to determine that the product is in proper operating condition. 23.
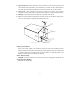
TABLE OF CONTENTS Before You Begin Installation Remote Control Functions Modes of Operation Using the DVD Loader Technical Specifications Troubleshooting Check List Introduction 1 3 Important Safety Information 6 Table of Contents 7 Contents of package 8 Under Cabinet Installation Countertop/Desktop Installation 9 10 Front Panel Controls 11 Rear Panel Controls 12 Battery Installation 13 Remote Control Functions 16 Operation 16 Initial Set up 16 Channel Tuning Set up 16 Positioning the Screen 16 Setting
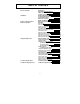
CONTENTS OF PACKAGE 3 2 5 6 1 4 7 8 11 10 9 1. VE720 5. Batteries (AAA) 2. Hardware bag 6. FM Dipole Antenna A. 2” Mounting screws (4) 7. Right Angle Coaxial Adaptor B. 2-1/2” Mounting screws (4) 8. FM Antenna Balun C. 3”Mounting screws (4) 9. AM Antenna D. Foot (4) 10. Mounting Hole Template E. Hole cap (4) 11. Owners Installation manual 3. Remote Control 4.
8
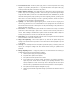
UNDER CABINET INSTALLATION 1) Choose an appropriate mounting location underneath a cabinet or shelf. Close proximity to an electrical outlet, TV antenna or cable connection will facilitate a neat, easy installation. Do not mount the VE720 above a range or oven. Be sure that the location chosen will provide adequate access to the electrical connections on the rear of the unit before continuing.
COUNTERTOP/DESKTOP INSTALLATION NOTE: Use caution to avoid damaging the LCD screen and the main unit when converting this unit from an under-counter unit to a countertop unit. Leave the protective plastic on the screen until this procedure is completed. 1) Place the unit (with the screen facing up) on a soft padded surface. 2) Pivot the screen so that it is perpendicular to the front of the unit and then turn it sideways.
FRONT PANEL CONTROLS 1) ON/OFF BUTTON – Power ON/OFF. 2) SET BUTTON – Press this button to set the TIME, ALARM, TV Mode or Speaker Mode. 3) ADD BUTTON – Press this button to add a selected TV channel. 4) DEL BUTTON – Press this button to delete a selected TV channel. 5) TV BUTTON – Press this button to select TV mode, press and hold to change the aspect ratio. 6) FM/AM BUTTON – Press this button to select FM or AM mode. 7) AV BUTTON – Press this button to select AV1 or AV2 mode.
16) SEEK BUTTONS (TS-Right Side) – Press these buttons to go to next available channel with sufficient signal strength. 17) CHANNEL BUTTONS (TS-Left Side) – Press these buttons to go to next available channel. 18) DISPLAY WINDOW – Displays the channel/station number, time, and selected source. 19) REMOTE INFRARED SENSORS-These sensors receive infrared command signals from the hand held remote control unit.
8) BATTERY INSTALLATION (Rear View, Battery Size AAA) 13
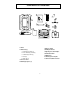
REMOTE CONTROL FUNCTIONS (1) EJECT (2) DVD (3) TV (4) SETUP 1 17 2 3 18 19 4 20 21 5 22 (8) STOP(■) 6 23 (10) Digit 0-9 Select 7 24 8 9 25 26 27 28 (5) SEEK DN, SEEKUP (6) MENU (7) FR(WW) (9) PREV (IWW) 10 (11) TITLE (12) DISPLAY (13) SUB TITLE (14) AUDIO (15) SCREEN (16) ANGLE (AP) (17) ON/OFF 29 30 31 32 33 34 11 12 13 14 15 16 (18) A/V (19) AM/FM (20) TEL (Not Used) (21) CH+, CH(22) ENTER (23) MUTE (24) FF (XX) (25) SF (IX ) (26) NEXT (XXI) (27) PLAY/PAUSE (XII) (28) VOL +/(29) SEA
DVD REMOTE FUNCTION (1) EJECT: Press this button to Eject and Load the disc tray. (2) DVD: Press this button to select DVD mode of operation. (4) SETUP: Displays setup menu for initial user settings. (5) SEEK DN/UP (21) CH+/-: For selecting item on menu. (6) MENU: For displaying the menu contained in the disc. (PBC ON/OFF Function - VCD) (7) FR (WW): Fast reverse (2X, 4X, 8X, and 20X).
TV REMOTE FUNCTION (3) TV: Press this button to select TV mode. (5) SEEK DN/UP: Use these buttons to advance to the next higher or lower station. (10) 0~9: Use these buttons to make a direct channel selection (15) SCREEN: Press this button to change the Display Mode. (16) AP (Auto Program): Press and hold this button for 0.5sec to program and save all active stations in memory. (21) CH+/-: Use these buttons to advance to the next higher or lower channel.
OPERATION INITIAL SETUP This unit defaults to cable TV mode. When the unit is first powered on, it will detect the cable system and auto-program the TV tuner to the available stations. before attempting to operate the unit. Please wait while the unit auto-programs During this time the unit will not respond to any commands. The unit will respond normally once the cable mode and channel search mode is concluded.
SETTING and ACTIVATING the ALARM NOTE: The VE720 must be turned “OFF” when performing the following procedure. 1) Press the SET button twice to enter the alarm mode, press the P3 button to toggle between the active and deactivated mode. NOTE: If a series of dashes appear (--: --), the Alarm is DEACTIVATED. 2) Press the CH up/down buttons to set the desired hour/minute. When setting the alarm, check the AM/PM indicator to assure the proper setting.
SETTING THE CABLE TV MODE 1) Press the SET button three times to enter the TV/Cable configuration mode. 2) CABLE or AIR will appear on the display. 3) Press the SEEK button to select Cable mode. 4) Press the CH UP/DOWN button(s) to select the desired cable mode (STD/IRC/HRC). 5) When the desired mode is reached, press the ON/OFF button to confirm. SETTING THE AIR TV MODE 1) Press the SET button three times to enter the TV/Cable configuration mode. 2) Press the SEEK button to select the AIR mode.
USING THE DVD PLAYER Inserting and Ejecting the Disc 1. Set the unit to DVD mode (press source button until (-----------) appears on the display. 2. Insert the disc with the label facing up. 3. The disc will begin playing automatically. If this is a DVD it will go to the DVD root menu. Press the PLAY button to begin watching the movie. 4. To eject the disc, press and hold the f/ button. The disc will be ejected. * Discs playable through DVD player – DVD, CD, CD-RW with MP3. Playback and Stop 1.
Repetitive Playback –To Repeat a Specific Section 1. Press the REPEAT button once to enable the REPEAT selection screen, follow by pressing the REPEAT button until REPEAT CHAPTER is displayed, the current chapter or track will be replayed repetitively (CHPTER REPEAT ON). 2. Repeat step 1 until REPEAT TITLE is displayed on the screen, the currently playing title or CD will be played repetitively (TITLE REPEAT ON). 3.
Viewing Different Angles Angle indicator appears on the upper part of the LCD display. When the Angle indicator appears, press the ANGLE button to view the screen from various angles. * This function may not be incorporated in some titles. Viewing the Main Disc Menu A DVD is divided into sections called titles and chapters. When you play a DVD, a root menu of the disc will appear on the screen of your Monitor. Contents of the menu will vary depending on the disc content.
During playback press DISPLAY to display the current disc playback information. Press display again to remove the display. 1. The type of disc. 12. The number of current subtitle language. 2. The number of current title. 13. The speed at which the disc is being read. 3. The number of total titles. 14. The number of total subtitle languages. 4. The number of current chapter. 15. Current subtitle language. 5. The elapsed time of title. 16. Dolby audio mode. 6. The number of total chapters. 17.
PLAYING AUDIO CDS When playing an audio CD the display will automatically display the disc playback information. The options below show you what information is displayed. Press the ‘DISPLAY’ button to remove the display. 1. The current track. 2. The number of total tracks. 3. Playing time of the disc. 4. Remaining time of the disc. USING THE REPEAT FEATURE The default mode for the Repeat feature is OFF.
1. Press the f or g button to choose a folder from the folder list on the left side of the screen. 2. Press ENTER to select the highlighted folder. All songs available under the selected folder will be listed. 3. Use f or g button to choose a song from the list, then press ENTER to play the selected song. 4. To move back up to the previous folder use the f button to highlight the at the top of the screen, make sure that the disc is paused and press ENTER.
PLAYING A JPEG FILE 1. Insert the JPEG Disc into tray. 2. Select JPEG file by pressing the “UP/DOWN” button. 3. You can preview the JPEG file by pressing “Play” or “ENTER”. 4. Pressing the left or right button will rotate the JPEG in that direction. 5. When browsing the photos, you can reverse the photo horizontally by pressing the “Up” button, or you can reverse the photos vertically by pressing the “Down” button. 6. You can return the root Menu by pressing “MENU” key.
3. Use the f or g buttons to highlight the desired menu item. 4. Press ENTER button to display the sub-menu. 5. Each sub-menu item provides a number of option items to its right. Use the f or g buttons to highlight the desired option item for selection. 6. Press the ENTER button to select the option item. 7. Press the f or g button to highlight the next sub-menu item for setup and repeat steps 3 and 6. 8. Press the SETUP button to exit the SETUP mode.
VIDEO Menu 1. Press the SETUP button to display the main menu (see sample screen under LANGUAGE Menu) 2. Press the button to highlight Video and press ENTER one time. Use the following screen to select screen aspect ratio. * 4:3 PS : When the player is connected to a normal TV, and a wide picture is shown on the full screen. * 4:3 LB : When the player is connected to a normal TV, and a wide picture is shown on the screen with a black strip at both the top and bottom of the screen.
Rating Menu Press the SETUP button to display the main menu (see sample screen under LANGUAGE Menu). Use to select parental Rating: Kid Safe. NC-17. G. PG. PG-13. PG-R. R. Adult. CHANGE PASSWORD & RATING 1. Select Rating by h or d buttons and press ENTER to enter the Rating setup page 2. Enter the current password and press ENTER button (unlock). 3. Select Rating by g button and press ENTER button to enter the sub-menu. 4. Select the rating level you desire by repeatedly pressing the ENTER button. 5.
default settings.
TECHNICAL SPECIFICATIONS GENERAL Power Supply : AC100-240V ~50/60Hz 40watts Operating Temperature : 0°~40°C / 32°~104°F Operating Humidity : 10% ~ 75% Body Size : 400 X 280 X 56mm / 15.8” x 11.0” x 2.20”Inches Weight : 3.4 Kg LCD Illumination : CCFL Edge Lit Tube Backlighting Life Expectancy : 30,000Hrs Resolution : 1440(W) X 234(H) Screen : TFT LCD (16:9) DVD : Linear Velocity - 3.49m/sec, Maximum CD : Linear Velocity 1.2~1.4m/sec, Maximum Playback / 7.
TROUBLESHOOTING CHECK LIST Problem Solution Power does not turn on • Check if the power cord is securely plugged into the wall • Check if the batteries of the remote control unit are not depleted. Disc fails to play • Check if the disc is inserted properly into tray (Label Side Up). • Check if the disc has viewing restriction selected. • Check if the disc is the proper region code. • Not all discs are playable in the DVD.
© 2005 Audiovox Electronics Corp.