DTT7810FM DESK TOP DOCKING STATION For DT102, DT85, and DT7 AM/FM BASS BOOST POWER ALARM OFF SLEEP DIMMER ® SNOOZE Operation Manual 128-7349
Materials Included In This Package 1) 2) 3) 4) 5) 6) Tabletop Docking Station for DT102, DT85 & DT7 (P/N: 136-3958) ~ 1pc Remote Control (P/N: 136-3956) ~ 1pc Picture Frame (P/N: 102-4126) ~ 1pc Adaptor AC to DC 100V/240V DC 12V 2.
Main Features • Desk Top Docking Station. • 125 Channel Cable Ready TV tuner. • AM/FM Radio. • Alarm Clock.
Main Features Front Panel Controls 1 2 3 WARNING ! TO AVOID POSSIBLE DAMAGE TO THIS DEVICE. DO NOT TOUCH CONNECTOR PINS WITH METAL OBJECT WHILE POWER ON. AM/FM BASS BOOST 4 POWER ALARM OFF 5 SLEEP DIMMER SNOOZE 6 7 8 9 10 11 12 131415 16 17 18 19 1. Release Button – Press this button to release the shuttle unit. 2. 24 pin Shuttle Interface Connector – Used to connect the shuttle to the DTT7810FM. 3. Speakers for Shuttle Models DT102, DT85 and Dt7. 4.
Main Features Back Panel Connections AUDIO IN VIDEO IN L 1 R DC 12V ANT 2 3 FM IN 4 AM IN 5 1. AV IN – The shuttle will accept an AV input through the AV jacks located on the rear of the unit. The video device could be a video game system, video camera, or other input device. • VIDEO IN – Yellow • AUDIO IN (L ) – White • AUDIO IN (R) – Red 2. DC 12V – Connect the supplied AC to DC adapter to this jack. The shuttle is designed for negative ground 12V DC operation. 3.
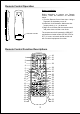
Remote Control Operation Battery Installation Before attempting to operate your Remote Control, install the batteries as described below. 1) Turn the Remote Control face down. Using a fingernail, lift the battery cover off. 2) Install two “AAA” batteries. Make sure that proper polarity (+ or -) is observed. 3) Align the cover tabs with the remote control and press down until the cover clicks.
* Function control is available on the unit and the remote control. ** Used only when Shuttle (DT102, DT85 or DT7) is installed. 1. POWER Button* Press this button to turn the DTT7810FM ON. Press the button again to turn the DTT7810FM OFF. 2. SOURCE Button* Use to select one of the four sources (DVD, TV, AV, and Radio) 3.
15. BAND Button** Used to select the desired radio band (FM1/FM2/AM) 16. AUDIO Button** Press this button to display and select the desired AUDIO language. Each time the button is pressed, the language or track changes. NOTE: The languages & tracks you can select vary from disc to disc. 17. ZOOM Button ** Press this button to enlarge the picture. 18. PAUSE(;)Button** Allows the user to pause the playback.
31. A-B Button Allow the user to repeat playback of a DVD or CD from point A to point B. 32. REPEAT Button** Allows the user to repeat a chapter, title, track, or all of a DVD, CD or MP3. 33. SEEK / CHANNEL DOWN (6) Button Use this button to decrease the TV channel number or radio station to the desired channel and to scroll downward in the menu options. 34.
TV / Radio Desk Top Docking Stereo System The Ideal Shuttle companion. This Docking System has been designed exclusively for the Shuttle models (DT102, DT85, DT7) with built-in TV Tuner, AM/FM Radio, Clock, and Alarm. The DTT7810FM can be placed anywhere in your home or office.
Installing the shuttle (DT102, DT85 and DT7) into the DTT7810FM 5 5 1 6 4 4 2 3 NOTE: Be sure to turn the DTT7810FM OFF before installing the shuttle. 1.) Insert the bottom part of the shuttle (#1) into the lower part of the docking station (#2). 2.) Center the shuttle in the docking station. There are two tabs on the rear of the shuttle that will line up with the two recessed areas on the docking station (#3). 3.
System Panel Controls DTT7810 Operation SETTING THE CLOCK: NOTE: All settings are preformed in standby mode. 1. Selecting 12 or 24 hour display mode: a.) Press the “clock mode” button once. The 12H/24H and AM/PM indicator will flash. b.) Press the “radio tune/clock set” (-) or (+) button to toggle between 12 or 24 hour modes. 2. Setting the time: a.) Press the “clock mode” button twice. The hours and minutes will flash. b.) Press the “radio tune/clock set”(-) button to set the hour.
Screen And System Panel Controls RADIO MODE: AM / FM – Press the source button until “Radio” appears on the display. Press the “Radio Band” button to select the following: ( AM, FM1 and FM2) Tune Radio Channel – Press the “Radio Tune” button either Up (+) or Down (-) to manually tune through the frequencies. “-” Button to decrease the radio frequency and the “+” button to increase the radio frequency. Storing a Radio station in memory 1.) Press the “Recall” button.
Troubleshooting PROBLEM SOLUTION The DVD Player will not play Make sure the AV IN/OUT switch on the side of the player is in the OUT position for standard play. Check the type of disc. This DVD Player only plays DVD's, Audio CDs and MP3s. Make sure that the shuttle is installed correctly. Make sure the correct source (DVD) has been selected. There is no sound from the Speakers Make sure the system settings are correct. Make sure the volume is turned UP. Make sure the sound setup of the DVD is correct.
Replacement Parts Remote Control 136-3956 14
90 DAY LIMITED WARRANTY Applies to Audiovox Video Products AUDIOVOX ELECTRONICS CORP. (the Company) warrants to the original retail purchaser of this product that should this product or any part thereof, under normal use and conditions, be proven defective in material or workmanship within ninety (90) days from the date of original purchase, such defect(s) will be repaired or replaced with reconditioned product (at the Company's option) without charge for parts and repair labor.