VM8022 Installation and Operation Manual 160 Watts Peak Watts en Crête Vatios el Máximo 40W x 4
VM8022 TABLE OF CONTENTS Introduction ..............................................................................................1 Installation ................................................................................................1 Wiring .......................................................................................................3 Remote Control ........................................................................................4 Operation ........................................
VM8022 ii
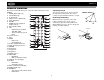
VM8022 INTRODUCTION 2. Remove Transport Screws Congratulations on your purchase of the Jensen VM8022 Mobile Multimedia Receiver. It’s a good idea to read all of the instructions before beginning the installation. We recommend having your Jensen VM8022 installed by a reputable installation shop. TRANSPORT SCREWS INSTALLATION This unit is designed for installation in cars, trucks and vans with an existing radio opening.
VM8022 turn the unit on to confirm operation (vehicle ignition must be on). If the unit does not operate, re-check all wiring until the problem is corrected. 3. Secure the rear of the unit to the car body using the mounting bolt and rubber cushion. 4. Test the radio using the “Operation” instructions that follow. 2. 3. 4. 5. mounting. Save all hardware and brackets as they may be used to mount the new radio. Carefully unsnap the plastic frame from the front of the new radio chassis.
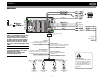
VM8022 WIRING Parking (Blue) (Yellow) (Yellow) NOTE: The amplifier in this radio is only designed for use with four speakers. Never combine (bridge) outputs for use with two speakers. Never ground negative Ground speaker leads to chassis ground. Connect to ground terminal Failure to wire exactly as shown may cause electrical damage to the or clean, unpainted part of chassis. radio. Black NOTE: Only connect speakers with Memory/Battery a nominal impedance of 4 ohms.
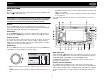
VM8022 REMOTE CONTROL Operating Range The remote control sensor (19) is located to the right of the power button. The remote control can operate within a distance of 3~5m. The remote control will allow you to control the advanced functions of the VM8022. 1. ZOOM (DVD, VCD only) 2. TITLE (DVD only) 3. Power On/Off 4. SETUP: Access DVD Setup 5. Menu Navigation 6. ENTER 7. PROG: Enter Programmed Playback mode. 8. Direct Number Entry 9. SEL • Audio Mode: Select BAS, TRE, BAL, FAD.
VM8022 OPERATION Power Press the (power) button (2) to turn the unit on. Press and hold the power button again to turn the unit off. • BALANCE: Turn the rotary encoder to adjust the balance from “R7” (full right) to “L7” (full left). • FADER: Turn the rotary encoder to adjust the fader from “F7” (full front) to “R7” (full rear). The unit automatically exits the audio control menu after five seconds of inactivity.
VM8022 Loudness Control (LOUD) When listening to music at low volumes, this feature will boost the bass and treble ranges to compensate for the characteristics of human hearing. Press the LOUD button (16) to activate this feature as indicated by “LOUD” on the display panel. Press the LOUD button again to deactivate the function. “LOUD” will disappear from the display. When the equalizer function is activated, the most recently selected bass/ treble levels cannot be adjusted.
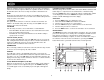
VM8022 TUNER OPERATION 18 remaining five presets on the current band and for presets on the other four bands. 20 STEREO INDICATOR VM8022 22 LOUD L O /D X 21 AS VOL FM1: 98.10 MHZ 3 PRESET NUMBER SD/MMC 1 / 2 INT 3 RPT 4 RDM 5 6 EQUALIZER INDICATOR 23 Select a Band Press the BAND button (3) to change between three FM and two AM bands. Each band stores up to six preset stations.
VM8022 DISC/MP3/WMA PLAYBACK Fast Forward/Reverse 18 20 VM8022 Press and hold the TUNE/TRACK >>| or |<< buttons (17) to fast forward or fast reverse. Press and hold once for 2X. Press and hold additional times for 4X, 8X, 20X or PLAY. Press the play/pause >/|| button (8) to end fast forward or reverse and resume normal playback. Intro Scan (INT) 22 During disc play, press the INT button (9) to select “INTRO” and play the first 15 seconds of each track/file.
VM8022 Programmed Playback 1. Press the PROG button on the remote control to access the programmed playback screen: • • • TITLE: Press to display the title or chapter list. Use the , , or cursor buttons or the numeric buttons to enter a title or chapter number, and then press ENTER to play. ANGLE: Press to select an alternate viewing angle, if available. ZOOM: Press to zoom the picture at X2, X3, X4, X1/2, X1/3 or X1/4, or select OFF to return to normal view.
VM8022 SYSTEM SETUP MENU During disc play, press the SETUP button on the remote control to access the SYSTEM SETUP menu. Table 1: System Setup Menu ASPECT RATIO 4: 3 PS With 16:9 display, the left and right sides are cut off. 4:3 LB With 16:9 display, the top and bottom are cut off. 16:9 Image is presented in wide view with a 16:9 aspect ratio. PASSWORD ____ Enter a 4-digit password to activate the “Rating” feature. The original password is “0000”.
VM8022 Table 1: System Setup Menu AUDIO LANGUAGE ENGLISH FRENCH SPANISH Choose from audio languages contained on the DVD If you are watching a disc recorded in multiple languages PORTUGUESE GERMAN SUBTITLE LANG ENGLISH FRENCH SPANISH Choose the language you would like subtitles to appear in (if available) GERMAN NOTE: Subtitles are DVD dependent and not all languages may be supported..
VM8022 USB/SD OPERATION Notes on MP3/WMA Play MP3 and WMA (Windows Media Audio) music files are digital audio files that are compressed to allow more files on a single CD. This unit can play MP3/WMA directly from files contained on a CD-R/RW or an SD card, USB Device using the buttons on the receiver (or remote control) as described below. Many types of software are available for converting audio files into MP3/ WMA formats. Jensen recommends Nero or Roxio Easy CD Creator.
VM8022 Loading an SD Card Insert the SD card into the SD slot (15) on the front of the radio. The unit will read the files on the card automatically. MP3 Playing Order When selected for play, files and folders (Folder Search, File Search or Folder Select) are accessed in the order in which they were written to the media. As a result, the order in which they are expected to be played may not match the order in which they are actually played.
VM8022 File Playback When a disc or device (SD, USB) containing individual music, video and/or photo files is inserted, the following screen appears: Folder Name File Name Folder List File List Category List The category, folder or file list is displayed on screen with the name of the file/folder being played displayed on top. The item currently selected will appear highlighted. You can change which type of items appear for selection on the screen using the following buttons: AUDIO PICTURE VIDEO 1.
VM8022 CARE AND MAINTENANCE DVD Player The following guidelines will help you extend the life of your DVD player: 1. When cleaning the vehicle interior, do not get water or cleaning fluids on the unit. 2. The DVD player will not operate properly in extreme hot/cold or under damp conditions. In case of such conditions, wait until the vehicle interior reaches a normal temperature or any condensation on the disc player lens has evaporated before using the player. 3.
VM8022 TROUBLESHOOTING Problem Does not operate (display does not light) No power to unit No/low audio output Blows fuses No image Flashing image or interference appears on screen Prolonged image or improper height/width ratio display Disc does not play back Image blurred, distorted, or dark Cause Corrective Action No power to yellow wire; no power to red wire Fuse blown Fuse blown Improper audio output connection Volume set too low Speakers damaged Heavily biased volume balance Check connection wit
VM8022 SPECIFICATIONS Monitor CEA Power Ratings Screen Size . . . . . . . . . . . . . . . . . . . . . . . . . . . . . . . . . . . . . . . . . .4.0" (Measured diagonally) Active Area . . . . . . . . . . . . . . . . . . . . . . . . . . . . . . . . . . . . . . . . . . . . . . . . . . . 88mm x 50mm Screen Type . . . . . . . . . . . . . . . . . . . . . . . . . . . . . . . . . . . . . . . . . . . . . . . . Digital TFT Panel Resolution . . . . . . . . . . . . . . . . . . . . . . . . . . . . . . . . . . . . . . .
VM8022 18
Limited Warranty DO NOT RETURN THIS PRODUCT TO THE STORE CD or Multimedia Radios/Headunits Audiovox Electronics Corporation (“the Company”) is committed to quality and customer service, and are pleased to offer you this Warranty. Please read it thoroughly and contact the Company at 1-800323-4815 with any questions. Who is covered? The Company extends this warranty to the original retail purchaser of products purchased through an authorized Audiovox retailer in the U.S.A., Puerto Rico or Canada.
Audiovox Electronics Corporation Hauppauge, NY 11788 Technical Assistance: 1-800-323-4815 www.jensen.com © 2007 Audiovox Ver.