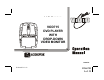
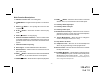
VOD705 PAUSE REV FWD S OURCE ON OFF AUTO VO LUME FM S ELECT INPUT VID EO IR HEADPHONES AUDI O R L S VOD715 DVD PLAYER WITH DROP-DOWN VIDEO MONITOR ® ELECTRONICS CORP. 128-6751 Released 5-13-03.
Important Notice It is unlawful in most jurisdictions for a person to drive a motor vehicle which is equipped with a screen that is located in the motor vehicle at any point forward of the back of the driver’s seat, or that is visible, directly or indirectly, to the driver while operating the vehicle. In the interest of safety, the VOD715 should never be installed where it will be visible, directly or indirectly, by the operator of the motor vehicle.
Features • 7 Inch TFT (Thin Film Transistor) Active Matrix Congratulations on your purchase of the Audiovox VOD715 DVD Player with Drop-Down Video Monitor. The VOD715 has been designed to give you and your family many years of video entertainment in the mobile environment. Please read the directions that follow to familiarize yourself with the product and to ensure that you obtain the best results from your equipment.
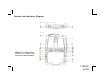
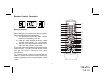
Controls and Indicators Diagram NOTE : Screen Mode Button Located on inside with screen in the closed position.
Main Function Descriptions 1. DVD Disc insertion slot – For loading Disc. 12. FWD ( ) Button – Allows the user to search in a forward direction at 2x, 4x, 6x and 8x times the normal speed. 2. POWER Button – Bright red when system is on dim when off. 13. Auxiliary Audio Right Input. 14. Auxiliary Audio Left Input. 3. EJECT ( ) Button – For ejecting discs from the disc compartment. 15. Auxiliary Video Input. 4. PLAY ( ) Button – This button is used to enter the play mode. 16.
22. FM Select Button – Each time this button is pressed will switched FMM cycles through (FM OFF – POD AUDIO – SAT AUDIO) and the frequency of the modulator will remain same. 23. VOLUME ( ) Button – Use this button to decrease the volume level of the headphone jacks. It is also used to make picture adjustments in picture select mode. Note : These buttons will not affect the volume of wireless headphones or the wired RF modulator.
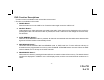
Remote Control Operation POWER EJECT 1 32 SOURCE 2 3 Battery Installation 4 5 Before attempting to operate your Remote Control, install the batteries as described below. 1) Turn the Remote Control face down. Using a fingernail, lift the battery cover off. 2) Install two “AAA” batteries as shown. Make sure that proper polarity (+ or -) is observed. 3) Align the cover tabs with the remote control and press down until the cover clicks. The remote control will operate the VOD715 and most Audiovox VCP’s.
DVD Function Descriptions *Function control is available on the unit and the remote control. ** Function not available on this model. 1. POWER Button* Press this button to turn the VOD715 on. Press the button again to turn the VOD715 off. 2. SOURCE Button* Video signals from video equipment connected to the audio / video inputs can be displayed on the monitor by pressing this button. Each time the button is pressed, the audio / video source will change the sources: DVD, AV1 and AUX. 3.
6. Channel Up ( ) Button** Use this button to increase the channel number to the desired channel and to scroll upward in menu options. 7. MUTE Button Press this button to mute the audio. Pressing the button again restores sound to the previously set level. 8. ENTER Button Used to implement setting selected. 9. LEFT ( ) Button Allows the user to shift left in the menu options. 10. MENU Button Allows the user to access the main menu. 11. RETURN Button Allows the user to return to the menu while PBC on.
13. DISPLAY Button Press to display DVD Disc current information.
17. REV ( ) Button* Allows the user to search in a backward direction at 2,4, 6 and 8 times the normal speed. 18. FWD ( ) Button* Allows the user to search in a forward direction at 2,4, 6 and 8 times the normal speed. 19. PLAY ( )Button* Press this button to activate the play mode while a disc is loaded into the disc compartment. 20. STOP () Button* DVD disc play will be stopped. 21. DVD Mode Select button Switches certain function keys on the remote control for DVD functions. 22.
26. SETUP Button Allows the user to select the DVD player’s options (Display, OSD Language, Defaults, Parental Control, Password, Exit Setup). 27. RIGHT ( ) Button Allows the user to shift to the right in the menu options. 28. PIX Button (PICTURE SELECT) Each time this button is pressed, the on screen picture adjustment display the “adjustment bars” for BRIGHTNESS, CONTRAST, COLOR or TINT. Once the desired adjustment bar is displayed, use the VOLUME UP/DOWN buttons to adjust the setting.
32. EJECT ( )Button* The disc will be ejected from disc compartment. 33. FM TRANSMITTER ON/OFF Button Turns FM Modulator power on/off. 34. SOURCE SELECT Button* With FM ON, used to selects the POD Audio (DVD and POD audio) or SAT Audio (Second IR input). With FM OFF, used to select SAT Audio or Car Audio. 35. CHANNEL SELECT Button Selects the FM modulator Frequency (Frequency 1, 88.3MHz, Frequency 2, 88.7MHz, Frequency 3, 89.1MHz, Frequency 4, 89.5MHz, Frequency 5, 89.9MHz, Frequency 6, 90.3MHz).
Turning the VOD715 On or Off 1. Sliding the screen release lock forward will unlock the LCD screen and it will drop down slightly. Pivot the screen downward until a comfortable viewing angle is reached. The internal friction will hold the screen in position while the system is in use. 2. Pressing the power button on the unit or the remote control will turn the system on or off alternately. When in use the internal backlighting will illuminate the controls. 3.
128-6751 15 of 31
Wired Headphones There are two 1/8” headphone jacks on the VOD715 that can be used with any standard wired stereo headphones. These jacks are controlled by the volume up / down buttons on the VOD715 remote control. Wired FM Modulator The VOD715 is equipped with an RF modulator, that allows you to listen to the VOD715 audio signal by tuning your vehicle’s radio to the selected frequency, (88.3, 88.7, 89.1, 89.5, 89.9, 90.3MHz).
DVD Basics To get the optimum use out of the DVD section, make sure you read this section completely. Regional Coding Both the DVD player and disc are coded by region. These regional codes must match in order for the disc to play. If the codes don’t match, the disc won’t play. This unit’s code is region 1. Other regional codes cannot be played in this unit. The unit will display “WRONG REGION.” Types of Discs your DVD will play • DVD discs – DVD discs which contain video.
Settings and Adjustments This chapter describes how to set and how to adjust using the on-screen SETUP menu. Using the Setup Menu Using the setup display, you can do the initial setup, adjust the picture quality, and set the various outputs. You can also set a language for the on-screen display and the setup display and limit playback by children. 1) Press the SETUP button to display the “setup menu” on the display screen.
Settings for Display Press the SETUP button and select Display. The DISPLAY SETUP allows you to adjust screen setting (aspect ratio) Press and then use the (▼▲)buttons to select the appropriate settings. 4:3 / PS This displays the wide picture on the screen with a portion of the left & right side removed. 4:3 / LB This displays the wide picture with black bands on the upper and lower portions of the screen. 16:9 This displays a picture with black bands on the upper and lower portion of the screen.
Settings for Parental (Parental Control) This section of the SETUP Menu allows user to control the content of movie playback from G to Adult. The Parental Control function allows you to limit viewing to your preference. 1. Use the ▼▲ buttons to select from: G (Children) PG PG 13 R NC-17 ADULT (Adult) Note:The lower the value, the more strict the limitation. Press the Enter button to confirm the selection. 2. Input a password in 4 digits using the numeric buttons then press the Enter button.
Settings for Password (Parental Control Password) Press the SETUP button and select PASSWORD. The PASSWORD SETUP allows you to change the parental control password. Press and then press Enter. OLD PASSWORD Input the old password or the default password (4 digits) NEW PASSWORD Input a new password (4 digits) using numeric buttons CONFIRM PWD Confirm the new password by entering the same new password again. Then press Enter to implement it.
Playing Audio CDs When playing an audio CD, the DISPLAY Banner appears automatically. It displays the current track and the amount of the time for that track playing, the total amount of time on the disc and the current time running on the disc. Press the DISPLAY button on the remote to display the DISPLAY Banner. The options below show you what happens when you press the DISPLAY button. Press DISPLAY 1x SINGLE ELAPSED appears along with the current track playing and the time of that track.
Playing MP3 Discs MP3 is a format for storing digital audio. An audio CD-quality song can be compressed into the MP3 format with very little loss of quality, while taking up much less space. CD-R discs that have been encoded in MP3 format can be played on your DVD player. Press the DISPLAY button on the remote to DISPLAY Banner. The options below show you what happens when you press the DISPLAY button. Press DISPLAY 1x TIME REMAIN appears along with the amount of time left in the song that is playing.
Selecting Folders and Songs When an MP3 disc is inserted in the player, the Smart Nav screen appears automatically. You can change folders and songs through Smart Nav. The DVD player plays the songs in order they were burned on to the disc. 1. If a disc is playing, press STOP. Press the up or down arrow button to go through the folder list on the right side of the Smart Nav screen. 2.
Selecting a Play Mode You can choose what order the songs will play on a disc temporarily. The FOLDER play mode is the default. To access the play mode options, press STOP if the disc is playing. Press the right arrow button until the PLAY MODE option is highlighted. Use the up or down arrow to choose an option. The play mode options are: • SINGLE: Play a selected song. • REP_ONE: Repeats the song that is playing. • FOLDER: Plays the folder in the order the songs were recorded.
Program Play To use the program play option, you must create a playlist of songs in the order you want them to play. Note: Once you begin adding songs from a folder to create your play list, you cannot add songs from a different folder. 1. Choose the PROG-END option for PLAY MODE. 2. Highlight and enter the folder you want to program. 3. Add songs to the program list by pressing ENTER once the song is highlighted.
Troubleshooting SOLUTION PROBLEM Poor in vehicle radio reception (FM modulator installed) • Check the condition of the vehicle’s IR sensor inoperative • Verify that the batteries in the remote PROBLEM No sound or distorted sound radio antenna. • Verify that the antenna is fully raised. • If a wired RF modulator has been installed, verify that it is turned OFF by using remote. are fresh. • Verify that the remote sensor eye is Can’t advance through a movie not obstructed.
PROBLEM Picture is distorted SOLUTION • The disc might be damaged. Try another disc. • It is normal for some distortion to appear during forward or reverse scan. No forward or reverse scan • Some discs have sections that prohibit rapid scanning or title and chapter skip. • If you try to skip through the warning information and credits at the beginning of a movie, you won’t be able to. This part of the movie is often programmed to prohibit skipping through it.
Replacement Parts Remote Control 136B3447 Specifications LCD Backlighting Edge Light Tube Resolution 1440 x 234 Pixels 336,960 Operation Temperature 32 -140º F (0 - 60º C) Storage Temperature -4 - 176º F (20 - 80º C) Backlight life 10,000 Hours Video Display System NTSC/PAL Headphone Audio Output 0.03W @ 32 ohms Video Output 1.
12 MONTH LIMITED WARRANTY Applies to Audiovox Mobile Video Products AUDIOVOX ELECTRONICS CORP. (the Company) warrants to the original retail purchaser of this product that should this product or any part thereof, under normal use and conditions, be proven defective in material or workmanship within 12 months from the date of original purchase, such defect(s) will be repaired or replaced with reconditioned product (at the Company's option) without charge for parts and repair labor.
For Customer Service Visit Our Website At WWW.audiovox.com Product Information, Photos, FAQ’s Owner’s Manuals © 2003 Audiovox Electronics Corp.