® ELECTRONICS CORP.
Important Notice It is unlawful in most jurisdictions for a person to drive a motor vehicle which is equipped with a television viewer or screen that is located in the motor vehicle at any point forward of the back of the driver's seat, or that is visible directly or indirectly to the operator of the motor vehicle. Please note that the state of Rhode Island forbids the installation of such a device in a motor vehicle.
MATERIALS INCLUDED IN THIS PACKAGE: 1)VOH560 Video Monitor with out TV Tuner (1 pc) 2)VCP Harness (P/N 112C3035) (1 pc) 3)12 Pin Power / Signal harness (P/N 112B2821) (1 pc) 4)2 Pin Power Wire Harness with choke (P/N 112B2824) (1 pc) 5)Hardware Package for VOH560 #4 x 3/8” Screws (12 pcs) #8 x 5/8” Self Drilling Screws (4 pcs) #8 Washers (4 pcs) 6)Remote Control (P/N 136C1957)(1pc) 7)Left Protective Cover for External A / V Inputs (P/N 102B3596) (1pc) 8)Right Protective Cover for Headphone Jacks (P/N 102B35
GENERAL INSTALLATION APPROACH: 1) Decide upon system configuration and options that will be installed (i.e.: what components, VCP, RF Modulator/external amp, remote headphone, 2nd VCP, etc.). 2) Review all manuals to become familiar with electrical requirements and hook ups. 3) Decide upon mounting locations of all components and method of mounting.
VEHICLE PREPARATION: 1) 2) 3) 4) Locate a constant power source (+12v at all times) and an accessory power source (+12v when key is in the acc. and run positions, and 0v when key is off). Generally, these wires can be found at the ignition switch or fusebox. The mounting method and location will vary from vehicle to vehicle, so this manual will only focus on the installation of the video monitor and related console accessories.
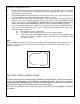
MINI CONSOLE INSTALLATION: This page only covers special installation considerations for the mini console installation. If the video monitor is to be installed with a custom full sized overhead console, refer to page 3. If the video monitor is to be installed in a vehicle with the mini console (P/N 102D3595), this console may need to be trimmed to fit the contour of the vehicle headliner.
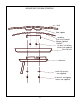
MOUNTING THE MINI CONSOLE Roof Roof support Headliner 5"x9"x3/4" Plywood Block or Optional VOHBKT (4) #8x1" self drilling screws (not supplied) Mini-Console Video unit (4) #8 Flat washers (not supplied) (4) #8x3/4" self tapping screws (not supplied) -5-
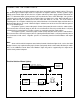
VOH560 N ote: cables ex iting the pod s hould be routed as sho w n. P o w e r H a rn e s s Item # 4 4 R e d: + 1 2 V D C (A c c es s o r y C ir.
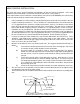
CONNECTING THE DOME LIGHTS The dome lights in the video monitor require three connections to the vehicle's wiring. There are two common types of dome light circuits used, positive or negative switched. Positive systems supply voltage to the interior lights to turn them on, negative switched systems apply ground to illuminate the bulbs. To determine which system you have you must locate the wires at the dome light.
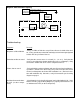
Negative Switched Dome lighting To 12 pin connector on Monitor Red / black - Lamp on Black / red - Lamp common Purple / brown - Lamp Auto To constant +12vdc Factory Dome light circuit To constant +12vdc Factory Door ajar switch or Body Control computer Troubleshooting: Symptom: Remedy: No power at Video Monitor -Verify +12 VDC on Red wire at 2 pin Power Harness behind video monitor.
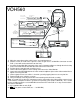
4 1 5 2 6 3A 7 8 9 10 3B Front Panel 1. Infrared Transmitter – Used to transmit audio to wireless headphones. 2. Power Button – (Bright red when system is On, dim when OFF). 3A. Forward Remote Sensor Eye – Allows the remote control to operate the VOH560 OSD (On Screen Display), control volume to wired headphone jacks (and optional external speakers), and to control the Video Cassette Player and other accessories. 3B.
VCP756 FRONT AND BACK VIEW V ID E O A U D IO L 8 A U D IO R 9 POWER 1 2 STOP/EJECT 3 REW PLAY 4 5 FF REPEAT 6 7 10 1. 2. 3. 4. Dust Cover – Protects VCP from dust and abuse access. Power Button – (Bright red when system is On, dim when Off). Stop / Eject Button – Used to stop the tape, and press it once more to eject the tape. (Fast) Rew Button : – Press Fast Rewind once in playback mode, the VCP enters the reverse picture search mode and the tape will rewind rapidly with the pictures.
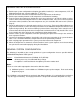
REMOTE CONTROL OPERATION 1 5 BATTERY INSTALLATION Before attempting to operate your Remote Control, install the batteries as described below. POWER 3 VIDEO or GAME REPLAY + PICTURE SELECT 4 2 WIRED HEADPHONE VOLUME CONTROL 1) Turn the Remote Control face down. Press down on the ridged area of the battery cover and slide it off. 2) Install two “AAA” batteries as shown. Make sure that proper polarity (+ or -) is observed. 3) Slide the cover back until it clicks.
Remote Controlled VCP Functions 5. REPLY BUTTON Pressing this button will rewind tape and immediately begin playback when the tape is fully rewound. 6. “REW” REWIND BUTTON If this button is pushed while the tape is stopped, the tape will rewind. If this button is pushed while the tape is playing, the VCP will go into rewind search mode. For more information, see page 10. 7. PLAY BUTTON Press this button to activate play mode while a tape is loaded into the VCP.
Remote Sensor The VOH560 incorporates an infrared sensor which relays signals from the remote control to allow the VOH560 and VCP to be controlled simply by pointing its remote control at the remote sensor eye. This provides control of auxiliary equipment such as an Audiovox DVD. The infrared sensor can reply signals to auxiliary source that is connecting to monitor din connector #2, such as a DVD player. In this case you must use the remote control supplied with the DVD player.
Wired FM Modulator Your video system may be equipped with an RF modulator, that allows you to listen to the VOH560’s audio signal by tuning your vehicle’s radio to the selected frequency, (88.7 or 89.1 - check with your installer) and turning on the remote mounted RF modulator switch. (In most cases this toggle switch will be located underneath the driver’s side of the dash, check with your installer for the exact location.) Whenever the RF modulator is on, broadcast radio reception will be poor.
Warnings ✦ Do not use any solvents or cleaning materials when cleaning the video system. ✦ Do not use any abrasive cleaners, they may scratch the screen. Use only a lightly dampened lint free cloth to wipe the screen if it is dirty. ✦ Lock the LCD screen in the fully closed position when not in use. ✦ Before putting on headphones always adjust the volume setting to the lowest position.
F o r C ustom er S e rvice Visit O u r W eb site A t WWW.audiovox.com P ro duc t Inform a tio n, P h otos , FA Q ’s O w ner ’s M a nua ls © Copyright 2001 Audiovox Electronics Corp. 150 Marcus Blvd.