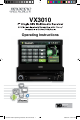
VX3010 Operating Instructions 160 128-9270 VX3010 Operating Instructions 02 20 2014.
VX3010 2 128-9270 VX3010 Operating Instructions 02 20 2014.
VX3010 Thank you for choosing a Jensen product. We hope you will find the instructions in this owner’s manual clear and easy to follow. If you take a few minutes to look through it, you’ll learn how to use all the features of your new Jensen VX3010 Mobile Multimedia Receiver for maximum enjoyment. iPod® Control “iPod” is a trademark of Apple Computer, Inc., registered in the U.S. and other countries. Bluetooth® is a trade mark of Bluetooth Special Interest Group (SIG) Inc.
VX3010 FCC Statement 1. This device complies with Part 15 of the FCC Rules. Operation is subject to the following two conditions: (1) This device may not cause harmful interference. (2) This device must accept any interference received, including interference that may cause undesired operation. 2. Changes or modifications not expressly approved by the party responsible for compliance could void the user’s authority to operate the equipment.
VX3010 Safety Precautions Please read through these operating instructions so you will know how to operate your model properly. After you’ve finished reading the instructions, keep this manual in a safe place for future reference. Only connect the unit to a 12-volt power supply with negative grounding. Please contact your nearest dealer if one of the following symptoms is experienced: (a). Water or other objects enters the unit. (b). There is smoke. (c). Peculiar smell.
VX3010 FEATURES Please read the instruction manual for this product before using. The documentation provided will allow the user to fully enjoy all the features of your new Jensen VX3010 Mobile Multimedia Receiver. Please read all of the instructions before beginning the installation and save this manual for future reference. We recommend having your Jensen VX3010 installed by a reputable installation shop.
VX3010 Chassis • • • • • 1.0 DIN (Import / ISO-DIN Mountable) Fixed Front Panel 7” High Definition TFT LCD 1,152,000 Sub Pixels (800 x 3 X 480) Beep Tone Confirmation (ON-OFF Option) General • Built-In Bluetooth® providing Hands-Free operation for safety and convenience and A2DP for streaming music from your smartphone or other Bluetooth® device.
VX3010 FRONT PANEL CONTROLS AND INDICATORS Figure 1. VX3010 Controls and Indicators Notice: The graphic in this manual is for reference only, and may be different from the actual unit. Reference to actual unit is suggested. 8 128-9270 VX3010 Operating Instructions 02 20 2014.
VX3010 1.) SRC Button ( ) Power ON/OFF, and Source Menu: Press the button to turn the unit ON. Once the unit is ON, momentarily pressing the [SRC] button will display the Main Touch Screen Source Menu. . Press and hold the knob for 2 seconds to turn the unit OFF. 2.) ROTARY ENCODER Knob: Rotate the knob to adjust the volume from 0 to 50. Press the knob momentarily to mute the audio. Press the knob again to restore the audio. 3.) REVERSE [ ] Button: Press Press to seek a lower station. to seek backward.
VX3010 REMOTE CONTROL OPERATION Figure 2. VX3010 Remote Control 10 128-9270 VX3010 Operating Instructions 02 20 2014.
VX3010 Remote Control Functional Description 1. S OURCE (SRC) Button: Press this button to switch between and select available sources. (Radio/Disc/Bluetooth/USB/Bluetooth Audio/SWC/AUX-1/ AUX-2/Camera) 2. EJECT Button ( ): Press this button to eject a DVD/CD/MP3 disc. Disc play is stopped, the disc is ejected and the unit will change to radio operation. If the disc is not removed from the unit and the button is pressed again, the disc will be re-loaded.
VX3010 10. GOTO Button: Press this button to open direct entry search screen during the playback of a disc. 11. [OPEN/CLOSE] Button: Open / Close the TFT monitor. 12. [TILT / ] Button: This button is used to adjusting the TFT Monitor tilting angle. 13. [RPT A-B] Button: A-B repeat. 14. [RPT] Key: Repeat playback 15. MUTE Button: Press this button to turn the audio output ON and OFF. 16. POWER Button ( ): Press this button to turn the unit ON and OFF. 17.
VX3010 26. [PIC] Button: Image setting, press this button to adjust the Brightness/Contrast and Saturation. 27. FAST REVERSE [ ] Button: Press this button to reverse Disc play 2x, 4x, 8x or 20x normal speed. Press this button while in Radio mode to search available radio station by decreasing tuning frequency. 28. [ / ] Button: Stop Playback / Hangup. Press this button to disconnect an active Bluetooth phone call. 29. [DISP/CLEAR] Button: Display information /Clear information. 30.
VX3010 Remote Control Battery Replacement Install Battery Use button-shaped lithium battery CR2025 (3V )” only. Insert the battery to the battery tray with proper direction according to the (+) and (-) poles. NOTE: Be sure and insert the positive (+) side of the battery UNDER the metal tab in the battery compartment. Uninstall Battery Slide out the battery compartment tray at the bottom on the back of the remote control.
VX3010 QUICK START GUIDE Turning the Unit ON or OFF Press the front panel Power/Menu button [ / SRC ] to turn the unit ON. To turn the unit OFF, press and hold the front panel Power/Menu button [ / SRC ] for 2 seconds. Selecting an Audio/Video Source, Bluetooth, Steering Wheel Controls or Backup Camera To access an Audio/Video source: 1. Momenterily press the front panel Power/Menu button or touch the Menu icon located in the upper left corner of the display to view the Main Menu Screen.
VX3010 Mute Press the volume knob on the front panel or press the [MUTE] Button on the remote control to mute the volume from the unit. Volume Adjustment Volume Increase/Decrease To increase or decrease the volume level, turn the rotary encoder on the front panel. When the volume level reaches "0" or "50", a beep sounds, indicating that the adjustment limit has been reached. The TFT screen displays the volume level for 3 seconds.
VX3010 Change Aspect Ratio Press the [WIDE] key on the remote control to adjust the aspect ratio. Image Settings 1. Enter image setting mode by pressing the [PIC] Button on the remote control. 2. Select the item to be adjusted and touch the Left or Right direction icons [ ]/[ ] on the user interface to adjust the value. 3. To exit image setting mode, press the [PIC] Button on the remote control again or simply stop making adjustments. Figure 6.
VX3010 SYSTEM SETTINGS 1. Touch the Menu icon the main menu. located in the upper left corner of the display to display 2. Touch the Settings icon [ ] and the settings menu is displayed. Figure 7. Settings Menu Screen General Settings 1. Touch [ General ], if necessary. 2. Touch to highlight a setting to display/select an option. General settings Options Description Radio region USA/Asia/Japan/Europe/Eur LW/ Oirt Select one that matches your location.
VX3010 Calibration Calibrate the touch screen using the calibration setting function. Recalibrating the touch screen: 1. Press the [ Calibration ] option on the setup menu to enter. 2. Touch [ Yes ] to enter. 3. Press and hold the center of [ + ] for 5 seconds, the [ + ] will move automatically. 4. Aim at center of [ + ], follow the path as shown in the figure. Once steps 1-4 are complete the system will automatically exit calibrating mode. Figure 8. Calibration Screen Video Settings 1. Touch [Video].
VX3010 Time Settings 1. Touch [ Time ]. 2. Touch an option repeatedly to select: Time settings Options Description Date Year / Mon / Day Touch [ Clock mode 12Hr/24Hr Touch [12Hr] or [24Hr] to switch clock mode. Time Hour / Min / AM / PM Touch [ Touch [ ] or [ ] or [ ] or [ ] to set year, month and day. ] to set hour and minutes. ] to set AM/PM (only for 12Hr). 3. Touch the return icon to exit and return to the previous screen. Audio Settings 1. Touch [ Audio ]. 2.
VX3010 Bluetooth Settings 1. Touch [Bluetooth]. 2. Touch an option repeatedly to select. Bluetooth settings Bluetooth Auto connect Auto answer Pairing code Options Description ON Turn-ON the Bluetooth function. OFF Turn-OFF the Bluetooth function. ON If the pre-paired device is within the effective range, the unit re-connects to pre-paired device automatically. OFF Need to re-connect manually. ON Answer paired phone call automatically. OFF Answer phone call manually.
VX3010 RADIO TUNER MODE Select radio as playing source Open the SOURCE MENU and then touch [Radio]. Selecting a Radio Band Press the [BAND] Button on the remote control or touch the [ ] icon on the user interface to select one radio band among FM1, FM2, FM3, AM1 and AM2. Tune Figure 9. Radio Screen Auto Tuning Press the [ ] / [ ] Buttons on the remote control or touch the [ ] / [ ] icons on the user interface to seek a higher / lower station.
VX3010 Search Stations Automatically Touch the search icon [ ] to search stations and store the 6 strongest stations in the current band automatically. Recalling a Station 1. Select a band. 2. Touch an on-screen preset button to select the corresponding stored station. Local radio station seeking (LOC) When the Local function is on, only radio stations with a strong local radio signal are played. To activate the Local function in the AM/FM tuner mode, touch [ ] on the screen. The Options tab is revealed.
VX3010 PLAYBACK OF AUDIO FILES Compatible Audio Discs Types This system will play the following types of discs: • DVD - DVDs that contain audio and/or video. • Audio discs - Audio CDs that contain audio, video and image files. • MP3 discs - A disc that contains audio, video and image files (for example, a CD-R with downloaded MP3 files). NOTE: This unit is designed to play pre-recorded (original) CD/DVDs. Some burned CD / DVDs may not play due to different recording formats.
VX3010 Controlling Playback To access the on-screen controls, touch the screen anywhere except for the upper left corner and touch again to cancel display. Connect an USB Device 1. Open the USB door. 2. Connect an USB device into the USB connector. Play starts automatically. NOTES: 1. If there are audio files supported on the USB stick, the system will enter the audio files menu automatically.
VX3010 Video Files 1. Touch Video icon [ ] to display all available video folders. 2. Touch a folder, then touch the desired file. 3. Touch the file again to start play. Picture Files 1. Touch Picture icon [ ] to display all available picture folders 2. Touch a folder, then touch the desired file. 3. Touch the file again to start play.
VX3010 Select Audio Mode When playing VCDs, the user can select an audio mode (R/L/Stereo). 1. During playback, touch the bottom half of the screen to display menu on the screen. 2. Touch the Next icon [ ] to display the 2nd menu. 3. Touch the Audio icon [ ] repeatedly until the audio mode is selected. Select Subtitle Language For DVD discs that contain two or more subtitle languages. 1. During play, touch the screen to display menu on the screen. 2. Touch the Next icon[ ] to display the 2nd menu. 3.
VX3010 For VCD 1. Disc type. 2. Return to the main menu. 3. VCD Track information. “1/16” indicates that this VCD has 16 tracks and the track playing back now is the first title. 4. Time display. VCD Title: 1/16 02:35 Figure 15. VCD Information Display Elapsed Time 1. Elapsed time of the current track. 2. Total time of the current track. Figure 16.
VX3010 General Disc Information Disc Properties Symbol 12cm Disc Properties Max Play Time Single side single layer (DVD-5) Single side double layer (DVD-9) Double side single layer (DVD-10) Double side double layer (DVD-18) (MPEG 2 Method) 133 minutes 242 minutes 266 minutes 484 minutes Single side single layer (VCD) (MPEG 1 Method) 74 minutes Single side single layer 74 minutes Disc Symbols Symbol Meaning Number of voice languages recorded.
VX3010 EQUALIZER CONTROL MENU Adjusting Equalizer Controls The Equalizer adjustment screen allows the user to easily adjust the audio system to meet the acoustical characteristics of the vehicle depending on vehicle type and cabin dimensions. For example: proper setting of the audio controls can improve the speakers frequency response.
VX3010 Adjusting the Fader and Balance The user can adjust front/rear fader settings, L/R balance settings, and subwoofer levels here. 1. Enter the EQ setup mode. 2. Touch the [ ] icon in the EQ interface menu. Figure 19. Fade-Balance Adjustment Screen Balance- This feature is used to balance the audio output levels between the left and right side of the vehicle. Touch the t or u icons to change the balance control settings -12 (Left) to +12 (Right).
VX3010 iPod®/iPhone® CONTROLS Accessing iPod® Mode The user can control an iPod®/iPhone® using the touch screen to access, albums, songs, videos, etc. NOTE: For basic connectivity, the iPod®/iPhone® must be connected to the unit using the iPod®/iPhone® adapter cable that came with the iPod/iPhone (also available separately). For iPod®/iPhone® video playback, use a jLink USB cable. equipped with a USB connector and a 3.5 mm AV jack.
VX3010 Pausing Playback 1.Touch the Pause icon [ ] on the bottom of the screen to pause play. “PAUSE” appears in the display, and Pause icon[ ] will switch to a Play icon[ ]. 2. Touch the Play icon [ ] to resume playback. Selecting a Track Track-up Touch the Forward icon [ ] to move to the beginning of the next track. Track-down 1. Touch the Back icon [ ] once to move back to the beginning of the current track. 2. Touch the Back icon[ ] twice to move back to the beginning of the previous track.
VX3010 BLUETOOTH® OPERATION Bluetooth® was launched by a special interest group (SIG) comprised of Ericsson Inc., Intel Corp., Nokia Corp., Toshiba and IBM in 1998, and it is currently developed by nearly 2,000 companies worldwide. The Bluetooth® word mark and logos are owned by the Bluetooth® SIG, Inc. and any use of such marks by Jensen Corporation is under license. Other trademarks and trade names are those of their respective owners.
VX3010 The user can make or receive phone calls with Bluetooth® enabled phones through the unit. The user can also listen to music from a Bluetooth® enabled device. Pairing Bluetooth® Enabled Devices To connect your Bluetooth® phone to the unit, the user needs to pair the phone to the unit. Pairing needs only to be done once. The user can pair up to five phones The user can search for Bluetooth head units by mobile phone. 1. Turn ON the Bluetooth® function on the device. 2.
VX3010 Disconnecting a Bluetooth® Device To disconnect one device, touch [ Disconnect ]. After "Disconnect" is pressed, the radio will display a screen listing paired devices. Pressing the Green "Plug" icon will reconnect a previously paired phone to the BT radio. Pressing the "Wastebin" icon next to a device's name will unpair the phone from the radio. NOTES. • The device will be disconnected when the device is moved beyond the operational range.
VX3010 Receiving a Call By default, all incoming calls are received automaticaly. 1. If there is an incoming call, the screen will display “Incoming call...”. 2. Touch the screen to select [ hang up ] or [ Answer ]. Speak into the Bluetooth microphone. Tip • You can select to receive calls manually by setting [Auto answer] to [OFF] Figure 27. Bluetooth® Incoming Call Screen Adjust Bluetooth Settings 1. In Bluetooth menu, touch [ Options ]. The option menu is displayed. 2.
VX3010 Bluetooth® Music Function Bluetooth® provides an Advanced Audio Distribution Profile (A2DP) profile for streaming music from a mobile phone or a portable multimedia player (PMP), sometimes referred to as a MP3 player. The unit allows you to play back audio files from your mobile phone or a PMP using a Bluetooth® connection. NOTE: Please quit A2DP mode before attempting to make a phone call, as unexpected results may occur depending on your mobile phone model.
VX3010 AV-In1/AV-In2 CONTROLS AV-In1 AV-In1 is used for playback of audio/video from an external device connected to the unit through a 3.5mm jack located on the font panel. AV-In2 AV-In2 is used for playback of audio/video from an external device connected through RCA connectors located on the back of the unit. You can connect an external audio/video device to the unit. 1. Connect the external device with an appropriate AV cable. 2. Touch the upper left corner to display the main menu. 3.
VX3010 BUILT-IN SWC INTERFACE The built-in SWC Interface is compatible with most vehicles equipped with “resistive type” OE steering wheels. Note: Not all OE steering wheel functions may be supported by the VX3010. The following controls are available for most vehicles: 1. Volume Up (+) 4. Seek Up (Next) 7. Preset (+) 10. Answer 2. Volume Down (-) 5. Seek Down (Prev) 8. Preset (-) 11.BT Send 3. Mute 6. Source 9. Band 12.
VX3010 REAR CAMERA OPERATION This unit is “camera ready.” Before accessing any camera features, you must install a rear video camera (sold Separately). When the camera is installed, the rear view image of what is behind the vehicle will appear when the vehicle is placed in reverse gear. When leaving reverse gear, the unit displays the previous screen. 41 128-9270 VX3010 Operating Instructions 02 20 2014.
VX3010 Troubleshooting Problem Cause Corrective action General Unit fuse blown. Install new fuse with correct rating. Unit can not power on Car battery fuse blown. Install new fuse with correct rating. Illegal operation Reset the unit. Remote control does not work Battery depleted. Change the battery. Battery installed incorrectly. Install the battery correctly. Improper audio output Check wiring and correct. connection.
VX3010 Troubleshooting (Continued) Problem Cause Corrective action Disc playback Cannot insert disc A disc is inside the unit already. Eject current disc and insert new one. Disc is warped or scratched. Use disc in good condition. Disc is dirty or wet. Clean disc with soft cloth. D i s c d o e s n o t p l a y Incompatible disc is used. back Disc is inserted upside down. Use compatible disc. Insert disc with label side up. Disc region code is not compatible with unit.
VX3010 SPECIFICATIONS DVD/CD Player Compatible Disc Media: DVD + R / RW (Single and Dual Layer) and CD-R / RW Compatible Media Formats: CD-DA, MP3, WMA, VCD, SVCD, Xvid, AVI, MPEG 1/2 Signal to Noise Ratio: >95dBA Dynamic Range: >95dB Frequency Response: 20Hz to 20 kHz, -3dB Channel Separation: > 60dB @ 1 kHz D/A Converter: High performance 24-bit / 192 kHz sample rate, Multi-Bit SigmaDelta Modulator Video Format: NTSC, PAL (auto-detection) Output: 1Vp-p (75-ohm) Input: 1Vp-p (75-ohm) FM Tuner Tuning Ran
VX3010 General Auxiliary Input impedance: 10k Power Supply: 11 to 16VDC, negative ground Power Antenna (Blue): 500mA max, current limited protection Amplifier Remote (Blue/White): 500mA max, current limited protection Operating Temperature: -20C ~ 65C Fuse: 15-amp, mini ATM type DIN chassis dimensions: 7” X 7” X 2” (178mm x 178mm x 50mm) CEA Power Ratings Power Output: 13 Watts RMS x 4 channels into 4-Ohms @ < 1% THD+N Signal to Noise Ratio: 70dBA below reference (Reference: 1 Watt, 4-Ohms) Frequency Respo
VX3010 Care and Maintenance 1. Use only a clean silicone cloth and neutral detergent to clean the front panel or monitor. A rough cloth and non-neutral detergent (such as alcohol) may result in scratching or discoloration. 2. Do not get water or cleaning fluids on the unit. 3. If the temperature inside the player gets too hot, a protective circuit automatically stops play of the disc. If this occurs, allow the unit to cool before operating the player again. 4.
VX3010 NOTES: 47 128-9270 VX3010 Operating Instructions 02 20 2014.
VX3010 Voxx Electronics Corporation Hauppauge, NY 11788 Technical Assistance: 1-800-323-4815 www.jensenmobile.com © 2013 Printed in China Installation Guide VX3010 Common Replacement Parts Owner’s Manual, Install Manual and Warranty Card 30613960 Wire Harness (Pwr/Spk/Line Out/ BT Mic / SWC Adapter) 30313990 Trim Ring 30413940 Remote Control 30713990 Hardware Bag 30513940 Mounting Sleeve & Removal Keys 30113940 48 128-9270 VX3010 Operating Instructions 02 20 2014.