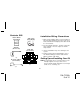
XH9 Home Cradle Home Installation Guide for use with XR9 Satellite Radio Receiver Released 9-30-04. Revision A: 11-8-04. Changed default screen.
CONTENTS Congratulations ........................................................................................ 3 Cautions and Warnings ............................................................................ 4 Contents XH9 ........................................................................................... 5 Installation/Wiring Precautions ................................................................. 5 Setting Up and Installing Your Kit .....................................................
Congratulations You are one step closer to experiencing XM Satellite Radio. XM will revolutionize your in-home or vehicle entertainment with: • Over 130 channels of original programming, including – 68 channels of 100% commercial-free music – guaranteed, Over 60 channels of world-class sports, news, talk and information. Your Audiovox XR9 Satellite Radio Receiver must be used with an adapter kit, such as the Audiovox Home kit, Boom Box or Vehicle Kit as required by your specific installation needs.
Cautions and Warnings 1. Do not install the in a position that obstructs viewing of any home entertainment component, such as Television, or stereo system indicators and displays. 2. This unit complies with the interference limits relative to a Class B digital device, applicable under Part 15 of the FCC Rules regarding installation in a residential environment. If the unit is not installed in accordance with these instructions, it could cause harmful interference to radio or television reception.
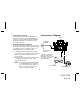
Contents XH9 Installation/Wiring Precautions Install Manual (P/N 1287219) Audio Cable (P/N 112B3293) 1. Make sure the adapter cable is not connected to an AC wall outlet until all interconnections have been made and verified. The adapter power cable should be connected last. 2. Do not install the unit in the locations exposed to direct sunlight or in areas subject to extreme temperatures. 1 pc. Antenna (P/N 118-1134) Cradle XH9 (P/N 136-3772) 3. Incorrect installation may cause damage to the system.
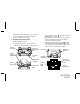
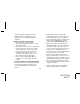
1. Cabling Interconnections You can begin to enjoy XM Satellite Radio as soon as the XR9 and home Kit installation are complete. Set up your XH9 using the following installation instructions, or enlist the help of a professional installer. Interconnect Diagram CRADLE XH9 DC POWER ADAPTER 2. Installing/Positioning the Antenna For best reception, the supplied antenna should be placed near a window; some repositioning may be required to achieve optimum results. The following guidelines are recommended: a.
continuously. If you experience a loss of signal or audio, reposition the antenna inside the home or outside as necessary. tab lever to the unlock ( ) position, and lower the XR9 into the cradle. b. After making sure the connectors are properly lined up, gently press down on the XR9 to mate the connectors together. c. Slide the latch tab lever to the lock ( ) position; the tab will enter the XR9 latching tab recess to prevent vertical movement. The XR9 should now be nestled securely in the cradle. 3.
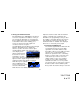
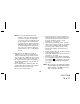
4. Aiming your XM Home Antenna If the XR9 display says “NO SIGNAL,” the antenna needs to be repositioned. In addition, even if you are receiving the XM signal, it is recommended that you optimize the position of your XM Antenna as described in this section enabling you to receive the strongest possible signal and consistent, mute-free reception.
strongest possible satellite signal. If the satellite signal is not available, you can optimize it for a terrestrial signal (where available). 1. Holding your antenna up, find a wall location that ensures a strong signal. It is recommended that you use an extension cord to temporarily locate your XR9 antenna outdoors while optimizing the antenna location with the Antenna Aiming screen. b. Indoor installation on a flat surface To aim your antenna at the satellite: 1.
NOTE: Do not cut the antenna cable and attempt to splice it or attach alternative connectors or cable. The cable and connectors used in your XH9 Home Kit are specially chosen and attached at the factory to ensure that they will work with XM’s unique frequency band. Use an XM-approved antenna extension kit from your local consumer electronics retailer. Failure to do so could damage the unit. d. Apply power to the XR9 home system as outlined in the associated User Guide and obtain an audio output.
12 MONTH LIMITED WARRANTY AUDIOVOX CORPORATION (the Company) warrants to the original retail purchaser of this product that should this product or any part thereof, under normal use and conditions, be proven defective in material or workmanship within 12 months from the date of original purchase, such defect(s) will be repaired or replaced with new or reconditioned product (at the Company's option) without charge for parts and repair labor.
© 2004 Audiovox Electronics Corporation, 150 Marcus Blvd.