Esec_ADV THX Crossover Inglese_Layout 1 03/05/12 16:21 Pagina 1 THX ADVANCED MANUAL CROSSOVER Rev. b www.audison.
Esec_ADV THX Crossover Inglese_Layout 1 03/05/12 16:21 Pagina 2 ADVANCED MANUAL / THX Index THESIS - The project Assembling and Cable connection Size 02 03 04 05 THX 2 THX 2 Mono-Wiring connections THX 2 Bi-Wiring connections THX 2 Installation recommended with default set filter THX 2 Installation with door mounted tweeter THX 2 Tweeter Level Ajustment THX 2 LFS (Low Frequency Shaping): Adjusting Low Frequency Response to eliminate resonances THX 2 How to disassemble the circuit board “Step 1” “Step 2
Esec_ADV THX Crossover Inglese_Layout 1 03/05/12 16:21 Pagina 3 ADVANCED MANUAL / THX THESIS The Project In order to create a system capable of reproducing amazing, first-class Sound, each acoustical component must abide to the most elevated standards of quality and design. The Thesis amplifiers offer their best performance when used with speakers designed with the same philosophy. Throughout the years Thesis has represented a name referenced to the perfection of electronic design and performance.
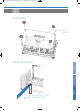
Esec_ADV THX Crossover Inglese_Layout 1 03/05/12 16:21 Pagina 4 ADVANCED MANUAL / THX Assembling O 4.
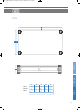
Esec_ADV THX Crossover Inglese_Layout 1 03/05/12 16:21 Pagina 5 ADVANCED MANUAL / THX Size C D THX 3 A B THX 2 THX mh THX 3 A B C D E 190 7”1/2 166 6”1/2 348 13”3/4 324 12”3/4 66,5 2”5/8 258 10”3/16 234 9”1/4 438 17”1/4 414 16”5/16 66,5 2”5/8 THX 2 THX mh E Misure espresse in millimetri e pollici / Measures in mm and inches 05
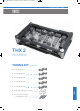
Esec_ADV THX Crossover Inglese_Layout 1 03/05/12 16:21 Pagina 6 ADVANCED MANUAL / THX 2 THX 2 PATTERNS TUNING KIT (supplied) N° 2 1Ω, 10W Resistors N° 2 2,2Ω, 10W Resistors N° 2 3,3Ω, 10W Resistors N° 2 4,7Ω, 10W Resistors N° 2 1µF, 330V Polypropylene capacitors N° 4 4,2x38 mm cross headed, self-tapping fixing screws THX 2 N° 2 5,6Ω, 10W Resistors
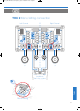
Esec_ADV THX Crossover Inglese_Layout 1 03/05/12 16:21 Pagina 7 ADVANCED MANUAL / THX 2 THX 2 Mono-Wiring connection Left Channel Right Channel TH 1.5 violino TH 1.5 violino TH 6.5 sax TH 6.
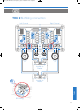
Esec_ADV THX Crossover Inglese_Layout 1 03/05/12 16:21 Pagina 8 ADVANCED MANUAL / THX 2 THX 2 Bi-Wiring connection Left Channel Right Channel TH 1.5 violino TH 1.5 violino TH 6.5 sax TH 6.
Esec_ADV THX Crossover Inglese_Layout 1 03/05/12 16:21 Pagina 9 ADVANCED MANUAL / THX 2 THX 2 Installation recommended with default set filter Tweeter suggested position J1 R1 4,7Ω J2 R2 4,7Ω R3 15Ω J3 R4 15Ω L2 0,68mH L1 3,3mH TH 6.5 sax C2 220µF J6 L3 0,68mH R6 8,2Ω J7 R7 5,6Ω J8 R8 3,9Ω J9 R9 2,2Ω R5 6,8Ω TH 1.
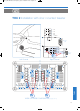
Esec_ADV THX Crossover Inglese_Layout 1 03/05/12 16:21 Pagina 10 ADVANCED MANUAL / THX 2 THX 2 Installation with door mounted tweeter J1 R1 4,7Ω J2 R2 4,7Ω J3 R3 15Ω R4 15Ω L2 0,68mH L1 3,3mH TH 6.5 sax C2 220µF C1 4,7µF R6 4,7Ω J6 C3 1,0µF A L3 0,68mH Left Channel R7 3,3Ω J8 R8 2,2Ω R9 1,0Ω J9 B R5 5,6Ω C TH 1.
Esec_ADV THX Crossover Inglese_Layout 1 03/05/12 16:21 Pagina 11 ADVANCED MANUAL / THX 2 THX 2 Tweeter Level Adjustment -2dB 0dB +2dB +4dB -2dB 0dB +2dB +4dB dB dB 0 500 0 1k 2k 5k 10k 20k 0 500 -2 1k 5k 10k 20k -2dB 0dB +2dB +4dB -2dB 0dB +2dB +4dB dB 0 +2 1k 2k 5k 10k 20k +4 0 500 THX 2 dB 500 2k 1k 2k 5k 10k 20k 11
Esec_ADV THX Crossover Inglese_Layout 1 03/05/12 16:21 Pagina 12 ADVANCED MANUAL / THX 2 THX 2 LFS (Low Frequency Shaping) Adjusting Low Frequency Response to eliminate resonances dB 0 0 0dB - 2dB - 4dB LFS 20 50 100 200 500 1k 2k 5k 10k 20k 180 0dB - 2db 0db - 2dB - 4dB - 4dB LFS LFS dB 0 0 -4 20 50 100 200 180 500 1k 2k 5k 10k 20k 20 50 100 200 180 500 1k 2k 5k 10k THX 2 -2 dB 20k 12
Esec_ADV THX Crossover Inglese_Layout 1 03/05/12 16:21 Pagina 13 ADVANCED MANUAL / THX 2 THX 2 How to disassemble the circuit board Step 1: remove plexiglass cover (see page 4) Step 2: remove the main screws (marked in blue) Right Channel THX 2 Left Channel 13
Esec_ADV THX Crossover Inglese_Layout 1 03/05/12 16:21 Pagina 14 ADVANCED MANUAL / THX 2 THX 2 How to disassemble the circuit board Step 3: remove the screws that secure the resistor blocks (marked in blue) Step 4: remove the screws that secure the resistors with the clamps THX 2 Clamp 14
Esec_ADV THX Crossover Inglese_Layout 1 03/05/12 16:21 Pagina 15 ADVANCED MANUAL / THX 2 THX 2 Modifications on the single components Insert the supplied 1,0 µF capacitor A B THX 2 C Replace the 6,8Ω resistor originally mounted with a 5,6Ω one supplied with the product Replace the supplied resistors originally mounted following the diagram on page 10 15
Esec_ADV THX Crossover Inglese_Layout 1 03/05/12 16:21 Pagina 16 ADVANCED MANUAL / THX mh THX mh PATTERNS TUNING KIT (supplied) N° 2 1.
Esec_ADV THX Crossover Inglese_Layout 1 03/05/12 16:21 Pagina 17 ADVANCED MANUAL / THX mh THX mh Mono-Wiring connection Left Channel TH 3.0 voce Right Channel TH 1.5 violino Left TH 1.5 violino TH 3.
Esec_ADV THX Crossover Inglese_Layout 1 03/05/12 16:21 Pagina 18 ADVANCED MANUAL / THX mh THX mh Bi-Wiring connection Left Channel TH 3.0 voce Right Channel TH 1.5 violino Left TH 1.5 violino TH 3.
Esec_ADV THX Crossover Inglese_Layout 1 03/05/12 16:21 Pagina 19 ADVANCED MANUAL / THX mh THX mh Installation recommended with default set filter Tweeter suggested position J2 C1 22µF L1 1.00mH TH 3.0 voce C3 10µF C4 2,2µF J5 L3 0,68mH J6 R1 2,2Ω J7 R2 4,7Ω TH 1.
Esec_ADV THX Crossover Inglese_Layout 1 03/05/12 16:21 Pagina 20 ADVANCED MANUAL / THX mh THX mh Installation with door mounted midrange Tweeter suggested position J2 L11.00mH C1 22µF A C2 10µF J1 TH 3.0 voce C3 10µF B L2 1,5mH C4 2,2µF J5 L3 0,68mH Left Channel J6 R1 2,2Ω J7 R2 4,7Ω TH 1.
Esec_ADV THX Crossover Inglese_Layout 1 03/05/12 16:21 Pagina 21 ADVANCED MANUAL / THX mh THX mh Tweeter Level Adjustment -2dB 0dB +2dB dB 0 500 0 1k 2k -2dB 10k 20k -2dB 0dB +2dB THX mh 0dB +2dB dB dB 0 500 5k -2 1k 2k 5k 10k 20k 0 500 +2 1k 2k 5k 10k 20k 21
Esec_ADV THX Crossover Inglese_Layout 1 03/05/12 16:21 Pagina 22 ADVANCED MANUAL / THX mh THX mh Midrange Hi-pass Activation of the High-pass filter for the midrange dB 0 20 50 100 200 500 1k 2k 5k 10k 20k 2k 5k 10k 20k Hi-pass frequency: ON THX mh dB 00 20 50 100 200 500 1k Hi-pass frequency: OFF 22
Esec_ADV THX Crossover Inglese_Layout 1 03/05/12 16:21 Pagina 23 ADVANCED MANUAL / THX mh THX mh How to disassemble the circuit board Step 1: remove plexiglass cover (see page 4) Step 2: remove the main screws (marked in blue) Right Channel THX mh Left Channel 23
Esec_ADV THX Crossover Inglese_Layout 1 03/05/12 16:21 Pagina 24 ADVANCED MANUAL / THX mh THX mh How to disassemble the circuit board Step 3: remove the screws that secure the resistor blocks (marked in blue) Step 4: remove the screws that secure the resistors with the clamps Right Channel THX mh Left Channel Clamp 24
Esec_ADV THX Crossover Inglese_Layout 1 03/05/12 16:21 Pagina 25 ADVANCED MANUAL / THX mh THX mh Modifications on the single components B THX mh A Insert the supplied 10 µF capacitor Insert the supplied 1,5 mH coil 25
Esec_ADV THX Crossover Inglese_Layout 1 03/05/12 16:21 Pagina 26 ADVANCED MANUAL / THX 3 THX 3 TUNING KIT (supplied) N° 2 1.
Esec_ADV THX Crossover Inglese_Layout 1 03/05/12 16:21 Pagina 27 ADVANCED MANUAL / THX 3 THX 3 Mono-Wiring connection Left Channel Right Channel C4 C9 R6 R19 R7 R20 L1 L10 L9 L5 C10 C5 J8 J20 -2db -2db J9 C3 L3 J21 0db R8 C8 L8 0db R21 J10 J22 +2db +2db MD Level MD Level L7 L4 R1 R9 R14 R22 J11 J3 J4 -2db L2 J12 TW Level R2 0db R10 J16 R15 0db 0db J13 J17 +2db +2db R3 R11 J14 J18 +4db +4db J24 R23 0db J25 -2db R24 R16 J5 -4db LFS TW Level
Esec_ADV THX Crossover Inglese_Layout 1 03/05/12 16:21 Pagina 28 ADVANCED MANUAL / THX 3 THX 3 Bi-Wiring connection Left Channel Right Channel C4 C9 R6 R19 R7 R20 L1 L10 L9 L5 C10 C5 J8 J20 -2db -2db J9 C3 L3 J21 0db R8 C8 L8 0db R21 J10 J22 +2db +2db MD Level MD Level L7 L4 R1 R9 R14 R22 J11 J3 J4 -2db L2 J12 TW Level R2 0db R10 J16 R15 0db 0db J13 J17 +2db +2db R3 R11 J14 J18 +4db +4db J24 R23 0db J25 -2db R24 R16 J5 -4db LFS TW Level J
Esec_ADV THX Crossover Inglese_Layout 1 03/05/12 16:21 Pagina 29 ADVANCED MANUAL / THX 3 THX 3 Tri-Wiring connection Left Channel Right Channel C4 C9 R6 R19 R7 R20 L1 L10 L9 L5 C10 C5 J8 J20 -2db -2db J9 C3 L3 J21 0db R8 C8 L8 0db R21 J10 J22 +2db +2db MD Level MD Level L7 L4 R1 R9 R14 R22 J11 J3 J4 -2db L2 J12 TW Level R2 0db R10 J16 R15 0db 0db J13 J17 +2db +2db R3 R11 J14 J18 +4db +4db J24 R23 0db J25 -2db R24 R16 J5 -4db LFS TW Level
Esec_ADV THX Crossover Inglese_Layout 1 03/05/12 16:21 Pagina 30 ADVANCED MANUAL / THX 3 THX 3 Installation recommended with default set filter J3 R1 4,7Ω J4 R2 4,7Ω R3 15Ω J5 Tweeter suggested position R4 15Ω L3 4.7mH L2 3,3mH C2 220µF C1 47µF TH 6.5 sax Midrange suggested position L1 1.00mH C4 22µF R6 4,7Ω J8 J9 R7 3,9Ω R8 3,3Ω J10 C3 10µF C6 2,2µF R9 8,2Ω J11 J12 R10 5,6Ω R11 3,3Ω R12 1,5Ω J13 J14 L4 0,68mH TH 3.0 voce R5 4,7Ω TH 1.
Esec_ADV THX Crossover Inglese_Layout 1 03/05/12 16:21 Pagina 31 ADVANCED MANUAL / THX 3 THX 3 Installation with door mounted midrange J3 R1 4,7Ω J4 R2 4,7Ω J5 Tweeter suggested position R3 15Ω R4 15Ω L3 4.7mH L2 3,3mH C2 220µF C4 22µF C1 47µF TH 6.5 sax L1 1.0 mH C5 10µF J8 J9 A D R6 3,3Ω R7 2,7Ω R8 2,2Ω J10 C3 10µF B C6 2,2µF R9 8,2Ω J11 J12 R10 5,6Ω R11 3,3Ω R12 1,5Ω J13 J14 L3 0,68mH TH 3.0 voce R5 6,8Ω C L5 .1,5mH TH 1.
Esec_ADV THX Crossover Inglese_Layout 1 03/05/12 16:21 Pagina 32 ADVANCED MANUAL / THX 3 THX 3 Installation with door mounted double woofer J3 R1 4,7Ω J4 R2 4,7Ω J5 Tweeter suggested position R3 15Ω R4 15Ω L3 3.3mH L2 3.3mH E C2 220µF 2x TH 6.5 sax C1 47µF Midrange suggested position L1 1.00 mH C4 22µF R6 4.7Ω J8 J9 R7 3.9Ω R8 3.3Ω J10 C3 10µF C6 2.2µF R9 8.2Ω J11 J12 R10 5.6Ω R11 3.3Ω R12 1.5Ω J13 J14 L4 0,68mH TH 3.0 voce R5 4.7Ω TH 1.
Esec_ADV THX Crossover Inglese_Layout 1 03/05/12 16:21 Pagina 33 ADVANCED MANUAL / THX 3 THX 3 Installation with door mounted double woofer and midrange J3 R1 4,7Ω J4 R2 4,7Ω J5 Tweeter suggested position R3 15Ω R4 15Ω L3 3.3mH L2 3,3mH E C2 220µF C4 22µF 2x TH 6.5 sax C1 47µF L1 1.00mH J8 J9 A C5 10µF D R6 3,3Ω R7 2,7Ω R8 2,2Ω J10 C3 10µF B C6 2,2µF R9 8,2Ω J11 J12 R10 5,6Ω R11 3,3Ω R12 1,5Ω J13 J14 L4 0,68mH TH 3.0 voce R5 6,8Ω C L5 .1,5mH TH 1.
Esec_ADV THX Crossover Inglese_Layout 1 03/05/12 16:21 Pagina 34 ADVANCED MANUAL / THX 3 THX 3 Tweeter Level Adjustment dB dB 0 0 0 -2 R6 2k 5k 10k 500 20k 5k J1 -2dB1 0db J12 R8 0dB J10 J1 +2dB3 +2db +4dJ1B4 20k MD Level J9 J1 10k J10 +2db -2db -2dB1 Le ve l 2k R7 J8 J10 +2db MD Level TW 1k Le ve l 1k TW 500 J12 0dB J1 +2dB3 +4dJ1B4 MD Level L l L4 R1 R9 J11 R3 J12 R10 0db J13 +2db R11 THX 3 R2 TW Level -2db J14 +4db R12 R4 J10 +2db J10 +2db
Esec_ADV THX Crossover Inglese_Layout 1 03/05/12 16:21 Pagina 35 ADVANCED MANUAL / THX 3 THX 3 Midrange Level Adjustment dB 0 -2dJ8B J9 0dB J10 +2dB MD Level C4 50 100 200 500 1k 2k 5k J11 -2db 10k ve l 20 J12 R6 R19 R7 R20 R8 R21 L5 C5 J8 -2db J9 C3 0db J10 +2db THX 3 MD Level L4 R1 -2dJ8B R9 J8 R14 -2dB J11 J9 0dB ve l J12 J4 -2db 0 J5 -2 R3 J12 R10 0db J12 dB 100 200 500 1k 2k 5k 10k R16 R12 R17 0 R4 50 R11 +2 LFS 20 R15 J11 -2db J13 +2d
Esec_ADV THX Crossover Inglese_Layout 1 03/05/12 16:21 Pagina 36 ADVANCED MANUAL / THX 3 THX 3 LFS (Low Frequency Shaping) Adjusting Low Frequency Response to eliminate resonances L1 L5 C5 dB J3 J8 0dB 0 0 J4 -2db - 2dB J5 - 4dB LFS C3 L3 J9 0db J10 +2db 20 50 100 200 160 500 1k 2k 5k 10k 20k MD Level L4 R1 J11 -2db J3 J4 -2db L2 J12 TW Level R2 0db 0db J13 +2db R3 J5 J14 -4db +4db LFS J3 J3 0dB C2 THX 3 R4 0dB J4 J4 R5 - 2dB - 2dB J5 - 4dB LFS - 4dB LFS C
Esec_ADV THX Crossover Inglese_Layout 1 03/05/12 16:21 Pagina 37 ADVANCED MANUAL / THX 3 THX 3 How to disassemble the circuit board Step 1: remove plexiglass cover (see page 4) Step 2: remove the main screws (marked in blue) C4 C9 R6 R19 R7 R20 L1 L10 L9 L5 C10 C5 J8 J20 -2db -2db J9 C3 L3 J21 0db R8 C8 L8 0db R21 J10 +2db J22 +2db MD Level MD Level L7 L4 R1 R9 R14 R22 J11 J3 J4 -2db L2 J12 TW Level R2 0db R10 J16 R15 0db 0db J13 J17 +2db +2db R3 R11 J14
Esec_ADV THX Crossover Inglese_Layout 1 03/05/12 16:21 Pagina 38 ADVANCED MANUAL / THX 3 THX 3 How to disassemble the circuit board Step 3: remove the screws that secure the resistor blocks (marked in blue) Step 4: remove the screws that secure the resistors with the clamps C4 C9 R6 R19 R7 R20 L1 L10 L9 L5 C10 C5 J8 J20 -2db -2db J9 C3 L3 J21 0db R8 C8 L8 0db R21 J10 J22 +2db +2db MD Level MD Level L7 L4 R1 R9 R14 R22 J11 0db J4 -2db J12 TW Level R2 J16 0db R15
Esec_ADV THX Crossover Inglese_Layout 1 03/05/12 16:21 Pagina 39 ADVANCED MANUAL / THX 3 THX 3 Modifcations on the single components 1. Remove the screws securing the coil from the bottom of the PCB; 2. Unsolder the coil leads; 3. Unwind the coil with the help of an LCR meter until the value of 3,3 mH can be measured; 4. Refixe the coil. Replace the 4,7Ω resistor originally mounted with the 6,8Ω one, supplied with the product.
Esec_ADV THX Crossover Inglese_Layout 1 03/05/12 16:21 Pagina 40 ADVANCED MANUAL / THX Technical Specifications THX 3 THX mh Stereo 2 way Passive Crossover Network Stereo 3 way Passive Crossover Network Stereo 2 way Mid-High Passive Crossover Network Size mm / inch 348x190x66,5 13”3/4x7”1/2x2”5/8 438x258x66,5 17”1/4x10”1/4x2”5/8 348x190x66,5 13”3/4x7”1/2x2”5/8 Power W peak 400 400 400 Handling W continuous 200 200 200 Crossover frequency LO/HI-pass 2.5 kHz 450 Hz / 3.