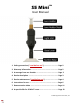
TM S5 Mini User Manual 1. Safety precautions (*read before use*) .……….………….…….. Page 2 2. Warranty information …………………………………………………….. Page 2 3. A message from our founder ..………………………………….…….. Page 3 4. Device description ………………………………………………………….. Page 3 5. Device maintenance (*read before use*) ..…….……………….. Page 4 6. Instructions for use …………………….………………………………….. Page 6 7. Demonstration video ………………….………………………………….. Page 11 8. A special offer for S5 Mini™ users ……………..…….
SAFETY PRECAUTIONS 1. Please consult with your eyecare provider for instructions on how to clean and maintain your lenses. Your doctor will recommend the appropriate lens cleaning and maintenance products that you should use with your lenses. 2. If you experience pain or a decrease in the quality of your vision after using the S5 Mini™ stop using the device and contact your eyecare provider immediately. 3. Lens Holder: a. Please read the insert included with the rubber lens holder before using it. b.
A MESSAGE FROM OUR FOUNDER Thank you for purchasing the S5 Mini™. I designed this device to eliminate the frustration that my patients had with inserting their scleral and hybrid lenses and I hope that it will do the same for you. Please don't hesitate to reach out to me via phone, text or email if you have any questions or if there is any way that we can be of assistance to you.
D EVICE MAINTENANCE 1. Please clean the rubber lens holder with an alcohol wipe before every use and allow it to dry completely before placing a lens on it. The lens holder should be replaced at leas once every 3 months. 2. Immediately after inserting your lenses, take a moment to remove any liquid that may have spilled onto your device. This will help prevent water from getting into the electronic components of your device. 3.
ii. Locate the USB port on the bottom of the light unit. iii. Connect the female end of the provided USB charging cable to the bottom of the light unit. iv. Connect the male end of the cable to a desktop or laptop computer. b. The light unit will reach a full charge after 1 hour of being plugged in.
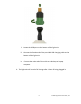
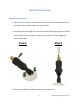
INSTRUCTIONS FOR USE B EFORE LENS INSERTION 1. Place the suction base on a smooth, flat surface. Ensure that both the bottom of the suction base and the surface are clean and dry. 2. Hold down the outer edge of the suction base while pulling the light unit upward until the device locks into place in the vertical position. This will engage the suction of the base. Step 2 Step 3 3. Connect the rubber lens holder to the top of the light unit.
4. Wash your hands with soap for 20 seconds and dry them with a lint-free towel. 5. Clean the rubber lens holder with a disinfecting alcohol wipe. a. *Allow the lens holder to dry completely before placing your contact lens on it. 6. Clean the upper segment of the light unit (the part that twists) with a disinfecting alcohol wipe. a. You can use the same wipe that you previously used to clean the lens holder. 7.
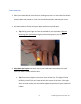
LENS INSERTION 1. Place your head directly over the lens, making sure that it is level with the surface that the base was placed on. Your chin should be tucked in toward your chest. 2. Use both hands to firmly hold your upper and lower eyelids open. a. Tip: Placing your finger as close as possible to your eyelashes (without touching your eyelashes) will give you the best grip on your eyelids. 3. Keep both eyes open and slowly move your head down toward the lens until your eye makes contact with the lens.
b. It is normal for saline to spill out of the lens bowl when your eye makes contact with the lens. 4. Once you feel that the lens has made contact with your eye, move your head back up and away from the device and slowly release your eyelids. 5. Twist the top half of the light unit clockwise to turn off the light. 6. For your second eye: a. Repeat steps 8 through 10 in the “Before Lens Insertion” section to prepare your second lens for insertion. b.
7. Cover one eye at a time to see if you can notice any air bubbles that may be trapped under the lens. It may be helpful to use a mirror and a flashlight to check for air bubbles. a. If air bubbles are seen, you must remove the lens and re-insert it. AFTER LENS INSERTION Please carefully follow the instructions below to keep liquid away from the electronics of your device. Following these instructions will extend the operational life of your device. 1. Remove the rubber lens holder from the light unit.
4. Drying the lens holder dock: a. Turn the light unit upside down to drain any liquid inside the orange lens holder dock. Use a paper towel or a q-tip to soak up any liquid remaining in the lens holder dock. 5. Please ensure that the storage case used to store the device is completely dry before using it to store your device. This is important for reducing the growth of microbes in the storage case as well as reducing the chance of moisture causing damage to the electronics of your device. a.
A SPECIAL OFFER FOR S5 M INI™ USERS As a token of our appreciation for your support, we would like to extend you a $50 credit that can be used towards the purchase of any new device on our website. To take advantage of this limited time offer, click the button below to complete our proof of purchase form. We will then send you a custom code that will allow you to apply your credit to the purchase of a new device through our website.
3 WAYS TO USE YOUR $50 CREDIT 1) Get a second device to help with lens insertion when you are away from home. 2) Try out the S5 Inserter™ which is optimized for lens insertion while standing. 3) Gift a device to a friend or family member who can benefit from using one.