TELL ME MORE® EDUCATION Admin Tools User Guide Copyright 2003 Auralog S.A. All rights reserved.
TELL ME MORE® EDUCATION Admin Tools Contents TELL ME MORE® Education: system set-up ............................................................................................................3 INTRODUCTION.............................................................................................................................................................4 TO RUN ADMIN TOOLS ............................................................................................................................
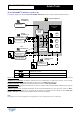
TELL ME MORE® EDUCATION Admin Tools TELL ME MORE® Education: system set-up This diagram displays the standard TELL ME MORE® Education system set-up for a multi-workstation licence.
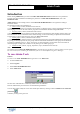
TELL ME MORE® EDUCATION Admin Tools Introduction Before running Admin Tools, you must install TELL ME MORE Education and define the server parameters. To know more about installation and defining the parameters of TELL ME MORE Education, refer to the Installation Guide. Admin Tools allows the training structure within TELL ME MORE Education to be organised according to individual contexts.
TELL ME MORE® EDUCATION Admin Tools The Admin Tools application comprises four windows. The Tutors window This window allows you to create, modify or remove Tutor accounts. The Language groups window This window allows you to create, modify or remove language groups. The Student groups window This window allows you to create, modify or remove student groups. The Students window This window allows you to create, duplicate, import, export, modify or remove student accounts.
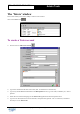
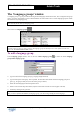
TELL ME MORE® EDUCATION Admin Tools The ‘Tutors’ window This section enables you to create, modify or remove Tutor accounts. Click on the Tutors icon . To create a Tutor account Ø Click on the icon Add a Tutor account Ø Type in the surname and the name of the Tutor (max. 50 characters for each text box). Ø Type in any useful additional information in the Description text box (e.g. Tutor’s title, availability etc.). This is optional.
TELL ME MORE® EDUCATION Admin Tools Note: Only the following information is necessary to create a Tutor account: name, user name and languages taught. ‘Languages’ tab Ø Select the language(s) taught by the Tutor by clicking on the icon Add a language Ø Choose the language from the drop-down menu, then confirm by clicking on the green tick. When the Tutor has been assigned to a language group, the name of this group appears under the heading Language Group. .
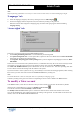
TELL ME MORE® EDUCATION Admin Tools To remove a Tutor account Caution! You cannot remove a Tutor account if the Tutor is responsible for a language group. You must first remove the language group before you can remove the Tutor account. For more details, refer to the section entitled The ‘Language groups’ window/To remove one or more language groups. In the Tutors window, select the Tutor(s) whose account(s) you want to remove.
TELL ME MORE® EDUCATION Admin Tools The ‘Language groups’ window A ‘language group’ is a group of students learning the same language with the same Tutor, who is assigned to the group when it is created. The student accounts created thereafter can be allocated to one or several language groups or indeed not allocated to any language group. Caution! There can only be one Tutor per language group. Click on the icon Language groups .
TELL ME MORE® EDUCATION Admin Tools To modify a language group You may need to modify the name, description or Tutor assigned to a language group. Caution! You cannot modify the lesson language of a language group. If you want to change the lesson language, you must remove the existing language group and create a new one choosing the new lesson language. In the Language groups window, select the language group you want to modify. You must then either double-click on .
TELL ME MORE® EDUCATION Admin Tools The ‘Student groups’ window The ‘student groups’ concept allows students to be grouped together, thus enabling easy system administration. A student can be allocated to one or several student groups or indeed not allocated to any student group. Click on the icon Student groups . To add a student group In the Student groups window, click on the icon Add a student group student group.
TELL ME MORE® EDUCATION Admin Tools To remove one or more student groups This function enables you to remove definitively one or more student groups. Caution! You cannot remove a student group containing students. You must first move or remove the student accounts before removing the student group. For more details, refer to The ‘Students’ window section. In the Student groups window, select the student group(s) you want to remove.
TELL ME MORE® EDUCATION Admin Tools To add a predefined student group type This function is only useful in the case where you have removed all of the default predefined student group types and you want to return them to the list. In TELL ME MORE Education, the predefined student group types are ‘Class’ and ‘Group’. Ø Click on the icon Add a predefined student group type Ø Select the predefined student group type you want to add from the list. Ø Confirm by clicking on the green tick. .
TELL ME MORE® EDUCATION Admin Tools The ‘Students’ window You can now create student accounts. There are 2 methods of doing this: 1. The Automatic creation of student accounts option is activated. In this case, it is not necessary to create student accounts using Admin Tools. An account is created when the student uses TELL ME MORE. To know more about this, refer to the Automatic creation of student accounts section. It is then possible to modify the default values of these accounts.
TELL ME MORE® EDUCATION Admin Tools To add a student account This function allows you to save all the information concerning an individual student to create their personal account. In the Students window, click on the icon Add a student account account. or select the menu Students/Add a student You must type in different types of information: Ø Type in the surname and first name of the student (max. 50 in each text box). Ø Select the TELL ME MORE default language.
TELL ME MORE® EDUCATION Admin Tools Lesson language To add a lesson language and define the associated parameters Ø Select the lesson language(s). To do this, click on the icon Add a lesson language Ø Select a lesson language from the drop-down menu. . Ø You can also select a language group (optional). The name of the Tutor responsible for the selected language group will be displayed. Note: A student does not have to be allocated a language group (select None from the drop-down menu).
TELL ME MORE® EDUCATION Ø Admin Tools Select one or more Lesson Families to which you want to restrict access. Ø Confirm by clicking on the green tick. If you want to restrict access to Lesson Families already selected, select the Lesson Family from the list and click on the icon Remove one or more Lesson Families . If you want to re-authorise access to all Lesson Families, remove the tick from the Restrict access to Lesson Families box by clicking on it.
TELL ME MORE® EDUCATION Ø Admin Tools Confirm the creation of the student account by clicking on the green tick. All the information contained within the various text boxes will not be taken into account until this moment. To add a student account by duplicating another student account You can create a new student account based on an existing account, by copying the non-personal data (e.g. student group, language group, lesson language).
TELL ME MORE® EDUCATION Admin Tools Name and description of column format Column name Explanation Surname* Student’s surname (by default, the entry in the UserName column) FirstName* Student’s first name PupilsGroup or IDPupilsGroup * Student group name or ID ® UserName TELL ME MORE user name Password* Password to access TELL ME MORE LearningGroups or Language group name or ID (Tutor-led training) IDLearningGroups If a student has been allocated to a language group, it is not necessary to s
TELL ME MORE® EDUCATION Admin Tools Example 2 File with the ‘UserName’ and ‘LessonLanguages’ columns (with two lesson languages for each student). Some basic rules for creating a valid file to be imported § § § § § § § § The minimum any student import file must include is the ‘UserName’ column. The lesson language will be subsequently asked for in order to complete the importation.
TELL ME MORE® EDUCATION Admin Tools If lesson language information (i.e. language group or lesson language) is missing for one LearningGroups or student, this information will be asked for to complete the importation of all student data. IDLearningGroups The lesson language added will be allocated to all students for which this information was missing. § The file contains one or more errors: a message warning you of the number of errors will be displayed.
TELL ME MORE® EDUCATION Admin Tools Ø Select the student account(s) you want to export by clicking on the icon Select student(s) . You can then sort by student group and/or language group, then by ID, surname and first name to locate the student accounts you want to export. Ø Click on the icon Add a field user name, etc.). Ø Confirm by clicking on the green tick. , then select the name of the field(s) you want to export (e.g.
TELL ME MORE® EDUCATION Admin Tools To remove one or more student accounts You can remove a student account when the student has completed their training programme or left the establishment. This removal entails the deletion of all information concerning the student, including their results obtained while working in TELL ME MORE. In the Students window, select the student(s) whose account(s) you want to remove. You can do this either by clicking on the icon Remove student account(s) student account(s).
TELL ME MORE® EDUCATION Admin Tools TECHNICAL SUPPORT If you have problems using Admin Tools, you can either: § consult the documents located on the root directory of the Installation CD-ROM in the AurDoc directory; § refer to Auralog’s regularly-updated FAQ (Frequently Asked Questions) section at www.auralog.com; § contact your supplier or Auralog’s technical support team who will help you find a solution. AURALOG 6 rue Jean-Pierre Timbaud 78180 Montigny-le-Bretonneux France Tel.