
User Manual


Replacing the Cable – Boom Pole with
Bottom Exit XLR
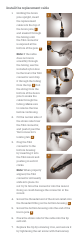
Remove the old cable
1. Use the hex key to
loosen the set screw
on the tip.
1
2. Remove the tip by
unscrewing it.
2
3. Lift the cable and
strain relief out of the
tip exit slot.
3
Tip: Before
proceeding, push a
small length of cable
into the tube from the
tip of the pole. This
will give you enough
slack to complete the
following steps.
4. Unscrew the bottom
housing from the base
of the boom pole.
4
5. Unscrew the plastic
TA3 strain relief.
5
6. Disconnect the TA3
connector by pressing
on the locking tab and
gently removing the
connector from the
mount.
Note: The TA3
connector should
easily disconnect. Do
not force or pull on the
cable to disconnect
it. Doing so could
damage the housing
or the connector.
7. Use a small slotted
screwdriver to reach
inside the strain
relief and depress the
locking tab of the TA3
connector.
6
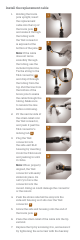
With the
locking tab depressed,
you can slide the
strain relief over the
TA3 connector and
o of the cable. Set
the strain relief piece
aside.
Alternative: Use a wire cutter to snip the cable
at the base of the TA3 connector. Remove the
strain relief, and set it aside.
Important: Once you have performed this step,
the cable will be unusable. If you plan on using
the cable again at a later point, don’t proceed
with this alternative step.
8. Remove the cable by pulling it out from the
top of the pole.
5
6
Instructions
1
2
3
4
Install the replacement cable
1. Holding the boom
pole upright, insert
the replacement
cable into the top of
the boom pole,
1
and snake it through
the tubing until
the TA3 connector
is exposed at the
bottom of the pole.
2
Note: If the cable
does not move
smoothly through
the tubing, use the
included nylon line:
tie the line to the TA3
connector and drop
it through the tubing
from the top.
3
Pull
the string from the
bottom of the boom
pole to snake the
cable through the
tubing. Make sure
to remove the line
before continuing.
2. Fit the narrow side of
the strain relief over
the TA3 connector,
and push it past the
TA3 connector’s
locking tab.
4
3. Plug the TA3
connector to the
bottom housing
by inserting it into
the TA3 mount and
pushing in until it
clicks.
Note: When properly
aligned, the TA3
connector will easily
slide into place. Do
not try to force the connector into the mount.
Doing so could damage the connector or the
mount.
4. Screw the threaded end of the strain relief onto
the threaded fitting on the bottom housing.
5
5. Screw the bottom housing onto the end of the
boom pole.
6
6. Place the strain relief of the cable into the tip
exit slot.
7. Replace the tip by screwing it on, and secure it
by tightening the set screw with the hex key.
2
4
1
3
5
6
Replacing the Cable – Boom Pole with
Side Exit XLR
Remove the old cable
1. Use the hex key to
loosen the set screw
on the tip.
1
2. Remove the tip by
unscrewing it.
2
3. Lift the cable and
strain relief out of the
tip exit slot.
3
Tip: Before
proceeding, push a
small length of cable
into the tube from the
tip of the pole. This
will give you enough
slack to complete the
following steps.
4. Unscrew the side
exit housing,
4
and
move the plastic
strain relief cap
so that the TA3
connector inside the
housing is exposed.
5 Disconnect the
TA3 connector by
pressing on the
locking tab and
gently remove the
connector from the
mount.
5
Note: The TA3
connector should
easily disconnect.
Do not force or pull
on the cable to
disconnect it. Doing
so could damage
the housing or the
connector.
6. Use a small slotted
screwdriver to reach
inside the strain
relief and depress
the locking tab of
the TA3 connector.
With the locking tab
depressed, you can slide the strain relief over
the TA3 connector and o of the cable.
6
Set
the strain relief piece aside.
Alternative: Use a wire cutter to snip the cable
at the base of the TA3 connector. Remove the
strain relief, and set it aside.
Important: Once you have performed this
step, the cable will be unusable. If you plan
on using the cable again at a later point, don’t
proceed with this alternative step.
7. Remove the cable by pulling it out from the
top of the pole.
4
5
1
2
3
6