® Aussie by Meco® LP Gas Grill Assembly and Use Manual TM Joey MODEL 7110.7.641 Liquid Propane Gas Grill FOR OUTDOOR HOUSEHOLD USE ONLY. NOT FOR COMMERCIAL USE. For Customer Service, call 1-800-251-7558 or visit our web site at www.meco.net • Failure to follow these instructions could result in fire or explosion which could cause death, serious personal injury, or property damage. • Read and follow instructions carefully before assembly or use.
— NOTICE — MECO CORPORATION STRIVES TO BE A QUALITY SUPPLIER OF CONSUMER PRODUCTS. IF WE OMITTED ANY PARTS NEEDED FOR ASSEMBLY, OR YOU NEED TROUBLESHOOTING INFORMATION, PLEASE CONTACT US USING OUR TOLL FREE NUMBER. THANK YOU FOR PURCHASING A MECO CORPORATION PRODUCT. 1-(800)-251-7558 8 am - 5 pm E.S.T Mon. - Fri. 1-(423)-639-1171 (TELEPHONE) 1-(423)-639-2570 (FAX) www.aussiegrill.net CONSUMER SERVICE DEPARTMENT MECO CORPORATION 1500 INDUSTRIAL ROAD GREENEVILLE, TN. 37745 USA CONTENTS I.
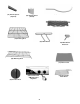
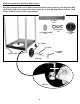
PARTS ILLUSTRATIONS If you need replacement parts, refer to the Parts Illustrations and the Parts List to find the exact parts you need. If you have any questions which require help, contact Customer Service and be sure to mention the model number of your grill.
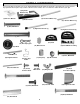
(31) Handle Spacer (Tapered) (33) Hood Handle (32) Handle Spacer (Fitted) (35) Flame Diffuser (34) Cooking Grid (36) Main Burner 42) Main Burner Electrode (38) Warming Rack (37) Fabric Panel (41) Control Knob (40) Control Panel w/Manifold and Regulator 4 (39) LP Cylinder Heat Shield
To reduce the risk of a cut injury: · Wear protective gloves when handling parts that have sharp edges. · Some assembly may require help from another person. Observe where noted. TOOLS: and/or or STEP 1) Cart Assembly: (3) LP CYLINDER CLIP Attach the Legs to the Bottom Shelf with M5 x 40 Bolts threaded into the Bottom Shelf holes. Position legs with the holes exactly as indicated .
STEP 2) Assemble Axle, Wheels & Wheel Covers: Push Axle through center hole in Wheel and through lower hole in each leg. (FIG. 2A) Insert Axle pin through small hole in end of Axle until it snaps over it. (FIG. 2B) Align Wheel Cover pins with 3-holes in Wheel and push flush against Wheel. (9) AXLE 1 PC (11) AXLE PIN 2 PC (12) WHEEL COVER 2 PC (10) WHEEL (9) AXLE (12) WHEEL COVER WHEEL LEGS FIG. 2A (11) AXLE PIN FIG.
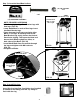
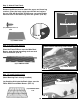
Step 3) Assemble Hood/Bowl to Cart: (16) M6 LOCKNUT 4 PC (15) BOLT, M6X45 4 PC Bowl Bracket Legs (14) HOOD/BOWL ASSEMBLY NOTE: REQUIRES 2-PERSONS · With Cart upright, align Bowl Bracket legs with Cart legs. (FIG. 3A) · Lower Hood/Bowl so ends of Cart legs insert into Bowl Bracket legs. · Press downward until leg screw holes align. NOTE: If cart legs do not align and fit into Bowl Bracket legs easily, loosen the Control Panel bolts slightly.
Step 5) Assemble Sidebraces: · Attach Right and Left Sidebraces (19 & 20) to legs with ST4.0 x 10 Screws. (FIG. 5A) Secure Bottom Heat Shield to Left Sidebrace with M4x10 Bolts and M4 Wingnuts. (FIG. 5B) Allow Heat Shield Edge to overlap Sidebrace edge. (21) SCREW, ST4.0 x 10 4 PC (22) BOLT, M4x 10MM 2 PC Heat Shield edge over Crossbrace edge (23) M4 WINGNUT (23) WINGNUT, M4 2 PC (22) BOLT, M4x10MM FIG. 5B (20) Left Sidebrace (21) Screw, ST4.
Step 6) Assemble Side Tables: Align bracket holes of Left and Right Side Tables with holes in Bowl Leg Brackets. Attach Side Tables with M6 x 15 Bolts underneath. (FIG. 6A 7 6B) (25) RIGHT SIDE TABLE (26) LEFT SIDE TABLE (27) BOLT, M6X15 8 PC FIG. 6B (27) SCREW, M6X15 (27) BOLT, M6X15 FIG. 6A Step 7) Attach Hood Handle: Open Hood. Insert the M6 x 50 Bolt through the right side of Heat Shield (right side has one hole), Hood and Handle Spacer and thread into handle. Do not tighten completely.
Step 8) Attach Front Panel: Remove the M6 nut used to attach the upper and lower leg sections. Place the large eyelet over the bolt and replace the nut. (FIG. 8B) Using the ST4.0 Screw, secure the Fabric Panel to holes in the lower legs over the eyelets. (FIG. 8A) RIGHT SIDE (21) SCREW, ST4.0 x 10 (21) SCREW, ST4.0 x 10 4 PC FIG. 8A FIG. 8B (37) FABRIC PANEL Step 9) Install Flame Diffuser: Flame Diffuser mounting stud in Bowl.
OPERATING YOUR LP GAS GRILL · Never fill the LP gas cylinder more than 80% of CONNECTING/DISCONNECTING THE GAS cylinder volume. (20 lb. maximum) Do not ask the propane supplier to over-fill the cylinder. · If you obtain LP gas through a cylinder exchange dealer, make sure you get a safe and adequate O.P.D. cylinder. (See page 22) Use only a licensed LP gas cylinder dealer. · Place dust cap on cylinder valve outlet whenever the cylinder is not in use.
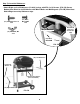
3) Lift and swing LP Cylinder Retainer Clip to outside of grill. Set LP cylinder in the large hole inside the Bottom Shelf. Rotate the LP cylinder toward the front of grill so regulator hose may connect. (FIG. 11A) To avoid pinching in next step, keep fingers and hands near corners of Cylinder Retainer Clip when swinging Clip over cylinder. 6) Swing the Cylinder Retainer Clip over round shoulder of the LP cylinder. Exert pressure at ends of clip until it stops at the cylinder carry handle.
6) Check for leaks by brushing the soap solution on all gas valves, hose connections and fittings. (shown by the heavy arrows in (FIG. 12A & 12B) Make sure you generously brush the locations with the soap solution, completely surrounding the connections and fittings. 7) If “growing” bubbles appear on any of the connection points, you have detected a gas leak. Immediately close the LP cylinder valve by turning handle clockwise.
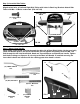
To reduce the risk of serious bodily injury or death: · Open Hood before lighting the grill to prevent an explosion from any gas accumulation. · If lighting attempts fail, or the burners go out during operation, turn all control knobs “Off” to dissipate any accumulation of gas. Accidental ignition could occur. Wait five minutes before repeating lighting procedure. · Light both left and right sides of burner to prevent gas from accumulating. FIG. 13B LIGHTING THE GRILL USING THE IGNITOR 1. Open the Hood.
MANUAL LIGHTING THE GRILL To reduce the risk of serious bodily injury or death: · Open Hood before lighting the grill to prevent an explosion from any gas accumulation. · If lighting attempts fail, or the burners go out during operation, turn all control knobs “Off” to dissipate any accumulation of gas. Accidental ignition could occur. Wait five minutes before repeating lighting procedure. · Light both left and right sides of burner to prevent gas from accumulating.
WARMING RACK Warming racks are a convenient way to keep cooked food warm or to warm items such as bread or rolls. When opening the hood, be alert of dripping fat from the warming rack which could then drip onto the barbecue causing a mess. Always check that your warming rack is properly fitted before use. ROASTING COOKING To avoid burns from the hot air and steam trapped inside: · Open the hood carefully when grill roasting.
CARE AND MAINTENANCE To reduce the risk of a cut injury: · Be careful or wear protective gloves when cleaning grill parts that have sharp edges. CLEANING THE GRILL 1) Remove Drip Cup, Cooking Grid, and Flame Diffuser. 2) Drip Cup-Wash the Drip Cup with soap and water. 3) Grill Body and Cart-Do not mistake the accumulation of grease and smoke residue for peeling or flaking paint. Remove excess grease and/or fat with a soft plastic or wooden scraper.
5) Use a pipe cleaner to clear insect nests from the inlet hole of main burner (FIG. 15D). Open up the main burner holes with a small nail or wire.Normal wear and corrosion may enlarge some holes, however, if large cracks or holes are found, replace the Burner. Use a brass wire brush to remove food particles and corrosion from the burner surface. (Note: It is normal for surface rust to be present on the burners.) It can be wire brushed and coated with cooking oil periodically.
Gas Leaks and Fire Emergencies Possible Cause Solution Damaged hose. Turn off gas at the LP cylinder. Replace valve/hose/regulator before continuing use. Gas leaking from LP cylinder Mechanical failure due to rust or mishandling. Replace LP Cylinder Gas leaking from LP cylinder valve Failure of valve from mishandling or mechanical malfunction. Turn off LP cylinder valve. Return cylinder to gas supplier. Gas leaking between LP cylinder and regulator connection.
TROUBLESHOOTING (Cont’d) Problem Burners will not light using the ignitor Possible Cause Solution LP-Excess flow valve tripped in regulator. Turn control knobs to “off” position and turn LP gas cylinder handle clockwise until it stops. Wait five minutes. Relight LP gas grill. If flame continues to be low, turn off gas at cylinder and grill. Disconnect the regulator from the LP gas cylinder. Reconnect the regulator to the LP gas cylinder. Perform a leak test. Relight grill.
TROUBLESHOOTING (Cont’d) Humming or whistling from the regulator Outside temperature, humidity, barometric pressure, and the gas level within the tank may cause the rubber diaphragm inside the regulator to vibrate, making a humming or whistling sound. Although this sound may be alarming, this is NOT dangerous as long as it is not accompanied by the smell of gas. Simply adjust the burner settings and usually the sound will subside.
MECO CORPORATION LIMITED WARRANTY This product is warranted to the original consumer purchaser against defects in material and workmanship under normal outdoor household use and correct assembly (if assembled by the consumer-purchaser). Burner and Cooking Grid are warranted for a period of one (1) year from the date of purchase. All other parts are warranted for a period of one (1) year from the date of purchase. Meco Corporation requires proof of purchase and we suggest you keep your receipt.
® Aussie P/N 03.6602.01 REV.