
Owners Manual


F/10
GEARBOX.
end
of
the layshaft must face forwards
and
the rear end
must be flush with the gearbox casing.
Reverse Gear
Refit
the
reverse gear
into
the gearbox casing with
the large gear to the rear.
Oil the reverse gear shaft
before inserting
and
secure the shaft with the locating
pin
and
tab
washer.
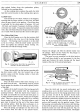
Selector Rods and Forks
Before commencing
to
locate the selector forks
within the gearbox casing it
is
advisable to pre-load
the spring
and
ball into each bronze fork,
and
with
the aid
of
a pilot bar, as
in
Fig.
14,
retain the spring
and
ball
in
position until each fork
rod
has entered
its correlative fork.
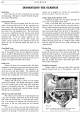
With the gears in
the
neutral position, first fit
A
Fig. 14. Preloading a change speed fork ball and
spring with the aid
of
a selector rod guide A.
the 3rd
and
4th
speed selector fork
and
then locate the
1st and 2nd speed selector.
Now
tap the 3rd
and
4th
selector fork rod through
the
casing, slide the distance
piece over the rod and continue tapping the
rod
through
its fork until it reaches its final position. Next locate
the reverse gear fork
and
then
enter the 1st
and
2nd
selector fork
rod
and
the reverse gear fork rod, through
the casing
and
into their respective forks.
Do
not
drive the two
latter
rods completely home
until
the change speed gate lever
and
its arm have been
fitted to the box.
When driving the fork rods home remember to
retrieve the pilot bars as they leave the forks.
Selector Arm and Cross
Shaft
Slide the cross shaft
into
its bearings. Replace
the selector
arm
over the
top
of
the lever, locating
it
on
the two flats. Insert the cross shaft gear engagement
lever between the forks
on
the
selector
arm
and secure
the latter by means
of
the
nut
and
tab
washer.
The selector fork rods may
now
be tapped right
through the forks into their final position.
If
the oil seal has been removed from the right-hand
side
of
the gearbox, ensure
that
this item is tapped
into place before fitting
the
cross shaft. Also make
sure
that
the felt washer is fitted before fixing
the
lever
to the cross shaft.
Front Cover
The
front cover
and
its
paper
joint
washer should
now be
p~sitioned
over
the
securing studs
and
fixed with
the seven nuts
and
spring washers.
At
this stage
of
the reassembly,
the
selector fork
rods should be locked in place with the two keys in the
gearbox rear face.
Rear
Oil Seal
Press
on
the new oil seal
and
maintain
an
even
pressure
around
the end
of
the seal while
it
is pinched
into its groove in three places.
If
this uniform pressure
is
not
exerted while the seal is being secured,
it
will fail
to seat evenly on its
joint
washer thus causing
an
oil leak
for which the seal itself may be blamed.
In
the same manner, fit
the
new dust cover. This
cover must be held up
hard
against the rear cover
of
the
gearbox
and
kept central whilst
it
is secured, thus
ensuring that it does
not
rub
on
the propeller shaft
when the latter
is
located.
Rear Cover
Pass the rear cover, together with its
joint
washer,
over
the.
third
motion shaft
and
secure it
to
the
rear
of
the gearbox with the eight setpins
and
spring washers,
ensuring in the process
that
the
third
motion
shaft is
centralised within the cover.
Now
refit
the
speedometer
pinion
and
sleeve.
Change
Speed Gate and Side Cover
The
change speed gate should now be fitted
into
position. The gate is in the form
of
an
angle plate; the
side incorporating the gear stops slides into the gearbox
(see Fig. 7),
and
the rounded ends
of
the outer side
of
the gate locate in two recesses which are bored
into
the
gearbox side face. Secure the side cover into position
by means
of
the
nine setpins
and
spring washers, ensur-
ing that the
joint
washer is intact.
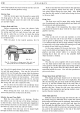
Clutch
Shaft and Fork
Slide
the
clutch shaft through the left-hand side
of
the clutch casing (on left-hand drive models the clutch
shaft circlip
and
washer
must
be replaced),
then
position
the clutch operating yoke
on
the
shaft
and
pass the
shaft through the right-hand side
of
the casing. Secure
the yoke in place with the cotter pin, spring washer and
nut, and
fix
the operating lever
to
the end
of
the shaft
by means
of
the washer
and
nut.