
Owners Manual


H/4
FRONT
HUBS
AND
INDEPENDENT
SUSPENSION
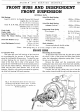
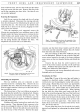
H40. 162. A.
Fig.
4.
Components
of
the independent front suspension,
1.
Shock absorber.
18.
Fulcrum pin for inner lower
35.
Front
screwed bush.
2.
Rear
top
wishbone arm. bearing.
36.
Flat washer.
3.
Clamping
bolt for front
top
wish-
bone arm.
19.
An
inner lower rubber bearing.
20.
An
outer
lower rubber bearing.
37.
Grease
nipple.
38. Steering
arm
nut.
4.
Front
top
wishbone arm.
21. Fulcrum pin nut and cotter.
39.
Steering
arm
nut
lockwasher.
5.
Joining bolt for top wishbone arms.
6.
Upper
trunnion
link.
7.
Trunnion
rubber bearing.
22. Fulcrum pin special washer.
23.
Nut
for bush cotter.
24. Bush cotter.
40. Steering arm.
41. Steering arm bolt.
42.
Swivel axle lower bush.
8.
Upper trunnion fulcrum pin.
9.
Fulcrum locking
nut
and
cotter.
25.
Swivel pin
dust
cover spring.
26.
Upper dust cover.
43. Swivel axle.
44.
Cork
ring.
10.
Nut
and
washer for clamping bolt.
11.
Coil spring.
27. Lower dust cover.
28.
Cotter
for fulcrum pin.
45.
Swivel grease nipple.
46.
Swivel pin nut
and
cotter.
12.
Rebound
rubber bumper.
13.
Spring plate bolt.
14.
Rear
lower wishbone arm.
29. Rear screwed bush.
30.
Swivel pin and lower trunnion.
31.
Nut
and washer.
47. Staybrite washers.
48.
Oil ite washer.
49.
Swivel upper bush.
15.
Simmonds
nut
and
lockwashcr.
32.
Cork
ring.
50. Back plate bolt lockwasher.
16.
Spring plate.
17.
Rebound
bumper nut
and
washer.
33.
Trunnion
grease nipple.
34.
Screwed fulcrum pin.
51.
Back
plate bolt.
52. Back plate assembly.
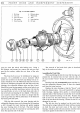
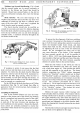
There are four nuts and bolts securing the bottom
spring plate
to
the suspension lower links, the nuts
being
of
the self-locking type. Unscrew the nuts from
two diagonally opposite bolts. Remove these bolts and
insert the two slave bolts in the vacated holes. Screw
their nuts down securely and then remove the remaining
two short bolts. Unscrew the nuts from the slave bolts,
each a little
at
a time. When the spring is fully
ex-
tended, release the bolts and remove the spring plate
and coil spring.
Checking the Spring: The spring should be checked
for a correct free length as given on page
H/
1.
The
spring should be renewed
if
there
is
any excessive
variation in its correct length.
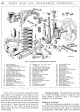
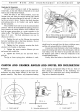
Refitting the Coil Spring
Offer the coil spring and spring plate into position,
fit the slave bolts
if
Service Tool 18G
37
is
not
available,
and screw down their nuts, each a little
at
a time until
the spring plate is held tightly against the suspension