
Owners Manual


M/6
BRAKES
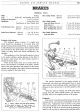
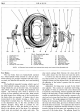
Rear Brakes:
(1)
Jack up the car and chock the front wheels.
(2)
Remove the wheels and brake drums.
(3)
It
will be found quite easy to lift one
of
the
shoes out
of
the slots provided
in
the adjuster links
and
expander tappets. Both shoes can be removed complete
with springs.
(
4)
Remove the two shoe return springs
and
replace
if stretched
or
damaged.
Fit
the new springs to the new
shoes with the shorter
of
the springs at the adjuster end
of
the shoes
and
with the springs between shoes and back
plate. Locate one shoe
in
the adjuster and expander slots
and
prise over the opposite shoe into its relative position.
Again it
is
important that the steady rests
and
shoe ends
should be lubricated with Girling brake grease.
Note: When fitting replacement shoes
it
is advi-
sable,
at
all times, to fit a new set
of
springs.
Always fit Girling "factory lined" shoes as replace-
ments as these have the correct type
of
lining
and
are
accurately ground to size, which ensures a fast bed into
drums.
Running Adjustments and General Maintenance
The brakes are adjusted for lining wear
ONLY
at
the brakes themselves
and
on
no account should any
alteration be made to the handbrake cable for this
purpose.
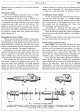
Front Brakes
Jack up the car until the front wheel to be adjusted
is
clear
of
the ground
and
fully release both hexagon
head adjuster bolts
on
the brake back plate.
Turn
one
of
the adjuster bolts until the brake shoe concerned
touches the brake drum. Release the adjuster until the
brake shoe
is
just free
of
the drum, and repeat the
operation for the second adjuster. As,
on
the front
brake assembly, a separate adjuster is provided for each
shoe, spin the wheel to ensure
that
the brake shoes are
quite free
of
the drum and repeat the adjustment for
the second front wheel.
Rear Brakes
Adjustment
is
made by turning the square head
adjuster
on
each rear brake back plate in a clockwise
direction until a resistance is felt. The adjuster must
then be slackened back two clicks. One common
adjuster is provided for both shoes
in
the rear brake
assembly and the adjustment
of
both rear wheel brakes
is
identical.
Replenishment of Hydraulic Fluid
Inspect the supply
tank
at regular intervals and
maintain about three-quarters full by the addition
of
Girling Crimson Brake Fluid.
For
the Saloon, this
tank
is mounted on the steering gear side
of
the radiator
frame
and
in the Sports,
on
the flitch plate adjacent to
the steering column.
Note: Serious consequences may result from the
use
of
incorrect fluids, and
on
no account should any-
thing other
than
the specified fluid be used. Great care
should be exercised when adding brake fluid to prevent
dirt or foreign matter entering the system.
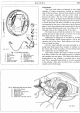
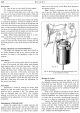
Fig,
8,
Showing the position
of
the brake fluid supply
tank
on
the Commercial vehicles.
Bleeding the System
Bleeding becomes necessary any time a portion
of
the hydraulic system has been disconnected,
or
if
the
brake fluid has been allowed to fall so low
that
air
has entered the master cylinder. The specified fluid has
been specially prepared and is unaffected by high tem-
peratures or freezing.
With all the hydraulic connections secure
and
the
supply
tank
topped with fluid, remove the rubber cover
from the right-hand rear brake nipple and fit a length
of
rubber tube to the nipple, immersing the free end
of
the tube in a clean
jar
containing a little brake fluid.
Unscrew the bleed nipple about three quarters
of
a
turn and then operate the brake pedal with slow full
strokes until the fluid entering the
jar
is completely
free
of
air bubbles. Then, during a down stroke
of
the
pedal, retighten the bleed nipple and remove the rubber
tube. . Replace the bleed nipple dust cover.