
Owners Manual


N/2
TYRES
AND
JACKING
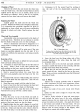
Changing a Wheel
Remove the wheel disc and loosen the wheel nuts
with the wheel brace. See
that
the hand-brake
is
firmly
applied and
if
the car is
on
an incline, chock one
of
the wheels not affected. Jack up the car
as
required,
remove the four wheel nuts and remove the wheel.
Replacing the Wheel
Lightly grease the studs and lift the wheel into
position. Replace the wheel nuts and tighten alternately.
It
is
important that particular attention be given to
tightening, as loose wheel nuts will cause considerable
damage to wheels and studs. Finally replace the steel
disc.
Wheel and Tyre
Assembly
Inextensible wires are incorporated in the beads
of
wired type tyres. Therefore do not attempt to stretch
the wire beads
of
the tyre cover over the rim flange.
Force is unnecessary and may be dangerous
as
it
merely tends to damage the cover beads and serves no
useful purpose.
Fitting or removing will be quite easy
if
the wire
beads are carefully adjusted into the rim well.
If
it
is
found to be difficult, the operation
is
not being correctly
performed.
Removing a Tyre
1.
Remove all valve parts to deflate the tyre and push
both tyre beads off the rim seats.
2.
Commence to remove the bead on the valve side of
the cover. Insert a lever
at
the valve position and,
while pulling on this lever, push the bead into the well
of
the rim diametrically opposite the valve.
3.
Insert a second lever about 2-in. away from the
first lever and gradually prise the bead over the
nm
flange.
4.
Continue with one lever while holding the removed
portion
of
the bead with the other lever. The tube can
then be removed.
5.
Stand the cover upright with the wheel in front.
6.
Insert a lever from the front between the bead and
the flange and pull the cover back over the flange.
7.
If
difficult to remove, keep the strain on the bead
with the lever and tap off with a rubber mallet.
Refitting a Tyre
1.
Place the cover on top
of
the wheel and push
as
much
as
possible
of
the lower bead by hand into the
well
of
the rim. Insert a lever to prise the remaining
portion
of
the lower bead over the rim flange.
2.
Slightly inflate the tube until
it
begins to round out
and insert
it
in the cover with the valve through the hole
in the rim. (Take care that the valve, which is fitted in
the side
of
the tube,
is
on the correct side
of
the rim.)
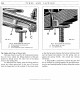
3.
Commence to
fit
the second bead by pushing
it
into the well
of
the rim diametrically opposite the
valve.
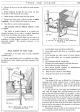
Fig. 1. Removing a tyre.
To
lever the tyre bead over the wheel rim
at
(A) first
push the bead
(B)
over the rim shoulder
at
(C) into
the well
of
the rim
at
(D).
4.
Lever the bead over the flange either side
of
this
position, finishing at the valve, when the bead will
be completely fitted.
5.
Ease the valve in the rim hole and push upwards
by hand to enable the beads to seat correctly, and then
pull the valve firmly back into position.
6.
Inflate the tyre and see that the beads are seated
evenly round the rim: check by the line on the cover.
Note: Water on levers considerably eases the fitting and
removing
of
beads.
Care in Fitting
Special care in fitting synthetic tubes
is
essential
to obtain maximum life and avoid premature failure.
Recommendations when fitting on
well
base rims are
as
follows:-
1.
Dust the inside
of
the cover evenly with French
chalk.
2.
Inflate the tube until
it
begins to round out; then
insert in cover.
3.
Apply a frothy solution of soap and water gener-
ously around the entire base
of
the tube, extending
upwards between the tyre beads and the tube itself for
at least two inches on both sides. Also apply the mixture
to the bottom and outside
of
the tyre beads.
Do
not
allow the solution to run into the crown
of
the tyre.
Mixture must be strong enough to
feel
slippery when
the fingers are wetted and rubbed together.