
Owners Manual

0/6
ELECTRICAL
EQUIPMENT
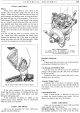
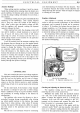
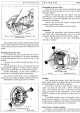
Fig.
6.
Distributor cap.
A. Terminal screw. B.
Carbon
brush.
paying particular attention to the space between the
terminals. See
that
the small carbon brush
on
the
inside
of
the moulding works freely
in
its holder and
that
the terminals are secure.
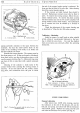
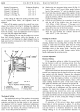
Examine the contact breaker. The contacts must be
free from grease or oil.
If
they are burned or blackened,
clean them with a very fine carborundum stone
or
with
very fine emery cloth (see Fig.
7).
Afterwards wipe away
any trace
of
dirt
or
metal dust with a petrol moistened
cloth.
Cleaning
of
the contacts
is
made easier
if
the
contact breaker lever carrying the moving contact is
removed. To do this remove the nut, washer, insula-
ting piece,
and
connections from the post to which
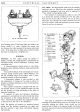
Fig. 7. Trueing the contacts with the aid
of
a car-
borundum stone.
the end
of
the contact breaker spring is anchored.
Th1
lever can then be lifted off its pivot pin. After cleaning
check the contact breaker setting.
If
the contacts are badly burned, they should
be
renewed. Replacement contacts must only be fitted
i11
pairs. To remove the moving contact, follow the pro·
cedure outlined above.
To
remove the plate carrying
the fixed contact take out
the
two screws complete with
spring washers and fiat steel washers. The replacement
set
of
contacts can now
be
refitted by a reversal of
the above.
Check the adjustment
of
the contact breaker gap
as described in
"After the first 500 miles running".
Trafficators-Lubrication
Apply by means
of
a small brush
or
other suitable
article, a drop
of
recommended lubricant to
the
bear-
ing on which the
ann
pivots. Use only
the
slightest
trace as any excess may adversely affect the operating
mechanism.
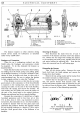
2
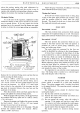
Fig. 8. Dynamo Lubrication.
l.
Wick Lubricator.
2.
Spring.
3.
Screw Cap.
Note.-Later
models have no wick type
lubricator;
see page XX for details.
EVERY 12,000
MILES
Dynamo Lubrication
After
about
every 12,000 miles running, unscrew
the lubricator at the end
of
the dynamo, lift
out
the
felt
pad
and
spring
and
about
half
fill the lubricator
with
H.M.P. grease. Replace the spring and felt pad
and screw the lubricator into position (see Fig.
8).