
Owners Manual

P/22
BODYWORK
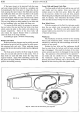
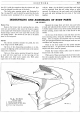
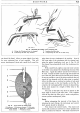
Fig. 32. The Fascia.
1.
Screws holding control knob panel.
3.
Side securing points
of
fascia.
5.
Fixing holes for instrument panel.
2.
Screws securing glove box to fascia
4.
Glove box hinge bolts.
6.
Cover panel securing screws.
is held by a grub screw, slacken
it
and remove the control
knob, also unscrew the chrome ring securing the heater
switch to the fascia. The remaining control knobs are
held by spring-loaded plungers. The control knob
panel
is
held in position by three screws, one each side
and one above the ignition switch. See
1,
Fig.
32.
The
removal
of
these, together with the control knobs,
will free the panel from the fascia.
Detaching the instrument panel necessitates two
operations. First, the panelling surrounding the
instru-
ments must be removed by releasing its four securing
screws, located beneath its bottom edge, when the panel
can be detached ; then the four screws which hold the
instrument panel frame to the fascia can
be
released.
These screws are situated
at
each corner
of
the frame.
The main fixing points
of
the fascia can now be
released. First remove the screws that hold the fascia
panel top rail in place. Also detach the glove box lid
by releasing four screws, see
4,
Fig.
32,
and the screws
holding the glove box to the scuttle. Extract the two
bolts, with nuts and washers, from each end
of
the fascia
panel.
The fascia can be lifted clear
of
the bodywork
and the glove box freed from the fascia by removing
four screws.
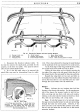
Hood
To remove the hood, first lower
it
into its well
behind the rear seat squab. Lift out the rear seat thus
giving access to the two rear seat side panels which are
released by removing three screws from each panel.
The removal
of
the side panels exposes the hood
securing bolts, there being two at each side. Remove
these four bolts together with their wooden packing
pieces and lift out the hood complete with linkage.
Doors and
Windows
Rear
Window
: The rear window in the hood is
of
celluloid and
is
stitched to the fabric in its allotted
position. Replacing a rear window entails cutting the
securing stitches surrounding the windows, extracting
the broken pieces
of
celluloid, then fitting the new
window and restitching the fabric.
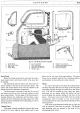
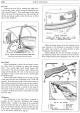
Door
Windows
: To replace a window glass,
it
is
first necessary to remove the door inner casing complete
with garnish rail. This operation necessitates the
follow-
ing procedure. Remove the single screw holding the
small chrome plate to the rear top end
of
the door. From
the front end
of
the leather garnish rail extract the single
screw and cup washer. The three handles on the inside
of
the door should now be removed, details
of
the
operation involved being given under the heading
"Door
Locks and Handles". Remove the two screws from the
front edge
of
the casing together with the remaining
screws that secure the carpet covered portion
of
the door
inner casing. Now slide the casing forward and out
of
the rear lip
of
the door.