
Owners Manual


B/6
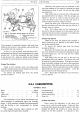
COOLING
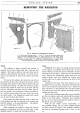
Method 2: Proceed
as
in the first paragraph
of
Method
1.
Then,
if
there is no pit available, the front
of
the car should be jacked up and wooden trestles
placed beneath the front wheels. Now remove the front
bumper complete. To do this, unfasten the two brackets
that hold the bumper to the chassis side members.
On
the steering gear side
of
the chassis the bumper bracket is
held by two bolts, one long and one short, with nuts and
washers, whereas on the idler side the bracket
is
fixed by
a short bolt, with nut and washer, and a long setpin.
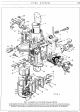
SYSTEM
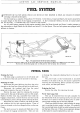
Fig. 9. Radiator and mounting frame
(Sports)
A.
Right-hand horn bracket.
B.
Radiator
frame.
C.
Left-hand horn bracket.
D.
Filler cap.
E.
Header
tank
expansion chamber.
F. Thermometer bulb socket.
G.
Drain
tap.
1.
Securing points to flitch plate.
2.
Radiator
securing points.
3.
Setpins to chassis.
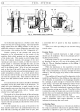
Next disconnect the cross tube by withdrawing
two split pins and removing the two castellated nuts,
one from each end
of
the tube. At each side, the radiator
is held to its frame
by
one bolt, with
nut
and washer,
and two setpins. Remove these and carefully manreuvre
the radiator downwards and
so
clear
of
the car.
Refitting is a reversal
of
the above procedure,
however, notice should be taken
that
it
is advisable to
check the track alignment once the refitting operations
have been completed.