
Owners Manual


AUSTIN
A40
SERVICE
MANUAL
C/1
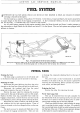
FUEL SYSTEM
ALTHOUGH
the two fuel systems (Saloon
and
Sports) are here described
in
detail, any measure
of
intricate
servicing is best left
to
the expert.
The
fuel
tank
has a capacity
of
8£
gallons (39.
78
litres). In the Saloon, Coupe
and
Sports, the
tank
is secured by
its
upper
flanges to the floor
of
the luggage compartment. In the Commercial vehicles, the
tank
is located under
the
rear
flooring. A lockable filler cap is fitted to each model.
An
AC
petrol
pump, operated by the engine camshaft, draws fuel from the
tank
and
forces
it
under
pressure
to
the carburetters, a single
Zenith
for the Saloon
and
twin
S.
U. for the Sports. The two fuel systems
are
equipped with
efficient air cleaners.
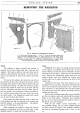
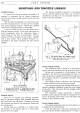
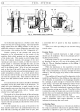
Fig. 1. The general layout of the fuel system (Saloon).
The Sports arrangement differs only, in the respect that twin
SU
carburetters are fitted and a different type
of
air cleaner.
(A) the tank
(B) electrical gauge unit (C) fuel pipe line (D) fuel pump (E) carburetter.
PETROL TANI{
Draining the Tank
The drain plug is positioned on
Lhc
left-hand side
in the
bottom
of
the
tank
and
is
removed for draining.
Removing the
Tank
Disconnect the petrol delivery pipe from the union
situated
on
the front face
of
the
tank
and
to the left-hand.
Disconnect the insulated lead from the petrol
gauge unit terminal
at
the
rear
of
the tank.
Remove the spare wheel by releasing the securing
setpin
and
in
the case
of
the sports, take
out
the carpet.
Slacken the filler hose clip, accessible from inside the
luggage compartment, remove the hose
and
seal up the
tank
opening to prevent foreign
matter
entering the tank.
Disconnect the rubber overflow pipe from the
tank
and withdraw the five tank securing setpins. Three
of
these are situated on the front flange
and
two
on
the rear
flange.
The tank can now be raised
and
lifted clear
of
the
car through the luggage compartment.
Take
care
not
to damage the composite sheeting fixed to the
top
of
the tank.
The petrol
tank
in the Commercials is
mounted
similarly to the
tank
in the car,
but
access is gained by
removing the rear flooring, held in position by counter-
sunk screws, and the spare wheel.
Replacing the
Tank
Reverse the order for removing the tank.
Petrol Tank Gauge Unit
This can
be
removed from the
tank
complete by
the withdrawal
of
the six securing screws,
but
care
must
be taken not to bend
or
strain the float lever
or
subse-
quent gauge readings may be seriously affected.
Great
care should be taken, when refitting the gauge
unit, to see
that
the
joint
washer is in place.
It
is essential
that
a petrol tight
joint
should be
made
between the
tank
and
the face
of
the unit.
If
there is any
apparent
damage
to the washer it must
be
replaced by a new one.