
Owners Manual


FUEL
SYSTEM
C/11
Now
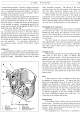
slacken the clamping bolts on the universally
jointed connections between the throttle spindles. Dis-
connect
the
mixture control linkage by removing one
of
the fork swivel pins. While the suction chambers are off
make sure
that
the needles are located
in
the same posi-
tion in
the
pistons and
that
the
jets are
the
same distance
below the bridges
of
the carburetters when they are
pushed hard against their adjusting nuts.
Unscrew the throttle adjusting screws
and
screw
these back until they will
just
hold a piece
of
thin paper
inserted between the adjusting screw
and
the stop lug,
then screw in one complete turn.
The
engine may now be started. When
it
is
thoroughly warmed up the speed may be adjusted by
1 urning
the
throttle adjusting screws equal amounts in
either direction, depending
on
whether a higher or lower
speed is required.
To
check for exact synchronisation
of
the throttle
openings
it
is best
to
listen
to
the intake. This is easily
done by inserting one end
of
a length
of
rubber tubing
in the ear
and
holding
the
other
end
near
the
intake
of
each
of
the carburetters in turn.
If
the
hiss
on
one
of
them is louder
than
on
the other, unscrew its
throttle
adjusting screw until the hiss
is
equal.
When
it
is
obvious
that
this
is
satisfactory the mixture should be adjusted
by screwing the
jet
adjusting nuts
up
or
down equal
amounts, pushing the jets
hard
up
against them, until
satisfactory running is obtained. As these are adjusted
the engine will probably
run
faster and
it
may therefore
be necessary to unscrew
the
throttle adjusting screws a
little, by equal amounts,
in
order to reduce speed.
When the mixture is correct on
both
carburetters
lifting
the
piston
of
one
of
them with a penknife blade
should make the engine beat become irregular from ex-
cessive weakness.
If
lifting the piston
on
one carburetter
stops the engine
and
lifting
that
of
the
other does
not,
this indicates
that
the mixture on the first carburetter is
weaker
than
on the second
and
therefore the first one
should be enriched by unscrewing
the
jet
adjusting nut.
Once the mixture
is
correct from both carburetters
the exhaust beat should be regular
and
even.
If
it
is
irregular, with a splashy type
of
misfire
and
colourless
vapour, the mixture is
too
weak. A regular
or
rhythmi-
cal type
of
misfire
in
the exhaust beat, together with a
blackish vapour, denotes a mixture
that
is
too
rich.
Before re-connecting
the
mixture control linkage,
make sure
that
the jets are
hard
up
against the adjusting
nuts and,
if
necessary, adjust the length
of
the
linkage so
that
the swivel pins may be inserted while the jets are in
this position. The throttle spindle connection clamping
bolts may now be tightened.
AIR CLEANER
AND
SILENCER
Air Cleaner (Saloon)
One
of
two types
of
air cleaner may be fitted
to
the
Saloon.
The
type illustrated in Fig.
12
is fitted to cars for
the export market.
The
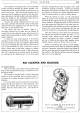
normal air cleaner, fitted to cars for the home
market,
is
of
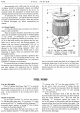
the oil-wetted type as shown in Fig.
11,
and
apart
from regular cleaning, requires little or no
attention.
To remove either type
of
air cleaner from its position
slacken the clip
that
secures
it
to
the carburetter. Dis-
connect the breather pipe
and
the air cleaner support
bracket from the valve rocker cover. Lift off the air
cleaner.
Fig. 11. Oil-wetted type air cleaner.
H!O.
71.
C.
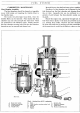
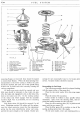
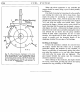
Fig. 12.
An
exploded
view
of the oil bath type air
cleaner.
1.
Securing disc.
2.
Gauze filter.
3.
Oil compartment.
4.
Main unit housing.