
Owners Manual


C/14
11-------
12-------~
H40. 247.
A,
FUEL
SYSTEM
~23
5
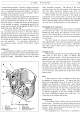
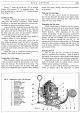
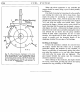
Fig. 15. Components
of
Fuel Pump.
I.
Top
cover screw.
9.
Valve joint washer.
17.
Rocker
arm
pin.
2.
Cover screw washer.
10.
Valves.
18.
Rocker arm pin clips.
3.
Pump top cover.
4.
Cork sealing washer.
1 I. Valve securing plate.
12.
Valve plate screw.
19.
Rocker
pin
washers.
20.
Rocker arm.
5.
Filter gauze. I
3.
Drain plug washer.
21.
Anti-rattle spring.
6.
Upper chamber securing screw.
14.
Drain plug.
22.
Rocker link.
7.
Washer for securing screw.
8.
Upper chamber.
15.
Priming lever spring.
I
6.
Lower casting.
23.
Diaphragm spring.
24.
Diaphragm.
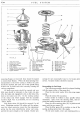
mounting flanges are distorted these should be lapped
to
restore their flatness. Where the
hand
priming lever
incorporated in the lower casting
is
broken the parts
should be renewed, the outer end
of
the spindle being
riveted over
by
hand tools after correctly locating the
various components.
All badly worn parts should be renewed and very
little wear should be tolerated
on
the rocker arm pins
( 17), the holes
and
engagement slots in the links (22),
hole in the rocker arm (20).
On the working surface
of
the rocker arm which engages with the camshaft
eccentric slight wear
is
permissible,
but
not
exceeding
.
010 in. depth .
Fuel
pump
valves (10) should
be
renewed
if
at all
worn. Diaphragm springs (23) seldom call for replace-
ment
but
where necessary, ensure
that
the replacement
spring has the same identification colour
and
conse-
quently the same strength as the original. Rocker arm
springs (21) are occasionally found
to
be broken after
service. All
joint
washers should be renewed.
Reassembling the Fuel Pump
The following procedure should be adopted dealing
with the upper portion
of
the pump first:
Place the valve
joint
washer (9) in the pump upper
casting.
Place the valves
(I
0)
in
position.
Valves should be swilled in clean paraffin before
reassembly.
Apart
from the cleaning effect, this im-
proves the sealing between the valve
and
seat.
Place the valve securing plate (11) in position and
secure with the two screws (12).
Place the filter gauze (5)
in
position on
top
of
the
casting, making certain
that
it fits snugly.
Fit
the cork washer, cover
and
retaining screw as