
Owners Manual


C/16
FUEL
SYSTEM
HB.
60.
B.
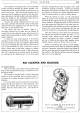
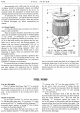
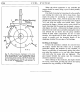
Fig. 17. When fitting the diaphragm to the pump
body, the locating tab (A)
on
the diaphragm must be
in the position shown. After engaging the notches
in the bottom
of
the pull rod, with the slot
in
the link,
tum
the diaphragm until the tab is
at
position (B).
This is done by gripping tab (C) and moving
it
to
position
(D).
When the above apparatus
is
not available the
pumps should be tested, using a pan
of
clean paraffin,
as
follows:-
First flush the pump by immersing
it
in the paraffin
and working the rocker
arm
half a dozen times; then
empty the pump by continuing to operate
it
while
held above the bath. Then, with the pump clear
of
the
paraffin bath, place the finger over the inlet union (marked
"in") and work the rocker arm several times. Upon
removing the finger a distinct suction noise should be
heard, denoting that the pump has developed a reason-
able degree
of
suction. Afterwards the finger should be
placed over the outlet union and after pressing the rocker
arm inwards the air drawn into the pump chamber
should be held under compression for two or three
seconds; this should also
be
done with the pump im-
mersed in paraffin and the clamping flanges
of
the
diaphragm watched for any signs
of
air leakages.
Re~fitting
to the Engine
R,~verse
the procedure outlined for removal from
the engine. Ensure
that
the rocker arm is correctly
positioned against the eccentric on the camshaft,
as
there is a possibility
of
inadvertently getting the rocker
arm under the eccentric
or
to one side, when damage
will result after the pump bolts are tightened. The
joint washer between the pump and the crankcase
should be renewed
if
unsound.
After re-fitting to the crankcase, the engine should
be run for a short time, and the pipe unions and pump
examined for any possibility
of
fuel leakage.