
Owners Manual


D/14
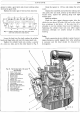
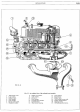
ENGINE
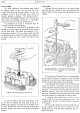
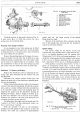
However, with the gearbox in place a convenient
method
of
obtaining the new firing position for No. 1
piston is to first
of
all remove all sparking plugs except
No.
1.
Using a piece
of
card, marked off in degrees,
attached to the front bumper rotate the engine with the
starting handle until T.D.C.
of
No. 1 piston, on com-
pression stroke,
is
obtained. Note the position
of
the
starting handle relative to the card, then with the handle
still engaged with the same dog tooth
of
the crankshaft
nut rotate the engine two revolutions less the required
number
of
degrees.
Having obtained the correct position
of
the flywheel
for No. 1 piston and with the distributor vernier set to
zero, slacken the distributor clamping bolt. Rotate the
distributor body until the rotor arm
is
at
the correct
position for No. 1 electrode in the distributor cap, again
rotate the distributor body until the contact points just
open.
An
effective method
of
ascertaining when the
points are open is to connect a battery and a bulb in
series with the contact points. When the points are
closed the bulb will light,
but
will
go
out as the contacts
open.
Re-tighten the clamping bolt and fit the distributor
cap. Finally, connect the vacuum control pipe and
replace the plug leads in the correct firing sequence
of
1,
3,
4,
2.
Test the car on the road, when a finer
adjustment can be made at the distributor vernier
adjustment knob.
Sparking Plugs
The sparking plugs fitted to both the Saloon
and
Sports are
of
the long reach 14mm. type ; Champion
NSB
for the Saloon range
and
Champion NSA for the
Sports.
The gaps
of
these plugs should be maintained
at
.018-in. (.4572 mm.) for the Saloon and .025-in.
(.
635
mm.) for the Sports.
If
the gap is allowed to
become too wide misfiring
at
high speeds
is
liable to
occur;
and
if
too small,
bad
slow running
and
idling
will be the result.
Sparking plugs should be regularly inspected,
cleaned and tested. This is
of
vital importance to ensure
good engine performance coupled with fuel economy.
When removing the plugs from the engine use a box
spanner; this
will
avoid possible damage to the insulator.
Always remove the copper washer with the plug. They
should then be placed
in
a suitable holder which has
holes drilled to admit the upper end
of
the plugs and
marked to identify each plug with the cylinder from which
it has been removed.
The plugs should now be carefully examined and,
for guidance, compared with a new plug.
Oil fouling will be indicated by a wet shiny black
deposit on the insulator. This condition is usually
caused by worn cylinders, pistons
or
gummed rings.
Oil vapour which is forced from the crankcase
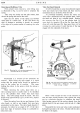
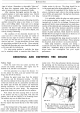
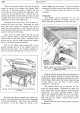
Fig. 18. Checking the sparking plug gap A with
a feeler gauge.
during the suction stroke
of
the piston, fouls the plugs.
Petrol fouling will cause a dry fluffy black deposit
to be apparent
on
the plugs. This is usually caused
by faulty carburation
or
ignition system.
In
this latter
connection the distributor coil or leaking
and
worn out
ignition leads may be contributory causes.
Under the above conditions,
if
the plugs otherwise
appear to be sound, they should be thoroughly cleaned,
adjusted
and
tested.
When preparing for cleaning, the plug washers
should be removed
and
examined. The condHion
of
these
washers is important, in that a large proportion
of
the heat from the plug insulator is
diss~pated
to the
cylinder head by them. The washer should therefore
be reasonably compressed. A loose plug can be easily
overheated, thus upsetting its heat range
and
causing
pre-ignition, with consequent short plug life. On the
other hand, do not overtighten. All that is needed is a
good seal between the cylinder head
and
the plug.
Tightening too much will cause distortion
of
the washer,
with the possibility
of
blow-by which will again lead to
overheating
and
resulting dangers.
If
there is any ques-
tion
of
defect, replace with new washers.
The plugs should now be thoroughly cleaned
of
all
carbon deposit, resorting to scraping
if
necessary,
removing as much as possible from the space between
the insulator and shell.
An
oily plug should be washed
out with petrol.
If
a plug cleaning machine is available,
5 to
10
seconds in this will remove all remaining