
Owners Manual
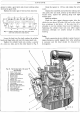


ENGINE
D/15
signs
of
carbon. Remember to thoroughly
"blow-out"
the plug after treatment under these conditions, in
order
to
remove all traces
of
abrasive left inside.
After cleaning, thoroughly examine the plug for
cracked insulator or worn away insulator nose. Should
either
of
these conditions be apparent a new plug
should be installed.
Carbon
deposit
on
the threads
of
the plug should be
carefully removed by using a wire brush, or,
if
avail-
able, a wire buffing wheel. Take care
not
to
damage
the electrodes or insulator tip.
Omission
of
this cleaning
operation will lead to tight threads and the resultant
loss
of
heat
dissipation due to the carbon deposit, and
thereby causing overheating.
The condition
of
the electrodes should now be
noted and (if it
is
felt
that
the plugs are worthy
of
further use) any signs
of
corrosion removed. This can
be
carried out with the use
of
a small
file,
to carefully
dress the gap area. The gap should then be reset, using
the plug gauge provided in the tool kit. When resetting,
bend the side electrodes only, never bend the central one
as this may split the insulator tip.
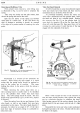
If
a plug testing machine
is
available, the plugs
can be accurately tested
to
ascertain their fitness for
further service
in
the car. The plugs should be set
to
the correct gap before being subjected
to
this test.
A plug can be considered fit for further use
if
it
gives a continuous spark, when
in
the testing machine,
up
to
100
lbs.
per
square inch. Having been found satis-
factory refit to the engine.
It
is
advisable, whilst the plugs are under pressure
in the testing machine,
to
apply a spot
of
oil to the
terminal end,
to
check for
air
leakage. Excessive leak-
age here will tend to cause compression loss, rapid deter-
ioration
of
the electrode
and
overheating
of
the electrode
tip. The top
half
of
the insulator should be carefully
examined for any signs
of
paint splashes or accumu-
lations
of
grime
and
dust, which should be removed.
Should there be any signs
of
cracks due
to
faulty use
of
the spanner, the plug should be replaced.
It
is
recommended
that
plugs should normally be
replaced every 10,000 miles (16,000 km.). When replacing
the plug lead, make sure
that
it is securely attached.
Make plug inspection, cleaning
and
testing a
routine
job
and
carry this
out
at
least every 3,000 miles
(4,800 km.). Remember, plugs in good condition will
ensure better fuel consumption and good engine
performance.
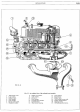
REMOVING AND REFITTING
THE
ENGINE
Saloon, Coupe
Drain
the water from the system
and
then dis-
connect the battery terminals. The engine may be
drained
of
oil,
but
this
is
not
essential.
The first operation is to remove the bonnet.
To
do this, release two bolts, nuts and washers from each
hinge, then lift off the bonnet.
Release the upper water hose from the radiator
header tank,
and
the thermostat housing.
To
effect
this removal, slacken the hose clip screws
at
either end
of
the hose with the aid
of
a screwdriver
and
then ease
the rubber pipe off both the radiator and thermostat
housing connections. In a similar manner release the
lower hose from the water pump. The temperature
gauge bulb should now be removed from the radiator.
Next release the three securing bolts
at
each side
of
the radiator (see Fig.
8,
page B/5), with nuts
and
washers,
that
hold the radiator to its mounting frame.
The radiator may now be lifted from the car.
For
the removal
of
the cooling fan, simply extract
the four setpins
that
secure
the
fan to
the
water
pump
pulley.
At
the left-hand side
of
the engine,
take
off
the
air
cleaner after slackening the clamp
at
the carburetter
intake
and
releasing the breather pipe from
the
valve
rocker cover.
From
the carburetter throttle, disconnect
the operating
rod
by removing the securing
nut
and
washer
of
the ball
joint
connector
pin
and
pull the pin
clear
of
the throttle lever. Release the choke control
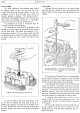
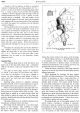
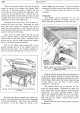
Fig.
19.
Levering over the gear change cross-shaft.
l.
Ball joint connector.
2.
Cross-shaft inner arm.
3.
Cross-shaft.
4.
Cross-shaft outer arm.
5.
Ball
joint connector.
6.
Cross-shaft outer bearing.