
User manual
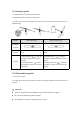
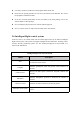
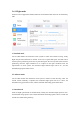
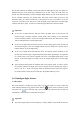
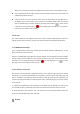


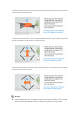
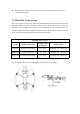
Table Of Contents
- User Manual
- EVO Lite Series
- Terms for Usage
- Trademark Information
- Copyright
- Disclaimer
- Data Storage and Use
- Table of contents
- Chapter 1 Read Instructions
- Chapter 2 Aircraft
- ① Propeller
- ④ Gimbal camera
- ② Undercarriage
- ⑤ Front LED indicator
- ③ Forward visual system
- ⑥ Motor
- ⑦ Power button
- ⑨ Rear LED indicator
- ⑧ Rear vision system
- ⑩ Air outlet
- ⑪ SD card slot
- ⑫ Aircraft battery
- ⑬ USB-C port
- ⑭ Ultrasonic sensor
- ⑯ Downward vision system
- ⑮ Downward LED
- The aircraft has one LED indicator at the end of e
- Designated symbol of color:
- R - Red
- Y - Yellow
- G - Green
- B - Blue
- Front LED Indicator
- Back LED Indicator
- Meaning
- B - Normally on
- G - Slow flash(2 secs/1 time)
- Aircraft in GPS mode
- B - Normally on
- Y - Slow flash(1 sec/1 time)
- Aircraft in ATTI mode
- B - Normally on
- Y - Slow flash(1 sec/1 time)
- Low battery warning
- B - Normally on
- R - Slow flash(1 sec/1 time)
- Serious low battery warning
- B - Normally on
- Y - Normally on
- Aircraft under calibration
- B - Normally on
- G - Normally on
- Calibration successful
- B - Normally on
- Y - Normally on
- Calibration failed
- B - Rapid flash
- G - Rapid flash
- Aircraft under pairing
- B - Rapid flash
- G - Normally on 5S
- Pairing successful
- B - Rapid flash
- R - Normally on 5S
- Pairing failed
- B - Rapid flash
- G - Rapid flash
- Aircraft under upgrading
- B - Normally on
- G - Normally on
- Upgrading successful
- B - Normally on
- Y - Slow flash(1 sec/1 time)
- Upgrading failed
- The battery for EVO Lite is 6175mAh and has the ra
- The battery indicator is divided into LED 1, LED
- Chapter 3 Remote controller
- Chapter 4 Autel Sky App
- When shooting night scene videos, users can choose
- Standard: The shooting effect is the same as the n
- Night: it will automatically adjust the ISO value,
- Super Night: it will automatically adjust the ISO
- Chapter 5 Flight
- 1) As shown in figure, press the left and right st
- 2) Slowly push up the left stick.
- 1) Press and slide the one-click takeoff button (
- 2) The aircraft will automatically rise to the hei
- Class I: main airport & low-altitude area for mann
- Class II: Sensitive area or organization & militar
- Chapter 6 Maintenance and service
- Chapter 7 Technical Specification

2.6.3 Compass calibration
The compass has been calibrated in factory, with no need for calibration by user normally. If
the compass indicates the error information, or the flight direction of the aircraft is not
consistent with the control input, or the flight place is far from the calibrated distance, please
carry out the following calibration procedure.
Warning
The compass is very sensitive to the electromagnetic interference that may cause the
compass error and the flight quality reduction. If the company still fails to be used after
calibration, it is allowed to move the aircraft to other places for recalibration.
In the case of compass calibration, please pay attention to the following points:
Select an open outdoor area.
Keep away from the magnetic interference source, such as magnet or concrete
reinforcement. The calibration result may also be affected if close to a large structure.
Keep away from the underground and overhead power lines.
Never carry the ferromagnetic materials (such as key or magnetic ornaments) with you.
Keep away from all electronic devices (such as mobile device) that may interfere with
the calibration.
Calibration procedure:
1. Unfold the aircraft and open Autel Sky App and enter the menu setting interface, choose
the “safety” option, click the “compass calibration” to the calibration interface, and then click
the “start” key.