
User Manual V2.0

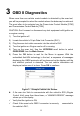

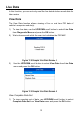
Table Of Contents
- Safety Information
- Safety Messages
- Safety Instructions
- 1 Using This Manual
- 2 Using the Scan Tool
- 3 OBD II Diagnostics
- 4 ABS
- 5 SRS
- 6 DTC Lookup
- 7 Playback Data
- 8 System Setup
- 9 Compliance Information
- 10 Warranty and Service

5
Accessories Included
1) OBDII Cable – provides power to tool and communicates between
tool and vehicle.
2) USB Cable – used to upgrade the scan tool and to print retrieved
data.
3) User Manual – instructions on tool operations.
4) Quick Guide – instructions on device connection and tool registration
and update.
Keypad
No solvents such as alcohol are allowed to clean the keypad or display.
Use a mild nonabrasive detergent and a soft cotton cloth. Do not soak the
keypad as it is not waterproof.
Power
The scan tool is powered via the vehicle Data Link Connector (DLC). Follow
the steps below to turn on the scan tool:
1) Connect the OBD II Cable to the scan tool.
2) Find DLC on the vehicle.
A plastic DLC cover may be found for some vehicles and you need
to remove it before plugging the OBDII cable.
3) Plug OBD II cable to the vehicle’s DLC.
4) The scan tool will power up and the Main Screen will appear.
Vehicle Coverage
Figure 2- 2 Sample Main Screen